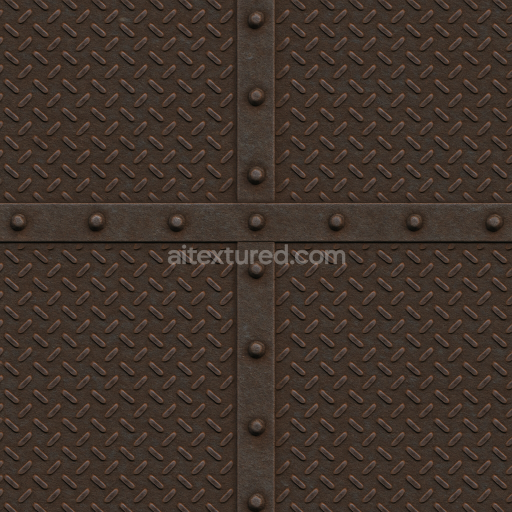
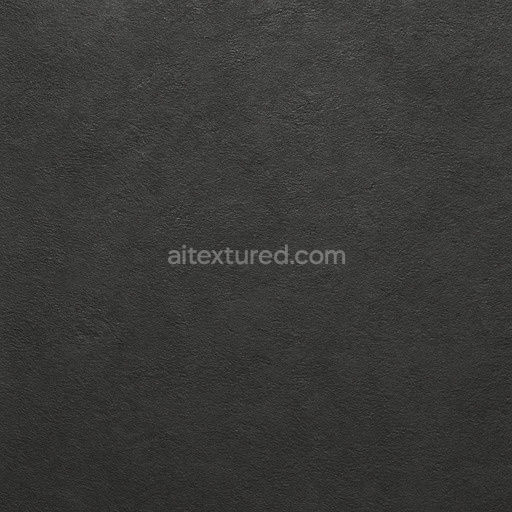
Archviz Metal Plate Sci Scifi Spaceship Substance - Seamless PBR Texture
Seamless texture (tileable) · PNG, WEBP, PBR ZIP. License: AITextured Free Commercial License (FCL) v1.1. Free personal and commercial use. Raw resale, standalone redistribution, mirroring/scraping, competing asset packs, and AI/ML training are not allowed without written permission. Attribution is not required, but appreciated..

| ID | peened-steel-fine-stippling |
|---|---|
| Category | Metal |
| Formats | PNG, WEBP, PBR ZIP |
| Size | 1k (1024x1024px), 2k (2048x2048px), 4k (4096x4096px), 8k (8192x8192px) |
| Color | sRGB |
| Tileable | Yes |
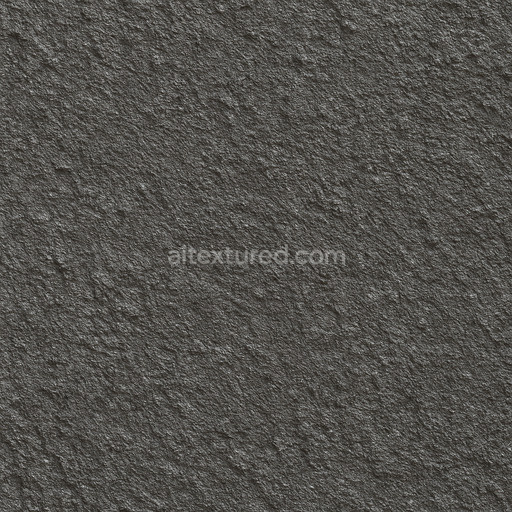
The Peened Steel Fine Stippling texture is a meticulously crafted metal surface designed to bring exceptional realism and detail to your 3D materials. This high-resolution seamless peened steel fine stippling texture simulates the unique surface finish created by the mechanical peening process where tiny indentations and subtle roughness are uniformly distributed across the steel substrate. The base metal exhibits a cool gray tone with a slightly brushed appearance enhanced by fine stippling that adds micro-variations in reflectivity and depth. The texture’s composition reflects a dense metal base with minimal porosity while the peening creates a consistent pattern of small rounded depressions that diffuse light softly contributing to a natural tactile surface finish. Color variations in the BaseColor/Albedo channel capture the steel’s subtle oxide layers and slight discoloration from wear while the metallic channel confirms the highly conductive nature of the steel substrate.
This tileable peened steel fine stippling texture is optimized for modern PBR workflows providing a comprehensive set of maps including BaseColor/Albedo Normal Roughness Metallic Ambient Occlusion and Height/Displacement. The Normal map intricately reproduces the fine indentations and surface relief enhancing the perception of depth without adding unnecessary geometry. The Roughness channel balances smooth and matte areas to simulate the interplay between polished steel and the stippled peened finish while Ambient Occlusion subtly accentuates crevices and recessed areas for added realism. Height and Displacement maps gently elevate the stippling effect allowing subtle parallax or displacement techniques to enrich surface complexity in both real-time and cinematic renders. Available up to 8K resolution this texture peened steel fine stippling is well-suited for demanding applications in Blender Unreal Engine and Unity ensuring crisp detail retention even at close inspection.
Designed to integrate seamlessly into your 3D projects this seamless peened steel fine stippling texture maintains perfect cohesion across large UV islands preventing visible tiling artifacts and enabling smooth continuous surfaces. It performs efficiently in real-time environments and supports rapid iteration workflows without compromising on visual fidelity. For optimal results adjusting the UV scale is recommended to keep the fine stippling crisp and proportional to your model’s dimensions. Additionally fine-tuning the roughness map can help achieve the desired level of metal reflectivity and surface variation while subtle use of height or parallax effects can enhance tactile realism without overpowering the base metal appearance. Whether used for industrial props architectural elements or detailed environment assets this metal texture elevates the authenticity and immersive quality of your 3D scenes.
Import the texture maps into Blender with sRGB color space for albedo/base color and Non-Color for normal, roughness, metallic, AO, height, and ORM maps. Connect normal maps through a Normal Map node, then adjust UV scale with a Mapping node so the material repeats naturally on your model.
For the full step-by-step setup, see How to Use Seamless Textures in Blender. Browse related material examples in wood, concrete, and metal.
Yes. This texture is designed as a seamless tileable PBR material, so it can repeat across large surfaces without visible borders.
You can download PNG/WEBP versions and use 1K, 2K, 4K and 8K download options when available on the page.
Yes. The download options and engine-mapped ZIP workflow are designed for Blender, Unreal Engine, Unity Standard, URP and HDRP material pipelines.
Yes. The texture is available under the AITextured free commercial license. Review the license page for redistribution and AI-training restrictions.


Build, preview, and export seamless PBR materials. Generate full map sets from a single image, inspect them in a real-time WebGL viewer, and re-package maps for Unreal, Unity, and Blender—directly in your browser.
AI text-to-texture: type a prompt and get a seamless, tileable base image ready for PBR workflows (great starting point for materials).
Create a full PBR set (Normal, Roughness, AO, Metallic, etc.) from a single image. Seamless and tiling-friendly.
Instant WebGL viewer: inspect materials on a sphere, plane, and cube. Check tiling and lighting in real time.
Re-packages maps per engine: Unreal (BaseColor + ORM), Unity (Mask/MetallicSmoothness), Blender (separate channels).
PNG ↔ JPG ↔ SVG: fast convert, SVG rasterize, embed/trace options, quality & background controls.