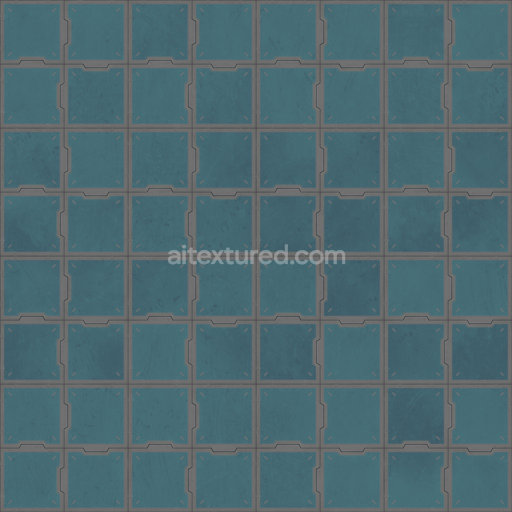
Geometric Metal Metallic Pattern - Seamless PBR Texture
Seamless texture (tileable) · PNG, WEBP, PBR ZIP. License: AITextured Free Commercial License (FCL) v1.1. Free personal and commercial use. Raw resale, standalone redistribution, mirroring/scraping, competing asset packs, and AI/ML training are not allowed without written permission. Attribution is not required, but appreciated..

| ID | perforated-ceiling-panels-with-metal-strips-free-pbr |
|---|---|
| Category | Metal |
| Formats | PNG, WEBP, PBR ZIP |
| Size | 1k (1024x1024px), 2k (2048x2048px), 4k (4096x4096px), 8k (8192x8192px) |
| Color | sRGB |
| Tileable | Yes |
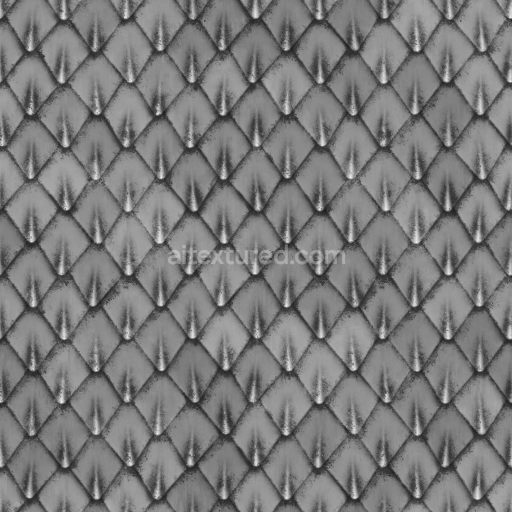
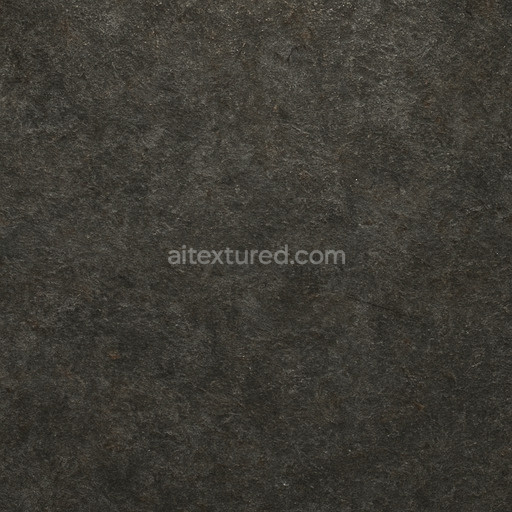
The perforated ceiling panels with metal strips present a sophisticated and carefully engineered material composition that combines a rigid mineral composite base with ceramic and metallic fibers. This substrate provides excellent structural integrity and enhanced acoustic performance, making it an ideal choice for modern architectural ceilings. The panels are expertly bound using advanced polymer adhesives that ensure long-lasting durability while maintaining precise alignment of the integrated metal strips. These strips, crafted from brushed aluminum with a subtle oxidized finish, reduce glare and introduce a refined visual depth that contrasts elegantly with the matte mineral base. The perforations are evenly and uniformly distributed across the surface, contributing not only to the panel’s airiness and sound absorption qualities but also creating an intricate pattern that interacts dynamically with light and shadow throughout a space.
Surface textures are thoughtfully designed to emphasize material realism and tactile detail. The brushed aluminum strips exhibit a fine linear grain orientation running parallel to the panel edges, which enhances the sleek, contemporary aesthetic. Meanwhile, the mineral-ceramic base features a lightly roughened, matte finish that is infused with mineral oxide pigments, resulting in a subtle, neutral off-white coloration that balances warmth and modern minimalism. Within the physically based rendering (PBR) workflow, these characteristics translate across multiple texture channels: the BaseColor (Albedo) captures the nuanced interplay of soft mineral hues and metallic sheens; the Normal map accurately defines the depth of perforations and the brushed texture of the metal strips; Roughness varies smoothly between the polished metal and the textured mineral surface; the Metallic channel highlights the conductive aluminum elements; Ambient Occlusion adds realistic shadowing within the perforations; and the Height/Displacement map emphasizes the subtle relief differences between the panel’s surface and recessed holes, enhancing depth perception.
This high-resolution seamless PBR texture is delivered in up to 8K resolution, ensuring exceptional detail and clarity for close-up renders and large-scale architectural visualizations. It is fully compatible and optimized for industry-standard platforms such as Blender, Unreal Engine, and Unity, making it versatile for both real-time and offline rendering workflows. To achieve the best visual fidelity, it is recommended to carefully adjust the UV scale to maintain the natural proportions of the perforations relative to the scene context. Additionally, fine-tuning the roughness values can help simulate a range of lighting conditions—from soft indoor illumination to harsher exterior light—while leveraging the subtle height map with parallax mapping techniques can further enhance the tactile realism of the ceiling panels during close inspection or interactive applications.
Import the texture maps into Blender with sRGB color space for albedo/base color and Non-Color for normal, roughness, metallic, AO, height, and ORM maps. Connect normal maps through a Normal Map node, then adjust UV scale with a Mapping node so the material repeats naturally on your model.
For the full step-by-step setup, see How to Use Seamless Textures in Blender. Browse related material examples in wood, concrete, and metal.
Yes. This texture is designed as a seamless tileable PBR material, so it can repeat across large surfaces without visible borders.
You can download PNG/WEBP versions and use 1K, 2K, 4K and 8K download options when available on the page.
Yes. The download options and engine-mapped ZIP workflow are designed for Blender, Unreal Engine, Unity Standard, URP and HDRP material pipelines.
Yes. The texture is available under the AITextured free commercial license. Review the license page for redistribution and AI-training restrictions.


Build, preview, and export seamless PBR materials. Generate full map sets from a single image, inspect them in a real-time WebGL viewer, and re-package maps for Unreal, Unity, and Blender—directly in your browser.
AI text-to-texture: type a prompt and get a seamless, tileable base image ready for PBR workflows (great starting point for materials).
Create a full PBR set (Normal, Roughness, AO, Metallic, etc.) from a single image. Seamless and tiling-friendly.
Instant WebGL viewer: inspect materials on a sphere, plane, and cube. Check tiling and lighting in real time.
Re-packages maps per engine: Unreal (BaseColor + ORM), Unity (Mask/MetallicSmoothness), Blender (separate channels).
PNG ↔ JPG ↔ SVG: fast convert, SVG rasterize, embed/trace options, quality & background controls.