Dirty Techno Grid Seamless Texture
Seamless texture (tileable) · PNG, WEBP, PBR ZIP. License: AITextured Free Commercial License (FCL) v1.1. Free personal and commercial use. Raw resale, standalone redistribution, mirroring/scraping, competing asset packs, and AI/ML training are not allowed without written permission. Attribution is not required, but appreciated..

| ID | clean-futuristic-panel-texture-seamless |
|---|---|
| Category | Sci-fi |
| Formats | PNG, WEBP, PBR ZIP |
| Size | 1k (1024x1024px), 2k (2048x2048px), 4k (4096x4096px), 8k (8192x8192px) |
| Color | sRGB |
| Tileable | Yes |
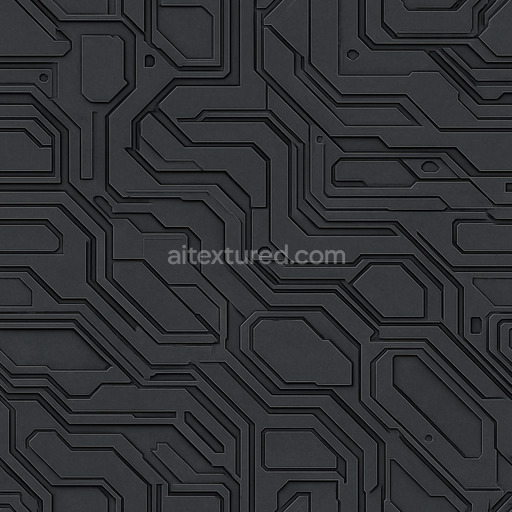
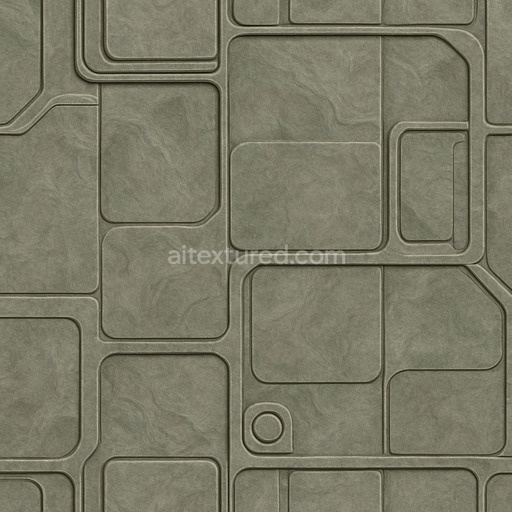
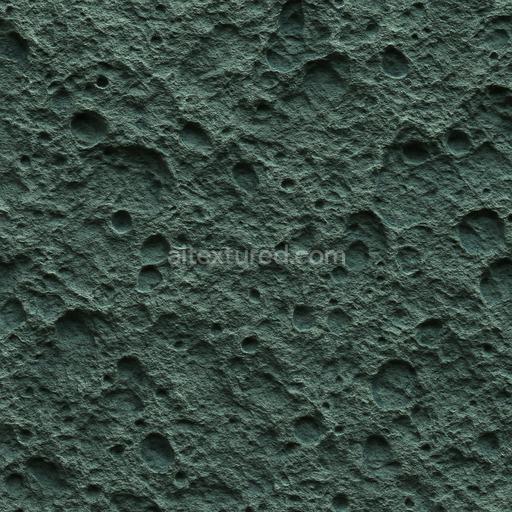
The Clean Futuristic Panel Texture Seamless high resolution up to 8K is expertly designed to emulate a state-of-the-art synthetic composite material often seen in advanced sci-fi environments. Its foundational substrate resembles a high-grade polymer or a lightweight metal alloy engineered to balance exceptional durability with sleek modern aesthetics. The surface is composed of finely integrated panel segments each separated by subtle grooves that imply modular assembly via precision adhesives or interlocking mechanical fasteners. This texture’s finish combines a polished yet slightly matte appearance achieved through controlled micro-abrasion or chemical etching resulting in balanced reflectivity that minimizes unwanted glare. Colorants are uniformly applied as pigments or oxide layers creating a clean neutral palette with gentle tonal variations that enhance depth and realism without overwhelming the overall design. The material’s low porosity and resistance to weathering reinforce a pristine well-maintained look typical of futuristic architectural and technological surfaces.
Within physically based rendering (PBR) workflows this tileable clean futuristic panel texture seamless high resolution up to 8K excels by providing highly detailed BaseColor/Albedo maps that capture nuanced color shifts and subtle panel delineations essential for realistic visual storytelling. Its Normal map adds crisp surface relief that accentuates panel edges and mechanical details without introducing excessive bumpiness or noise. The Roughness map is carefully calibrated to reflect the polished yet softly diffused surface controlling light reflection to produce believable highlights under diverse lighting conditions. Metallic channels simulate the semi-metallic nature of anodized alloys or coated metals while Ambient Occlusion enhances shadowing around recessed panel lines and joints adding a convincing sense of depth. Height or Displacement maps further support subtle surface undulations and groove depths enabling effective parallax effects in real-time engines. Thanks to its ultra-high 8k resolution this seamless clean futuristic panel texture provides exceptional clarity on large surfaces making it ideal for cinematic renders and detailed environment creation in Blender Unreal Engine and Unity.
Designed to seamlessly integrate into professional sci-fi workflows this texture clean futuristic panel texture seamless high resolution up to 8K offers fast iteration without visible seams or pattern repetition. To optimize visual fidelity it is recommended to maintain consistent texel density across all assets using this texture and ensure UV maps remain uniform to prevent stretching or distortion. Additionally adjusting the roughness channel allows customization of surface reflectivity tailoring the material’s appearance to various lighting scenarios and enhancing realism in both real-time and cinematic projects. By leveraging the seamless tileable nature and ultra-high resolution of this texture artists can confidently create expansive futuristic environments and materials with precision and efficiency.
This seamless clean futuristic panel texture features high-resolution sci-fi textures with up to 8k detail and a realistic PBR appearance enhanced by an interactive 3D preview for precise material evaluation.
Import the texture maps into Blender with sRGB color space for albedo/base color and Non-Color for normal, roughness, metallic, AO, height, and ORM maps. Connect normal maps through a Normal Map node, then adjust UV scale with a Mapping node so the material repeats naturally on your model.
For the full step-by-step setup, see How to Use Seamless Textures in Blender. Browse related material examples in wood, concrete, and metal.
Yes. This texture is designed as a seamless tileable PBR material, so it can repeat across large surfaces without visible borders.
You can download PNG/WEBP versions and use 1K, 2K, 4K and 8K download options when available on the page.
Yes. The download options and engine-mapped ZIP workflow are designed for Blender, Unreal Engine, Unity Standard, URP and HDRP material pipelines.
Yes. The texture is available under the AITextured free commercial license. Review the license page for redistribution and AI-training restrictions.


Build, preview, and export seamless PBR materials. Generate full map sets from a single image, inspect them in a real-time WebGL viewer, and re-package maps for Unreal, Unity, and Blender—directly in your browser.
AI text-to-texture: type a prompt and get a seamless, tileable base image ready for PBR workflows (great starting point for materials).
Create a full PBR set (Normal, Roughness, AO, Metallic, etc.) from a single image. Seamless and tiling-friendly.
Instant WebGL viewer: inspect materials on a sphere, plane, and cube. Check tiling and lighting in real time.
Re-packages maps per engine: Unreal (BaseColor + ORM), Unity (Mask/MetallicSmoothness), Blender (separate channels).
PNG ↔ JPG ↔ SVG: fast convert, SVG rasterize, embed/trace options, quality & background controls.