
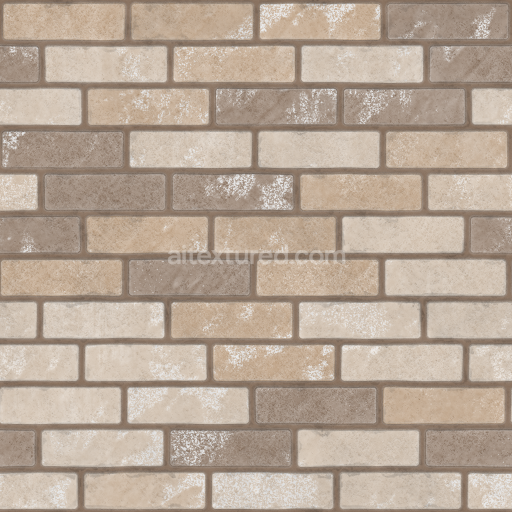
Stylized Bricks Wall - Seamless PBR Texture
Seamless texture (tileable) · PNG, WEBP, PBR ZIP. License: AITextured Free Commercial License (FCL) v1.1. Free personal and commercial use. Raw resale, standalone redistribution, mirroring/scraping, competing asset packs, and AI/ML training are not allowed without written permission. Attribution is not required, but appreciated..

| ID | seamless-3d-texture-pbr-8k-subway-tile-wall-with-glazed-tile-finish-and-polished-concrete-base-photorealistic |
|---|---|
| Category | Wall |
| Formats | PNG, WEBP, PBR ZIP |
| Size | 1k (1024x1024px), 2k (2048x2048px), 4k (4096x4096px), 8k (8192x8192px) |
| Color | sRGB |
| Tileable | Yes |
This seamless 3D texture presents an exquisitely detailed 8K resolution depiction of a classic subway tile wall perfectly engineered for physically based rendering (PBR) workflows in Blender Unreal Engine and Unity. The texture features rectangular glazed tiles crafted from a refined ceramic substrate primarily composed of high-quality clay enriched with kaolin and aluminosilicates. These tiles are arranged in a traditional horizontal brick pattern their smooth glossy surface achieved through a silica-based glaze that offers a subtly reflective finish. This glaze incorporates delicate color variations and glazing imperfections authentically replicating real-world firing and production effects. Narrow precisely formed grout lines made from cementitious binders mixed with fine sand and carefully selected pigments provide consistent coloration and low porosity enhancing the texture’s realism and durability while emphasizing the tactile nature of the tiled surface.
Beneath the glazed subway tiles lies a polished concrete base that introduces a complementary material contrast. This base is composed of a dense cement matrix combined with finely crushed aggregates such as quartz and limestone which are ground and polished to reveal a smooth gently reflective surface. The micro-roughness and subtle tonal variations of the concrete base arise from embedded mineral particles delivering a natural tactile appearance without harsh reflections. These material qualities—glazed ceramic tiles and polished concrete—are meticulously captured across all PBR texture channels. The BaseColor (Albedo) map faithfully reproduces the whites and off-whites of the glazed tiles with faint mottling alongside the muted greys and mineral flecks of the concrete base. The Normal map encodes fine surface details including tile edges grout recesses and the polished concrete’s micro-texture while Roughness values clearly distinguish between the mirror-like sheen of the glazed tile finish and the softer diffused reflection of the concrete. Both materials exhibit metallic values near zero consistent with their non-metallic nature. Ambient Occlusion enhances depth perception around grout lines and aggregate clusters and the Height/Displacement map adds subtle parallax effects to tile edges and grout lines boosting the three-dimensional realism when used with compatible shaders.
Optimized for seamless tiling this 8K resolution PBR texture ensures exceptional fidelity and versatile application across various rendering engines and real-time environments. To achieve the best results it is advisable to carefully adjust the UV scale to preserve realistic subway tile dimensions and fine-tune roughness parameters to suit specific lighting conditions avoiding overly glossy or unnaturally flat finishes. Incorporating height or parallax mapping further enhances the tactile illusion of grout depth and tile relief making this texture an excellent choice for architectural visualizations and interior design projects that demand photorealistic detail material accuracy and efficient workflow compatibility with Blender Unreal Engine and Unity.
Import the texture maps into Blender with sRGB color space for albedo/base color and Non-Color for normal, roughness, metallic, AO, height, and ORM maps. Connect normal maps through a Normal Map node, then adjust UV scale with a Mapping node so the material repeats naturally on your model.
For the full step-by-step setup, see How to Use Seamless Textures in Blender. Browse related material examples in wood, concrete, and metal.
Yes. This texture is designed as a seamless tileable PBR material, so it can repeat across large surfaces without visible borders.
You can download PNG/WEBP versions and use 1K, 2K, 4K and 8K download options when available on the page.
Yes. The download options and engine-mapped ZIP workflow are designed for Blender, Unreal Engine, Unity Standard, URP and HDRP material pipelines.
Yes. The texture is available under the AITextured free commercial license. Review the license page for redistribution and AI-training restrictions.


Build, preview, and export seamless PBR materials. Generate full map sets from a single image, inspect them in a real-time WebGL viewer, and re-package maps for Unreal, Unity, and Blender—directly in your browser.
AI text-to-texture: type a prompt and get a seamless, tileable base image ready for PBR workflows (great starting point for materials).
Create a full PBR set (Normal, Roughness, AO, Metallic, etc.) from a single image. Seamless and tiling-friendly.
Instant WebGL viewer: inspect materials on a sphere, plane, and cube. Check tiling and lighting in real time.
Re-packages maps per engine: Unreal (BaseColor + ORM), Unity (Mask/MetallicSmoothness), Blender (separate channels).
PNG ↔ JPG ↔ SVG: fast convert, SVG rasterize, embed/trace options, quality & background controls.