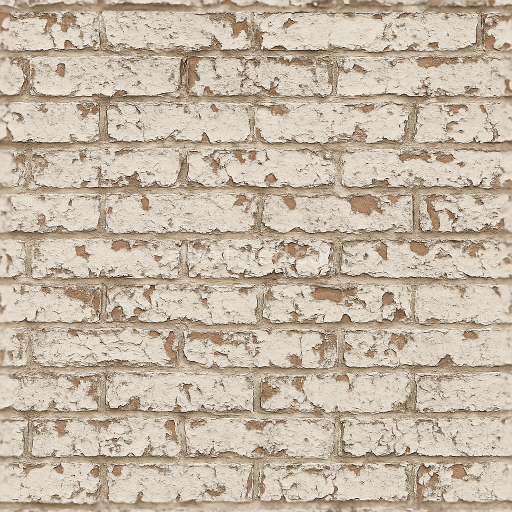
Brick Wall Bricks - Seamless PBR Texture
Seamless texture (tileable) · PNG, WEBP, PBR ZIP. License: AITextured Free Commercial License (FCL) v1.1. Free personal and commercial use. Raw resale, standalone redistribution, mirroring/scraping, competing asset packs, and AI/ML training are not allowed without written permission. Attribution is not required, but appreciated..

| ID | defense-wall-02-by-texture-haven-pbr-seamless-8k |
|---|---|
| Category | Wall |
| Formats | PNG, WEBP, PBR ZIP |
| Size | 1k (1024x1024px), 2k (2048x2048px), 4k (4096x4096px), 8k (8192x8192px) |
| Color | sRGB |
| Tileable | Yes |
The Seamless Defense Wall 02 texture by Texture Haven captures the rugged and durable essence of a man-made stone fortification designed with a mineral-rich base substrate typical of quarried rock. This material resembles weathered masonry composed primarily of rough aggregates tightly bonded by a cementitious adhesive creating a naturally porous surface that has endured years of exposure to outdoor elements. The wall’s finish is matte and slightly coarse reflecting a surface that has been shaped by time and use rather than polished or artificially treated. Earthy colorants mainly iron oxide pigments and subtle mineral deposits contribute to the warm yet muted tones visible in the base color replicating the natural variation in stone bricks and mortar. This rich composition is expertly translated into the PBR workflow providing a highly realistic physically based rendering experience.
In the PBR texture channels the Base Color (Albedo) map delivers the intricate and nuanced coloration of the stone and mortar free from baked-in shadows or lighting to ensure true consistent shading across multiple engines. The Normal map encodes fine surface details of the rough brick faces and subtle cracks enhancing the tactile feel of the wall’s uneven grain orientation and texture depth. Roughness values are carefully calibrated to reflect the stone’s natural matte finish allowing specular highlights to behave predictably under various lighting conditions without any glossy or metallic sheen. There is no metallic channel since the material is purely non-metallic stone while the Ambient Occlusion map accentuates crevices and joins between bricks to bolster depth perception and realism. The Height (Displacement) map captures the slight relief and weathered erosion of the wall’s surface enabling physically accurate parallax effects and subtle surface deformation in advanced rendering setups.
This high-resolution texture pack is optimized for seamless tiling and consistent shading across modern rendering workflows supporting resolutions up to 8K for ultra-detailed applications. It is fully compatible with leading engines such as Blender Unreal Engine and Unity integrating effortlessly into Principled BSDF shaders or equivalent PBR materials. For best results maintain consistent texel density when applying the texture to large surfaces and consider combining the height map with normal data to enhance parallax or displacement effects thereby adding extra realism to defensive walls castles or outdoor fortifications. Import base color maps as sRGB to preserve accurate color reproduction and treat roughness normal ambient occlusion and height maps as non-color data to retain precision across platforms and workflows.
Import the texture maps into Blender with sRGB color space for albedo/base color and Non-Color for normal, roughness, metallic, AO, height, and ORM maps. Connect normal maps through a Normal Map node, then adjust UV scale with a Mapping node so the material repeats naturally on your model.
For the full step-by-step setup, see How to Use Seamless Textures in Blender. Browse related material examples in wood, concrete, and metal.
Yes. This texture is designed as a seamless tileable PBR material, so it can repeat across large surfaces without visible borders.
You can download PNG/WEBP versions and use 1K, 2K, 4K and 8K download options when available on the page.
Yes. The download options and engine-mapped ZIP workflow are designed for Blender, Unreal Engine, Unity Standard, URP and HDRP material pipelines.
Yes. The texture is available under the AITextured free commercial license. Review the license page for redistribution and AI-training restrictions.
Build, preview, and export seamless PBR materials. Generate full map sets from a single image, inspect them in a real-time WebGL viewer, and re-package maps for Unreal, Unity, and Blender—directly in your browser.
AI text-to-texture: type a prompt and get a seamless, tileable base image ready for PBR workflows (great starting point for materials).
Create a full PBR set (Normal, Roughness, AO, Metallic, etc.) from a single image. Seamless and tiling-friendly.
Instant WebGL viewer: inspect materials on a sphere, plane, and cube. Check tiling and lighting in real time.
Re-packages maps per engine: Unreal (BaseColor + ORM), Unity (Mask/MetallicSmoothness), Blender (separate channels).
PNG ↔ JPG ↔ SVG: fast convert, SVG rasterize, embed/trace options, quality & background controls.