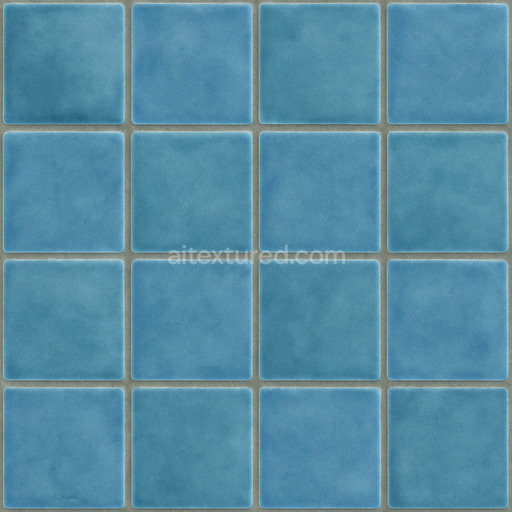
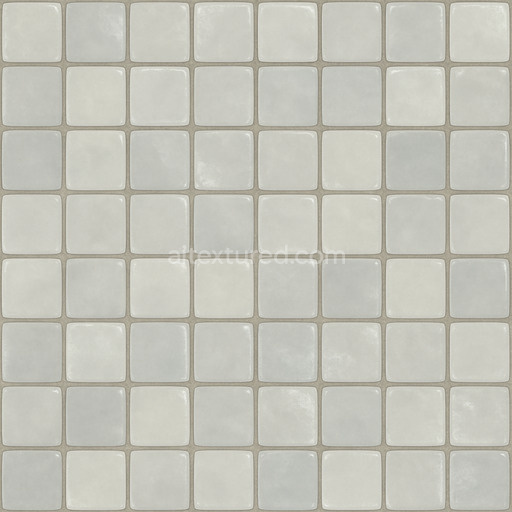
Seamless Glazed Ceramic Tile Seamless Texture
Seamless texture (tileable) · PNG, WEBP, PBR ZIP. License: AITextured Free Commercial License (FCL) v1.1. Free personal and commercial use. Raw resale, standalone redistribution, mirroring/scraping, competing asset packs, and AI/ML training are not allowed without written permission. Attribution is not required, but appreciated..

| ID | penny-round-mosaic-small-circles |
|---|---|
| Category | Ceramic-tile |
| Formats | PNG, WEBP, PBR ZIP |
| Size | 1k (1024x1024px), 2k (2048x2048px), 4k (4096x4096px), 8k (8192x8192px) |
| Color | sRGB |
| Tileable | Yes |
The penny round mosaic small circles texture features a meticulously crafted ceramic-tile surface composed of numerous small round mosaic tiles arranged in a timeless seamless pattern that highlights the natural beauty of ceramic materials. The base substrate is a dense fine-grained mineral composition carefully fired to produce a durable yet slightly porous ceramic foundation. This process ensures the tiles maintain excellent resistance to wear and moisture penetration preserving their clean refined appearance over time. The tile faces are polished to a moderate gloss exhibiting subtle variations in tone and surface finish thanks to oxide-based colorants that impart warm earthy hues while maintaining excellent colorfastness. The adhesive binder creates thin uniform grout lines that contrast softly with the glossy tiles enhancing the visual depth and intricate detail of the pattern without overpowering the natural ceramic texture.
In terms of PBR integration this tileable penny round mosaic small circles texture delivers comprehensive material data channels for realistic rendering. The BaseColor (Albedo) map captures the nuanced pigment variations and grout details while the Normal map simulates the slight curvature and beveled edges of each small round tile adding convincing tactile relief. The Roughness map balances the ceramic’s polished finish by controlling moderate glossiness without introducing any metallic shine as confirmed by near-zero values in the Metallic map characteristic of non-metallic ceramic surfaces. Ambient Occlusion enhances subtle shadowing between tiles amplifying depth perception and separation while the Height (Displacement) map accentuates the mosaic’s dimensionality enabling realistic surface undulations in real-time 3D previews and cinematic renders without the need for dense geometry. This makes the texture ideal for architectural visualizations detailed material studies and level dressing within popular 3D applications.
Designed for high-end workflows this seamless penny round mosaic small circles texture supports resolutions up to 8K ensuring exceptional clarity and eliminating visible seams or repetitive artifacts even on large surfaces. It is fully compatible with industry-standard 3D software such as Blender Unreal Engine and Unity offering a reliable and high-quality 3D preview experience. For optimal results adjusting the UV scale is recommended to maintain the authentic size ratio of the penny round tiles relative to your models preventing distortion and preserving the natural ceramic tile appearance. Additionally fine-tuning the roughness map can help you achieve the perfect balance of ceramic reflectivity while leveraging the height or parallax mapping features enhances the perceived texture depth efficiently elevating both realism and visual appeal across a wide range of creative projects involving ceramic-tile textures.
Import the texture maps into Blender with sRGB color space for albedo/base color and Non-Color for normal, roughness, metallic, AO, height, and ORM maps. Connect normal maps through a Normal Map node, then adjust UV scale with a Mapping node so the material repeats naturally on your model.
For the full step-by-step setup, see How to Use Seamless Textures in Blender. Browse related material examples in wood, concrete, and metal.
Yes. This texture is designed as a seamless tileable PBR material, so it can repeat across large surfaces without visible borders.
You can download PNG/WEBP versions and use 1K, 2K, 4K and 8K download options when available on the page.
Yes. The download options and engine-mapped ZIP workflow are designed for Blender, Unreal Engine, Unity Standard, URP and HDRP material pipelines.
Yes. The texture is available under the AITextured free commercial license. Review the license page for redistribution and AI-training restrictions.


Generate, preview, and export seamless PBR materials for Blender, Unity, and Unreal Engine—directly in your browser.
AI text-to-texture: type a prompt and get a seamless, tileable base image ready for PBR workflows (great starting point for materials).
Create a full PBR set (Normal, Roughness, AO, Metallic, etc.) from a single image. Seamless and tiling-friendly.
Instant WebGL viewer: inspect materials on a sphere, plane, and cube. Check tiling and lighting in real time.
Re-packages maps per engine: Unreal (BaseColor + ORM), Unity (Mask/MetallicSmoothness), Blender (separate channels).
PNG ↔ JPG ↔ SVG: fast convert, SVG rasterize, embed/trace options, quality & background controls.