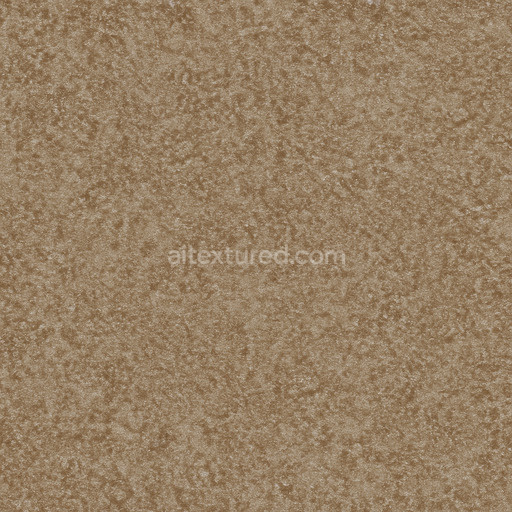
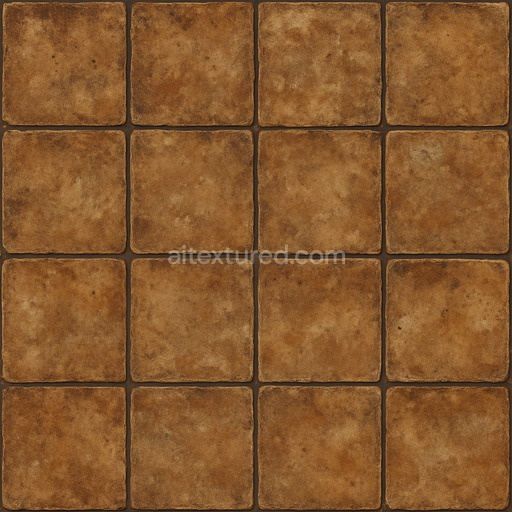
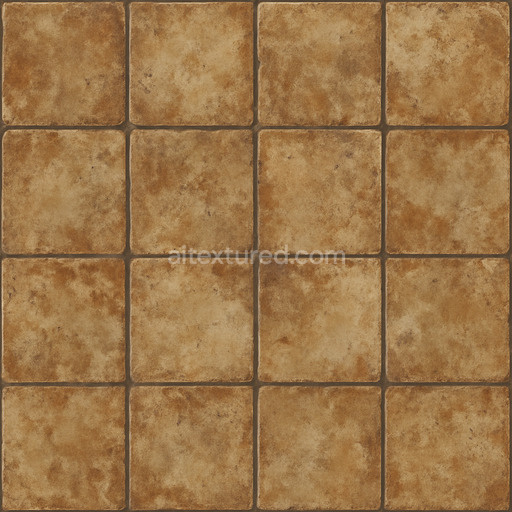
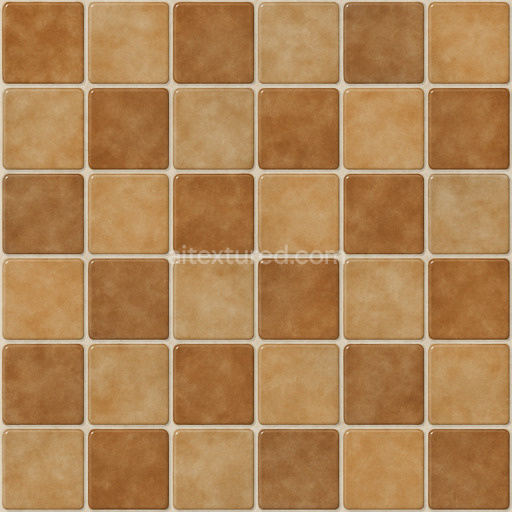
Rough Glazed Ceramic Tile Seamless Texture
Seamless texture (tileable) · PNG, WEBP, PBR ZIP. License: AITextured Free Commercial License (FCL) v1.1. Free personal and commercial use. Raw resale, standalone redistribution, mirroring/scraping, competing asset packs, and AI/ML training are not allowed without written permission. Attribution is not required, but appreciated..

| ID | seamless-ceramic-tile-texture |
|---|---|
| Category | Ceramic-tile |
| Formats | PNG, WEBP, PBR ZIP |
| Size | 1k (1024x1024px), 2k (2048x2048px), 4k (4096x4096px), 8k (8192x8192px) |
| Color | sRGB |
| Tileable | Yes |
This seamless ceramic tile texture is meticulously crafted from a high-quality ceramic base featuring a fine-grained mineral substrate that provides exceptional structural integrity and durability. The composition incorporates durable binders alongside subtle organic fibers which enhance the longevity and resilience of the tiles while maintaining a natural authentic feel. The surface showcases an intricate geometric pattern formed through precise layering techniques and expert pigment application. These pigments are derived from vibrant natural colorants including oxide layers and mineral dyes resulting in a visually compelling and realistic finish. The tiles boast a semi-polished surface that balances smoothness with a slight texture capturing the moderate roughness and subtle porosity typical of premium ceramic flooring and wall materials. Minimal weathering effects such as gentle micro-scratches and faint color variations further contribute to the texture’s true-to-life appearance making it suitable for both modern and traditional interior design projects.
In a physically based rendering (PBR) workflow this ceramic tile texture excels at accurately representing the material’s physical properties across multiple channels. The BaseColor (Albedo) map delivers the rich vibrant pigments that define the ceramic tiles’ distinctive look. The Normal map enhances depth by capturing the fine relief of the geometric pattern along with subtle surface imperfections. The Roughness map reflects the semi-gloss finish managing light diffusion and specular highlights to create a balanced sheen. As expected for ceramic materials the Metallic channel is set to zero reinforcing the non-metallic character of the surface. Ambient Occlusion adds soft shadowing in the recessed areas of the pattern increasing the perceived dimensionality while the Height/Displacement map provides detailed elevation data that supports realistic parallax and displacement effects in 3D environments. Offered in resolutions up to 8K this texture ensures outstanding clarity and fine detail making it ideal for close-up renders and large-scale architectural visualization digital art gaming and interior design applications.
Designed with versatility in mind this tile texture adapts seamlessly for use on both floors and walls enhancing a wide range of digital and physical environments. It is fully compatible with leading industry software including Blender Unreal Engine and Unity enabling smooth integration into diverse creative workflows. For practical implementation adjusting the UV scale allows precise control over tile repetition to suit various project sizes while fine-tuning the roughness values can customize the surface reflectivity—from matte to subtly glossy finishes—according to design requirements. Additionally utilizing the height map for parallax mapping enriches the tactile realism of virtual ceramic surfaces without the need for heavy geometry making this texture an excellent choice for high-quality realistic rendering across numerous architectural and interior design projects.
Import the texture maps into Blender with sRGB color space for albedo/base color and Non-Color for normal, roughness, metallic, AO, height, and ORM maps. Connect normal maps through a Normal Map node, then adjust UV scale with a Mapping node so the material repeats naturally on your model.
For the full step-by-step setup, see How to Use Seamless Textures in Blender. Browse related material examples in wood, concrete, and metal.
Yes. This texture is designed as a seamless tileable PBR material, so it can repeat across large surfaces without visible borders.
You can download PNG/WEBP versions and use 1K, 2K, 4K and 8K download options when available on the page.
Yes. The download options and engine-mapped ZIP workflow are designed for Blender, Unreal Engine, Unity Standard, URP and HDRP material pipelines.
Yes. The texture is available under the AITextured free commercial license. Review the license page for redistribution and AI-training restrictions.


Generate, preview, and export seamless PBR materials for Blender, Unity, and Unreal Engine—directly in your browser.
AI text-to-texture: type a prompt and get a seamless, tileable base image ready for PBR workflows (great starting point for materials).
Create a full PBR set (Normal, Roughness, AO, Metallic, etc.) from a single image. Seamless and tiling-friendly.
Instant WebGL viewer: inspect materials on a sphere, plane, and cube. Check tiling and lighting in real time.
Re-packages maps per engine: Unreal (BaseColor + ORM), Unity (Mask/MetallicSmoothness), Blender (separate channels).
PNG ↔ JPG ↔ SVG: fast convert, SVG rasterize, embed/trace options, quality & background controls.