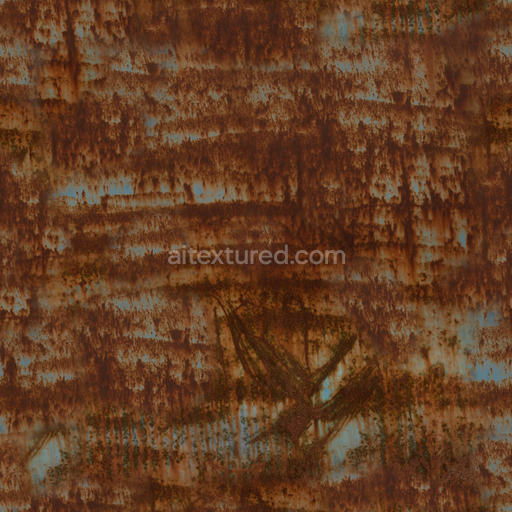
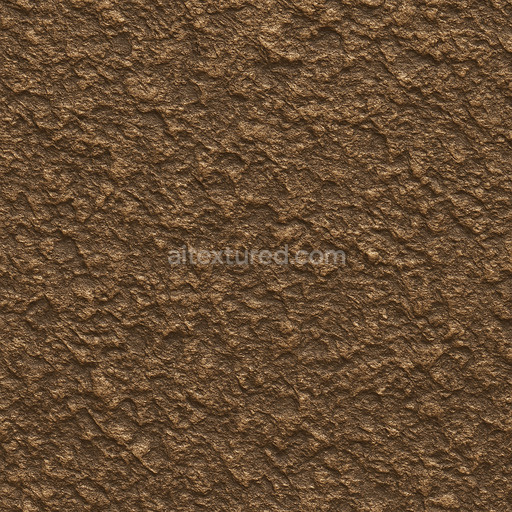
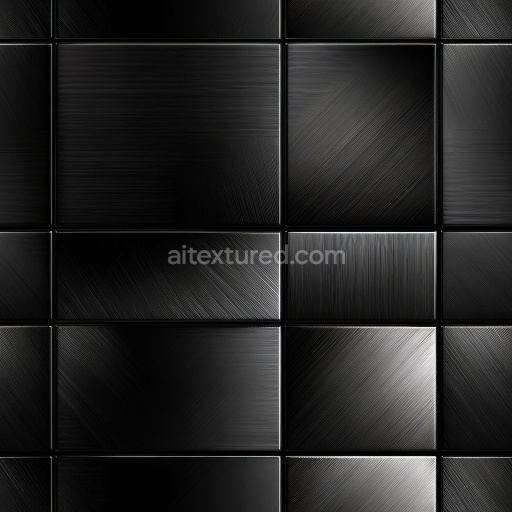
Rusty Metal
Seamless texture (tileable) · PNG, WEBP, PBR ZIP. License: AITextured Free Commercial License (FCL) v1.1. Free personal and commercial use. Raw resale, standalone redistribution, mirroring/scraping, competing asset packs, and AI/ML training are not allowed without written permission. Attribution is not required, but appreciated..

| ID | aged-archviz-damage-damaged-metal-old-pitted |
|---|---|
| Category | Metal |
| Formats | PNG, WEBP, PBR ZIP |
| Size | 1k (1024x1024px), 2k (2048x2048px), 4k (4096x4096px), 8k (8192x8192px) |
| Color | sRGB |
| Tileable | Yes |
This aged archviz damage damaged metal old pitted seamless PBR texture authentically represents the complex materiality of weathered metal surfaces exhibiting rich detail in its pitted and rusted character. The base substrate consists of a metallic alloy naturally degraded through prolonged exposure to harsh environmental conditions showing evident oxidation and corrosion. Over time the metal surface has developed a porous texture characterized by pronounced pitting and erosion while fine scratches and abrasions from mechanical damage add further realism. The surface finish is irregular combining oxidized matte areas with partially polished metal patches that create subtle variations in reflectivity. Rust pigments primarily iron oxide impart warm reddish-brown tones that contrast with cooler dull gray oxidized zones enhancing the visual depth and authenticity of this old and damaged metal surface.
In terms of physically based rendering this high-resolution texture is optimized for seamless tiling up to 8K ensuring detailed and artifact-free presentation in architectural visualization and real-time applications. The BaseColor (Albedo) channel captures the nuanced coloration of scratched and rusted metal including oxide layers and discoloration patterns. The Normal map simulates intricate surface irregularities such as pits scratches and dents adding tactile depth and enhancing light interaction. Roughness values vary to distinguish between smoother worn metal patches and rough corroded areas providing realistic surface reflectance differences. The Metallic channel clearly delineates conductive metal regions from oxidized non-metallic zones while Ambient Occlusion increases shading in crevices and pitted sections. The Height/Displacement map offers subtle relief effects perfect for parallax or tessellation techniques boosting tactile authenticity in close-up renders and game engines.
Designed for seamless integration across major platforms like Blender Unreal Engine and Unity this substance maintains consistent color space and gamma standards for reliable cross-pipeline compatibility. For best results users should adjust the UV scale carefully to prevent visible tiling on expansive surfaces and fine-tune roughness parameters to balance contrasts between scratched and rusted metal patches. The included base layer preview expedites material evaluation allowing designers to quickly assess surface response before full implementation. This comprehensive aged metal texture resource is ideal for designers seeking to add realistic old damaged and pitted metal surfaces with convincing corrosion and weathering effects in both offline and real-time rendering workflows.
Import the texture maps into Blender with sRGB color space for albedo/base color and Non-Color for normal, roughness, metallic, AO, height, and ORM maps. Connect normal maps through a Normal Map node, then adjust UV scale with a Mapping node so the material repeats naturally on your model.
For the full step-by-step setup, see How to Use Seamless Textures in Blender. Browse related material examples in wood, concrete, and metal.
Yes. This texture is designed as a seamless tileable PBR material, so it can repeat across large surfaces without visible borders.
You can download PNG/WEBP versions and use 1K, 2K, 4K and 8K download options when available on the page.
Yes. The download options and engine-mapped ZIP workflow are designed for Blender, Unreal Engine, Unity Standard, URP and HDRP material pipelines.
Yes. The texture is available under the AITextured free commercial license. Review the license page for redistribution and AI-training restrictions.


Build, preview, and export seamless PBR materials. Generate full map sets from a single image, inspect them in a real-time WebGL viewer, and re-package maps for Unreal, Unity, and Blender—directly in your browser.
AI text-to-texture: type a prompt and get a seamless, tileable base image ready for PBR workflows (great starting point for materials).
Create a full PBR set (Normal, Roughness, AO, Metallic, etc.) from a single image. Seamless and tiling-friendly.
Instant WebGL viewer: inspect materials on a sphere, plane, and cube. Check tiling and lighting in real time.
Re-packages maps per engine: Unreal (BaseColor + ORM), Unity (Mask/MetallicSmoothness), Blender (separate channels).
PNG ↔ JPG ↔ SVG: fast convert, SVG rasterize, embed/trace options, quality & background controls.