
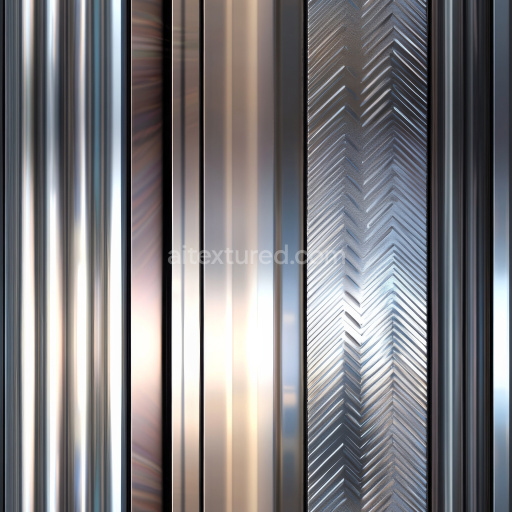
Default Geometric Metal Metallic Pattern - Seamless PBR Texture
Seamless texture (tileable) · PNG, WEBP, PBR ZIP. License: AITextured Free Commercial License (FCL) v1.1. Free personal and commercial use. Raw resale, standalone redistribution, mirroring/scraping, competing asset packs, and AI/ML training are not allowed without written permission. Attribution is not required, but appreciated..

| ID | wave-shaped-grille-metal-mesh-free-pbr |
|---|---|
| Category | Metal |
| Formats | PNG, WEBP, PBR ZIP |
| Size | 1k (1024x1024px), 2k (2048x2048px), 4k (4096x4096px), 8k (8192x8192px) |
| Color | sRGB |
| Tileable | Yes |
This wave-shaped grille metal mesh texture is crafted from a durable metal alloy substrate, designed to faithfully replicate an intricate pattern of curved, interwoven metal strips that form a continuous, flowing mesh. The base metal exhibits a finely brushed surface finish enhanced by subtle oxidized accents, which add depth and realism by simulating natural wear and slight weathering. Variations in color range from cool silvers to muted grays, resulting from thin oxide layers and minor surface patinas that develop over time. The grain orientation within each mesh element is carefully modeled to contribute a fine tactile quality, reinforcing the authentic metallic feel. This combination of materials and treatments produces a visually compelling texture that captures the complex interplay of light and shadow on wave-shaped metal surfaces with exceptional precision and subtlety.
Optimized for physically based rendering (PBR), this texture excels through its comprehensive channel setup to deliver high-fidelity realism in any modern 3D environment. The BaseColor (Albedo) map reveals the nuanced metallic coloration and subtle surface patina, while the Normal map defines the delicate wave-shaped relief of the grille pattern, emphasizing its three-dimensional depth and curvature. The Roughness channel balances the semi-brushed finish, controlling how light scatters and reflects diffusely across the surface, simulating realistic wear and polishing effects. Metallic maps accurately represent the conductive nature of the alloy, producing crisp specular highlights that enhance the perception of real metal. Ambient Occlusion maps accentuate crevices within the mesh, deepening visual contrast, and the Height/Displacement map adds additional dimensionality to the wave contours, enabling finely detailed close-up renders that reveal the texture’s intricate sculptural qualities.
Rendered at an impressive 8K resolution, this seamless wave-shaped grille metal mesh texture is fully optimized for seamless integration into Blender, Unreal Engine, and Unity workflows, ensuring sharp and precise detail even at large scales. This makes it ideal for applications such as architectural visualization, product rendering, and immersive game environments that demand authentic metal surfaces with complex patterns. For practical use, adjusting the UV scale allows fine control over the apparent size and repetition of the wave pattern to suit specific project requirements. Additionally, fine-tuning the roughness parameter can help achieve the perfect balance between polished and weathered metal finishes, enhancing the overall material authenticity and visual impact within any 3D scene.
Import the texture maps into Blender with sRGB color space for albedo/base color and Non-Color for normal, roughness, metallic, AO, height, and ORM maps. Connect normal maps through a Normal Map node, then adjust UV scale with a Mapping node so the material repeats naturally on your model.
For the full step-by-step setup, see How to Use Seamless Textures in Blender. Browse related material examples in wood, concrete, and metal.
Yes. This texture is designed as a seamless tileable PBR material, so it can repeat across large surfaces without visible borders.
You can download PNG/WEBP versions and use 1K, 2K, 4K and 8K download options when available on the page.
Yes. The download options and engine-mapped ZIP workflow are designed for Blender, Unreal Engine, Unity Standard, URP and HDRP material pipelines.
Yes. The texture is available under the AITextured free commercial license. Review the license page for redistribution and AI-training restrictions.

Build, preview, and export seamless PBR materials. Generate full map sets from a single image, inspect them in a real-time WebGL viewer, and re-package maps for Unreal, Unity, and Blender—directly in your browser.
AI text-to-texture: type a prompt and get a seamless, tileable base image ready for PBR workflows (great starting point for materials).
Create a full PBR set (Normal, Roughness, AO, Metallic, etc.) from a single image. Seamless and tiling-friendly.
Instant WebGL viewer: inspect materials on a sphere, plane, and cube. Check tiling and lighting in real time.
Re-packages maps per engine: Unreal (BaseColor + ORM), Unity (Mask/MetallicSmoothness), Blender (separate channels).
PNG ↔ JPG ↔ SVG: fast convert, SVG rasterize, embed/trace options, quality & background controls.