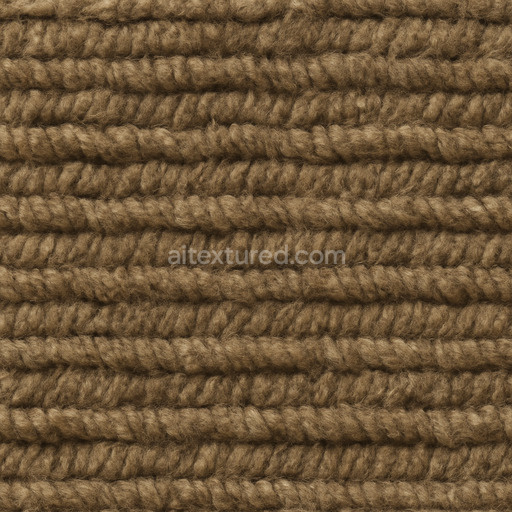
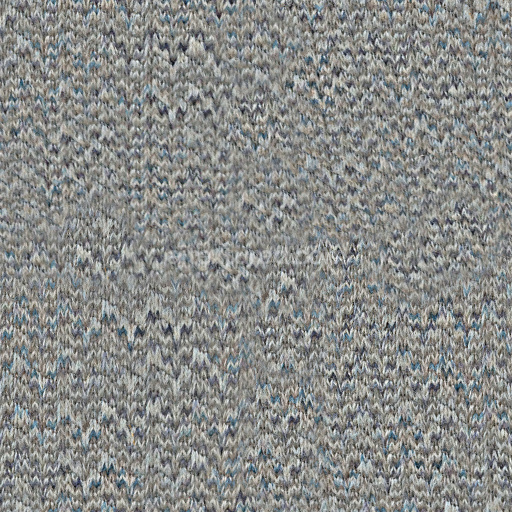
Ancient Wool Seamless Texture
Seamless texture (tileable) · PNG, WEBP, PBR ZIP. License: AITextured Free Commercial License (FCL) v1.1. Free personal and commercial use. Raw resale, standalone redistribution, mirroring/scraping, competing asset packs, and AI/ML training are not allowed without written permission. Attribution is not required, but appreciated..

| ID | archviz-cloth-fabric-metal-metallic-sci-scifi-x3 |
|---|---|
| Category | Fabric |
| Formats | PNG, WEBP, PBR ZIP |
| Size | 1k (1024x1024px), 2k (2048x2048px), 4k (4096x4096px), 8k (8192x8192px) |
| Color | sRGB |
| Tileable | Yes |
This seamless PBR texture masterfully captures a sophisticated blend of cloth fabric and metallic elements perfectly suited for archviz and sci-fi environments such as spaceship interiors and futuristic architectural walls. The base substrate is a tightly woven combination of organic and synthetic fibers creating a durable textile layer that balances softness with structural integrity. Interwoven metallic threads and subtle oxidized metal accents introduce an industrial metallic sheen that contrasts beautifully with the fabric’s natural warmth. Carefully applied colorants including fine pigments and oxide layers add depth and tonal variation across the surface while specialized binders ensure a strong bond between textile fibers and metal components. The finish presents a refined fusion of brushed metal luster and matte fabric softness enhancing the texture’s realistic appearance and designer quality.
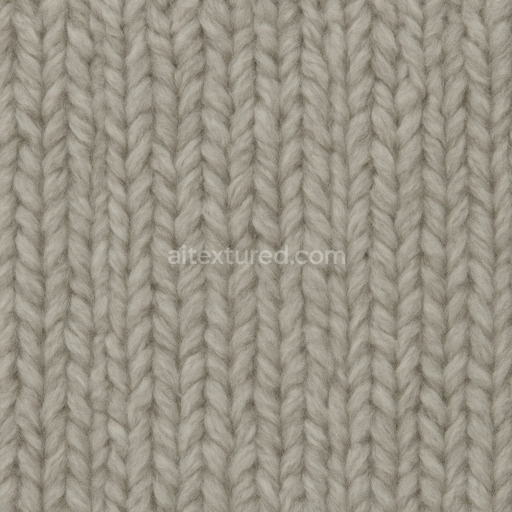
In terms of PBR channel representation the BaseColor (Albedo) map highlights the intricate interplay between fabric dyes and metallic patinas with consistent well-calibrated colors and subtle tonal shifts. The Normal map emphasizes the detailed grain orientation of the cloth fibers alongside embossed metallic ridges adding surface complexity while maintaining seamless continuity. Roughness values vary across the texture—higher in softer textile regions to convey fabric softness and lower in metallic areas to reflect light with a polished yet slightly weathered look. The Metallic map clearly differentiates the metal fibers from organic fabric sections ensuring accurate reflectance under diverse lighting conditions. Ambient Occlusion enhances shadowing around weave intersections and metal overlays while Height and Displacement maps provide subtle depth cues that improve parallax effects especially in close-up real-time rendering scenarios.
Rendered in ultra-high 8K resolution this texture delivers exceptional detail and clarity making it ideal for large-scale tiling on spaceship walls futuristic architectural elements or sci-fi interiors. It is optimized for seamless integration in Blender Unreal Engine and Unity supporting projects that demand both realism and intricate detail. For optimal results carefully adjusting the UV scale is recommended to preserve the fabric weave’s fidelity and avoid repetitive patterns. Additionally fine-tuning roughness settings allows for a customized balance between metallic highlights and textile softness enhancing visual authenticity across various lighting setups. This versatile substance texture is a reliable resource for designers and artists aiming to achieve high-quality architectural visualization and advanced real-time rendering outcomes.
Import the texture maps into Blender with sRGB color space for albedo/base color and Non-Color for normal, roughness, metallic, AO, height, and ORM maps. Connect normal maps through a Normal Map node, then adjust UV scale with a Mapping node so the material repeats naturally on your model.
For the full step-by-step setup, see How to Use Seamless Textures in Blender. Browse related material examples in wood, concrete, and metal.
Yes. This texture is designed as a seamless tileable PBR material, so it can repeat across large surfaces without visible borders.
You can download PNG/WEBP versions and use 1K, 2K, 4K and 8K download options when available on the page.
Yes. The download options and engine-mapped ZIP workflow are designed for Blender, Unreal Engine, Unity Standard, URP and HDRP material pipelines.
Yes. The texture is available under the AITextured free commercial license. Review the license page for redistribution and AI-training restrictions.


Build, preview, and export seamless PBR materials. Generate full map sets from a single image, inspect them in a real-time WebGL viewer, and re-package maps for Unreal, Unity, and Blender—directly in your browser.
AI text-to-texture: type a prompt and get a seamless, tileable base image ready for PBR workflows (great starting point for materials).
Create a full PBR set (Normal, Roughness, AO, Metallic, etc.) from a single image. Seamless and tiling-friendly.
Instant WebGL viewer: inspect materials on a sphere, plane, and cube. Check tiling and lighting in real time.
Re-packages maps per engine: Unreal (BaseColor + ORM), Unity (Mask/MetallicSmoothness), Blender (separate channels).
PNG ↔ JPG ↔ SVG: fast convert, SVG rasterize, embed/trace options, quality & background controls.