Archviz Cloth Clothes Drapes Fabric Furniture Substance - Seamless PBR Texture
Seamless texture (tileable) · PNG, WEBP, PBR ZIP. License: AITextured Free Commercial License (FCL) v1.1. Free personal and commercial use. Raw resale, standalone redistribution, mirroring/scraping, competing asset packs, and AI/ML training are not allowed without written permission. Attribution is not required, but appreciated..

| ID | fine-cotton-texture-seamless |
|---|---|
| Category | Fabric |
| Formats | PNG, WEBP, PBR ZIP |
| Size | 1k (1024x1024px), 2k (2048x2048px), 4k (4096x4096px), 8k (8192x8192px) |
| Color | sRGB |
| Tileable | Yes |
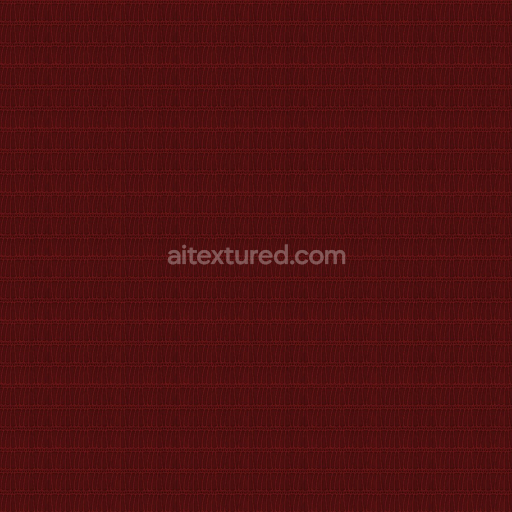
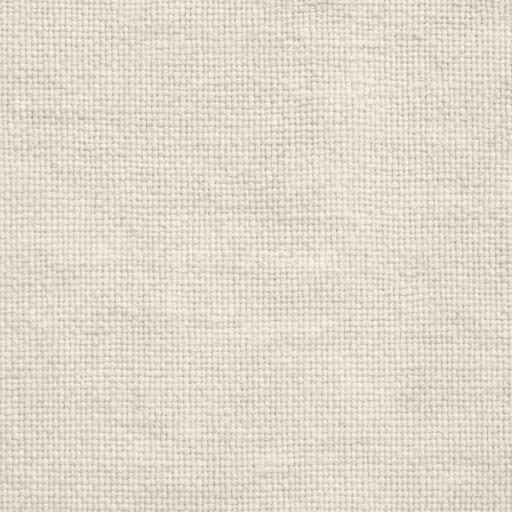
The Fine Cotton Texture Seamless high resolution up to 8K presents a meticulously crafted fabric surface that authentically captures the natural characteristics of fine cotton fibers. This seamless fine cotton texture high resolution up to 8K reveals the organic composition typical of woven cotton fabric where tightly aligned cellulose fibers form the base substrate lending softness and a subtle irregularity to the weave pattern. The fibers are naturally bound together through hydrogen bonding without synthetic adhesives resulting in a porous yet resilient surface that conveys both durability and comfort. Its lightly brushed finish evokes the gentle nap of cotton with nuanced variations in fiber orientation and density that enhance the tactile realism of the fabric. The coloration is achieved through soft pigment dyes that deeply penetrate the fibers producing a muted uniform base color interspersed with natural tonal shifts that reflect authentic cotton dyeing processes.
In terms of physically based rendering (PBR) channels this tileable fine cotton texture seamless high resolution up to 8K delivers exceptional detail and material accuracy. The BaseColor/Albedo channel showcases the delicate matte pigment distribution characteristic of fine cotton while the Normal map emphasizes the subtle relief of the fine weave and fiber directionality. Roughness captures the fabric’s soft low-gloss surface reflecting cotton’s naturally diffuse scattering of light and the Metallic channel remains negligible consistent with cotton’s non-metallic nature. Ambient Occlusion subtly enhances the depth within the weave folds adding visual richness while Height and Displacement maps provide fine surface undulations that reinforce the tactile quality of the textile. This texture fine cotton texture seamless high resolution up to 8K is rendered in a seamless tileable format at an ultra-high resolution of up to 8k ensuring impeccable detail and coverage without visible seams or repetition artifacts across large surfaces.
Designed for seamless integration with leading 3D software including Blender Unity and Unreal Engine this texture is optimized for realistic fabric representation in diverse applications such as environment art architectural visualization concept prototyping and look development. A practical tip to maximize realism is to carefully adjust the UV scale to maintain natural fiber density relative to the object’s dimensions preventing distortion or loss of detail. Additionally fine-tuning the roughness channel can simulate the soft diffuse reflection typical of cotton under various lighting conditions. Leveraging subtle ambient occlusion and slight normal map enhancement further breaks up uniformity delivering a believable and visually rich cotton fabric appearance. The included 3D preview functionality allows precise inspection of texture behavior under real-time lighting facilitating accurate PBR appearance and material setup.
Import the texture maps into Blender with sRGB color space for albedo/base color and Non-Color for normal, roughness, metallic, AO, height, and ORM maps. Connect normal maps through a Normal Map node, then adjust UV scale with a Mapping node so the material repeats naturally on your model.
For the full step-by-step setup, see How to Use Seamless Textures in Blender. Browse related material examples in wood, concrete, and metal.
Yes. This texture is designed as a seamless tileable PBR material, so it can repeat across large surfaces without visible borders.
You can download PNG/WEBP versions and use 1K, 2K, 4K and 8K download options when available on the page.
Yes. The download options and engine-mapped ZIP workflow are designed for Blender, Unreal Engine, Unity Standard, URP and HDRP material pipelines.
Yes. The texture is available under the AITextured free commercial license. Review the license page for redistribution and AI-training restrictions.


Generate, preview, and export seamless PBR materials for Blender, Unity, and Unreal Engine—directly in your browser.
AI text-to-texture: type a prompt and get a seamless, tileable base image ready for PBR workflows (great starting point for materials).
Create a full PBR set (Normal, Roughness, AO, Metallic, etc.) from a single image. Seamless and tiling-friendly.
Instant WebGL viewer: inspect materials on a sphere, plane, and cube. Check tiling and lighting in real time.
Re-packages maps per engine: Unreal (BaseColor + ORM), Unity (Mask/MetallicSmoothness), Blender (separate channels).
PNG ↔ JPG ↔ SVG: fast convert, SVG rasterize, embed/trace options, quality & background controls.