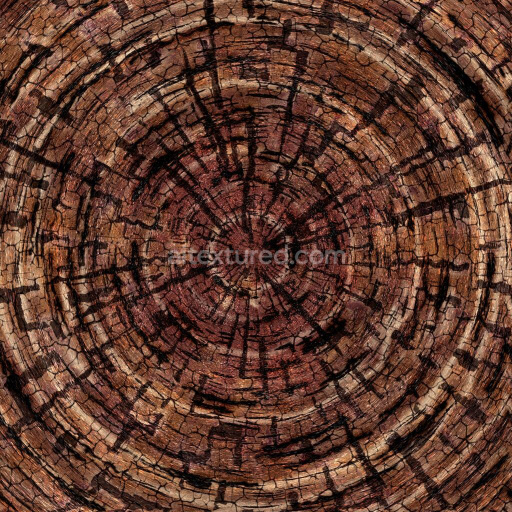
Cross Section of Wood Log Texture | Free PBR
Seamless texture (tileable) · PNG, WEBP, PBR ZIP. License: AITextured Free Commercial License (FCL) v1.1. Free personal and commercial use. Raw resale, standalone redistribution, mirroring/scraping, competing asset packs, and AI/ML training are not allowed without written permission. Attribution is not required, but appreciated..

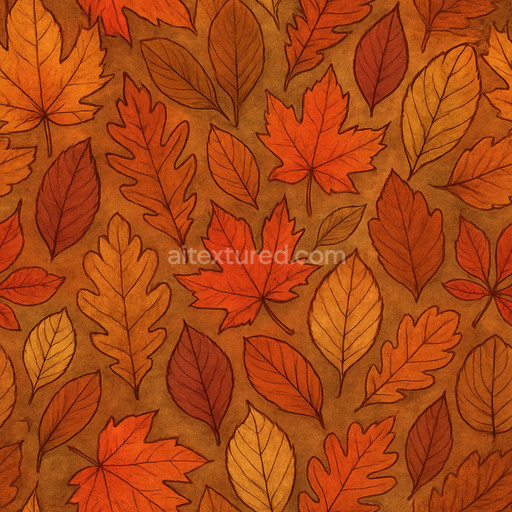
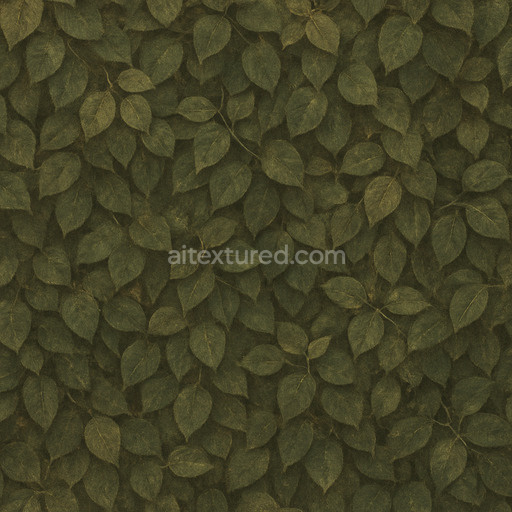
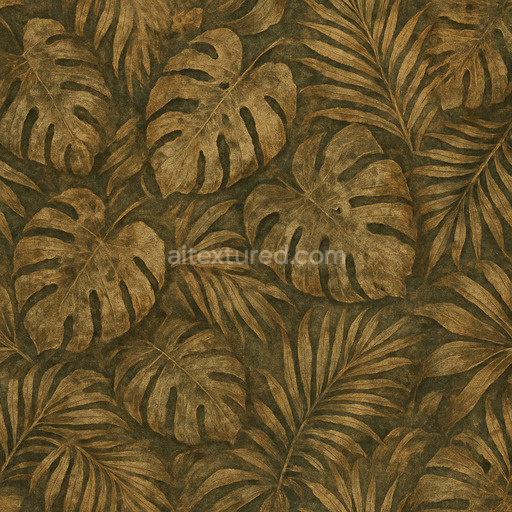
| ID | weathered-autumn-leaves-texture-seamless |
|---|---|
| Category | Foliage |
| Formats | PNG, WEBP, PBR ZIP |
| Size | 1k (1024x1024px), 2k (2048x2048px), 4k (4096x4096px), 8k (8192x8192px) |
| Color | sRGB |
| Tileable | Yes |
The Weathered Autumn Leaves Texture Seamless high resolution up to 8K captures the intricate natural composition of decayed foliage with exceptional fidelity. This texture showcases a rich organic substrate composed primarily of dried weathered leaf matter—an amalgam of cellulose fibers intertwined with residual pigments and oxidized tannins. The surface exhibits subtle porosity and micro-roughness resulting from natural weathering and decomposition processes which lend authenticity to the worn appearance. The color palette ranges from muted browns and ochres to faded yellows and deep rusts reflecting the gradual breakdown of chlorophyll and the accumulation of mineral deposits. These colorants are effectively represented in the BaseColor/Albedo channel creating a lifelike multihued surface. The Normal map enhances the fine grain orientation and raised veins characteristic of autumn leaves while the Roughness channel conveys the varied surface finish—from smoother brittle patches to rougher fibrous areas. The Metallic channel remains neutral as organic material is non-metallic and Ambient Occlusion adds depth to crevices and overlapping leaf edges. Height maps provide subtle elevation differences that emphasize the natural undulations and curled edges typical of weathered leaves.
Designed as a seamless tileable weathered autumn leaves texture seamless high resolution up to 8K this generated texture scales elegantly across large surfaces with no visible edges or repetition artifacts. It integrates smoothly within popular 3D software such as Blender Unity and Unreal Engine requiring minimal setup to achieve photorealistic foliage effects. Its high resolution up to 8K enables close-up inspection and detailed 3D preview making it ideal for environment art architectural visualization and concept prototyping that demand both quality and performance. The texture’s structural consistency and micro-detail fidelity ensure that it remains convincing under varying lighting conditions and camera angles enhancing realism in any digital scene.
When applying this tileable weathered autumn leaves texture seamless high resolution up to 8K consider adjusting the UV scale to balance between overall coverage and visible detail depending on your scene’s requirements. Additionally fine-tuning the Roughness intensity can help match the texture’s surface finish to your lighting rig whether aiming for a matte weather-beaten look or a slightly glossy dewy effect. For enhanced depth perception subtle use of the Height or Parallax maps can simulate leaf curling and surface irregularities further grounding the material within the environment. This texture is a versatile addition to any foliage textures collection enabling faster iteration and high-quality results in both personal and commercial projects.
Import the texture maps into Blender with sRGB color space for albedo/base color and Non-Color for normal, roughness, metallic, AO, height, and ORM maps. Connect normal maps through a Normal Map node, then adjust UV scale with a Mapping node so the material repeats naturally on your model.
For the full step-by-step setup, see How to Use Seamless Textures in Blender. Browse related material examples in wood, concrete, and metal.
Yes. This texture is designed as a seamless tileable PBR material, so it can repeat across large surfaces without visible borders.
You can download PNG/WEBP versions and use 1K, 2K, 4K and 8K download options when available on the page.
Yes. The download options and engine-mapped ZIP workflow are designed for Blender, Unreal Engine, Unity Standard, URP and HDRP material pipelines.
Yes. The texture is available under the AITextured free commercial license. Review the license page for redistribution and AI-training restrictions.

Generate, preview, and export seamless PBR materials for Blender, Unity, and Unreal Engine—directly in your browser.
AI text-to-texture: type a prompt and get a seamless, tileable base image ready for PBR workflows (great starting point for materials).
Create a full PBR set (Normal, Roughness, AO, Metallic, etc.) from a single image. Seamless and tiling-friendly.
Instant WebGL viewer: inspect materials on a sphere, plane, and cube. Check tiling and lighting in real time.
Re-packages maps per engine: Unreal (BaseColor + ORM), Unity (Mask/MetallicSmoothness), Blender (separate channels).
PNG ↔ JPG ↔ SVG: fast convert, SVG rasterize, embed/trace options, quality & background controls.