
Detailed Snow Crystal Texture PBR - 4K Resolution
Seamless texture (tileable) · PNG, WEBP, PBR ZIP. License: AITextured Free Commercial License (FCL) v1.1. Free personal and commercial use. Raw resale, standalone redistribution, mirroring/scraping, competing asset packs, and AI/ML training are not allowed without written permission. Attribution is not required, but appreciated..

| ID | seamless-3d-texture-pbr-8k-of-slate-tiled-stone-with-mossy-stones-and-lichen-crust |
|---|---|
| Category | Ground surface |
| Formats | PNG, WEBP, PBR ZIP |
| Size | 1k (1024x1024px), 2k (2048x2048px), 4k (4096x4096px), 8k (8192x8192px) |
| Color | sRGB |
| Tileable | Yes |
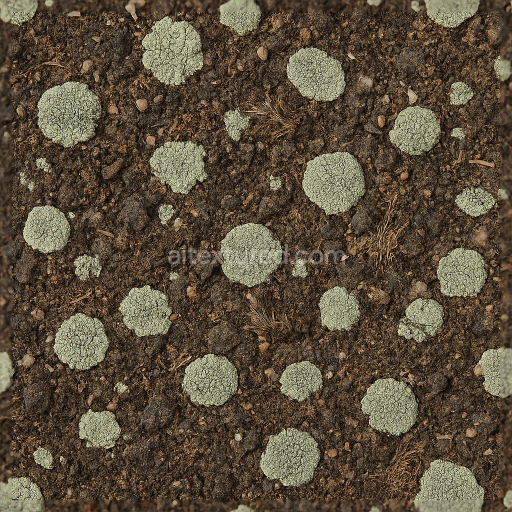
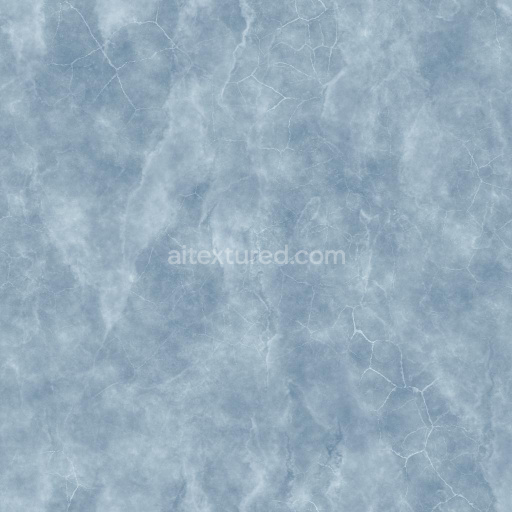
This seamless 3D texture in stunning 8K resolution showcases a meticulously crafted slate tiled stone surface enriched with natural mossy stones and delicate lichen crust. The base material composition reflects a weathered sedimentary rock substrate characterized by fine-grain mineral layers typical of slate. The texture captures the inherent porosity and subtle fractures of aged stone where natural binders and mineral cementation create an uneven yet cohesive ground surface. Organic growth in the form of moss and lichen crust adds intricate detail and color variation contributing green and off-white pigments that contrast softly against the cool gray and blue tones of the slate tiles. The surface finish appears matte with slight roughness mimicking a naturally eroded unpolished rock face exposed to environmental conditions over time.
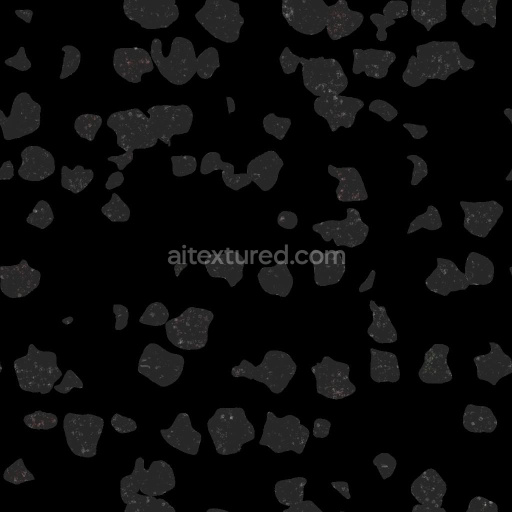
In the physically based rendering (PBR) channels this texture excels at realism and detail. The BaseColor (Albedo) map presents the nuanced coloration of the slate and organic elements without baked-in shadows or highlights ensuring clean and flexible lighting adaptation. The Normal map emphasizes subtle stone fragments surface undulations and the raised texture of moss and lichen enhancing depth and tactile quality. Roughness values vary across the surface representing the contrast between worn smoother slate tiles and the softer more porous moss patches. The Metallic channel remains minimal as expected for natural stone while the Ambient Occlusion map adds realistic shadowing in crevices and tile joints increasing dimensionality. Height/Displacement data further accentuates the uneven ground features and fine relief supporting advanced parallax or tessellation effects in 3D engines.
This photorealistic slate tiled stone seamless PBR texture is optimized for use in architectural and natural 3D visualizations providing a versatile material for paved surfaces such as garden paths courtyard floors or rustic walls. It is fully Unreal Engine Blender and Unity ready allowing for straightforward integration with physically accurate shaders. For optimal results adjusting the UV scale to maintain natural stone proportions and fine-tuning roughness can help tailor the weathered appearance to specific lighting conditions. Leveraging the height channel for parallax occlusion mapping enhances realism further especially in close-up shots where surface detail is critical.
Import the texture maps into Blender with sRGB color space for albedo/base color and Non-Color for normal, roughness, metallic, AO, height, and ORM maps. Connect normal maps through a Normal Map node, then adjust UV scale with a Mapping node so the material repeats naturally on your model.
For the full step-by-step setup, see How to Use Seamless Textures in Blender. Browse related material examples in wood, concrete, and metal.
Yes. This texture is designed as a seamless tileable PBR material, so it can repeat across large surfaces without visible borders.
You can download PNG/WEBP versions and use 1K, 2K, 4K and 8K download options when available on the page.
Yes. The download options and engine-mapped ZIP workflow are designed for Blender, Unreal Engine, Unity Standard, URP and HDRP material pipelines.
Yes. The texture is available under the AITextured free commercial license. Review the license page for redistribution and AI-training restrictions.


Generate, preview, and export seamless PBR materials for Blender, Unity, and Unreal Engine—directly in your browser.
AI text-to-texture: type a prompt and get a seamless, tileable base image ready for PBR workflows (great starting point for materials).
Create a full PBR set (Normal, Roughness, AO, Metallic, etc.) from a single image. Seamless and tiling-friendly.
Instant WebGL viewer: inspect materials on a sphere, plane, and cube. Check tiling and lighting in real time.
Re-packages maps per engine: Unreal (BaseColor + ORM), Unity (Mask/MetallicSmoothness), Blender (separate channels).
PNG ↔ JPG ↔ SVG: fast convert, SVG rasterize, embed/trace options, quality & background controls.