
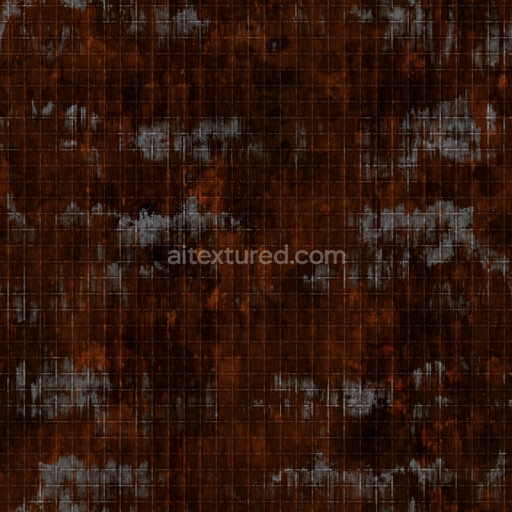
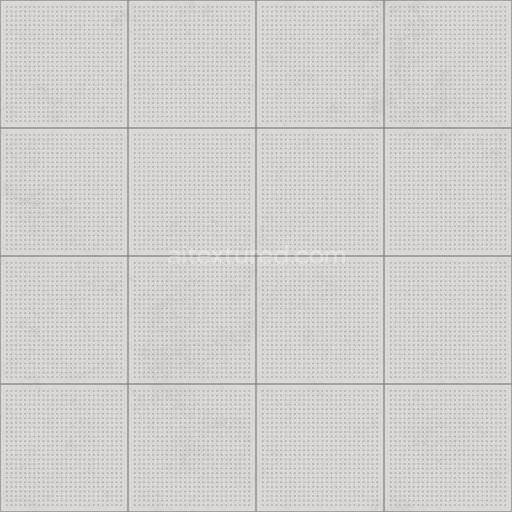
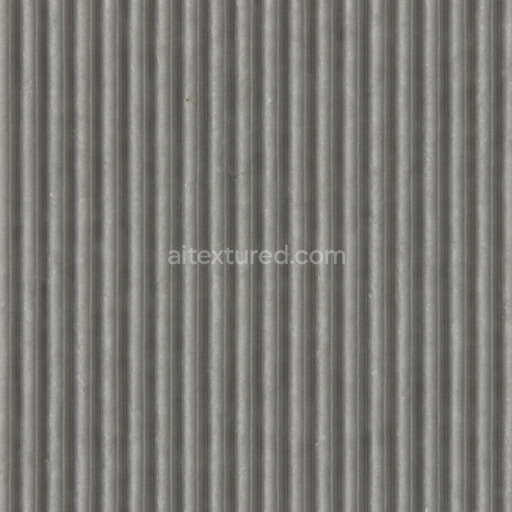
Punched or Perforated Metal Sheet Texture with Rust | Free PBR
Seamless texture (tileable) · PNG, WEBP, PBR ZIP. License: AITextured Free Commercial License (FCL) v1.1. Free personal and commercial use. Raw resale, standalone redistribution, mirroring/scraping, competing asset packs, and AI/ML training are not allowed without written permission. Attribution is not required, but appreciated..

| ID | rusty-peeling-paint-of-metal-free-pbr |
|---|---|
| Category | Metal |
| Formats | PNG, WEBP, PBR ZIP |
| Size | 1k (1024x1024px), 2k (2048x2048px), 4k (4096x4096px), 8k (8192x8192px) |
| Color | sRGB |
| Tileable | Yes |
This high-quality seamless PBR texture authentically captures the complex appearance of rusty peeling paint on metal surfaces, making it an excellent resource for digital artists and designers seeking realistic material representations. The underlying substrate is corroded metal, characterized by a layered oxide film formed through prolonged oxidation processes. This oxidation creates a textured, uneven surface marked by pitting and roughness. Over time, the once smooth, protective paint layer has undergone significant deterioration, exhibiting extensive peeling and flaking caused by continuous exposure to weathering elements such as moisture and air. The paint’s binders and adhesives have broken down, leading to a cracked, eroded finish where the original polished or brushed metal surface is partially obscured by deposits of rust and faded pigment layers. The color palette is dominated by a mix of dull grays and rusty reddish-brown oxide hues, emphasizing the material’s aged, weathered state and its complex multi-layer composition.
Within the PBR workflow, this texture excels by faithfully representing the material’s physical and optical properties through multiple texture channels. The BaseColor (Albedo) map presents a detailed interplay of rusty orange tones and muted metal grays beneath the peeling paint. The Normal map accentuates the tactile surface irregularities, highlighting chipped paint edges and corroded metal pits that add depth and realism. Roughness values vary significantly across the surface, with oxidized, rusted areas showing higher roughness to simulate diffuse reflections, while smoother, exposed metal patches possess lower roughness for sharper highlights. The Metallic map clearly differentiates the metal substrate from the non-metallic paint layers, ensuring accurate reflection behavior under lighting. Ambient Occlusion enhances depth perception by darkening crevices and cracks formed by peeling paint and rust buildup. Additionally, the Height/Displacement channel adds subtle relief effects to emphasize the layered, peeling nature of the paint and the corroded texture beneath.
Rendered at an impressive resolution of up to 8K, this seamless texture is optimized for seamless tiling and ready to be integrated into popular 3D software such as Blender, Unreal Engine, and Unity. To maximize realism, it is recommended to carefully adjust the UV scale to prevent visible repetition patterns, and to fine-tune the roughness channel when simulating varying environmental conditions, such as wet or dry surfaces. Employing the height or parallax maps can further enhance the visual depth, creating convincing dimensionality in the peeling paint and rusted metal features. Overall, this texture provides a detailed, high-fidelity solution for creating authentic weathered metal surfaces in any digital visualization or game development project.
Import the texture maps into Blender with sRGB color space for albedo/base color and Non-Color for normal, roughness, metallic, AO, height, and ORM maps. Connect normal maps through a Normal Map node, then adjust UV scale with a Mapping node so the material repeats naturally on your model.
For the full step-by-step setup, see How to Use Seamless Textures in Blender. Browse related material examples in wood, concrete, and metal.
Yes. This texture is designed as a seamless tileable PBR material, so it can repeat across large surfaces without visible borders.
You can download PNG/WEBP versions and use 1K, 2K, 4K and 8K download options when available on the page.
Yes. The download options and engine-mapped ZIP workflow are designed for Blender, Unreal Engine, Unity Standard, URP and HDRP material pipelines.
Yes. The texture is available under the AITextured free commercial license. Review the license page for redistribution and AI-training restrictions.


Build, preview, and export seamless PBR materials. Generate full map sets from a single image, inspect them in a real-time WebGL viewer, and re-package maps for Unreal, Unity, and Blender—directly in your browser.
AI text-to-texture: type a prompt and get a seamless, tileable base image ready for PBR workflows (great starting point for materials).
Create a full PBR set (Normal, Roughness, AO, Metallic, etc.) from a single image. Seamless and tiling-friendly.
Instant WebGL viewer: inspect materials on a sphere, plane, and cube. Check tiling and lighting in real time.
Re-packages maps per engine: Unreal (BaseColor + ORM), Unity (Mask/MetallicSmoothness), Blender (separate channels).
PNG ↔ JPG ↔ SVG: fast convert, SVG rasterize, embed/trace options, quality & background controls.