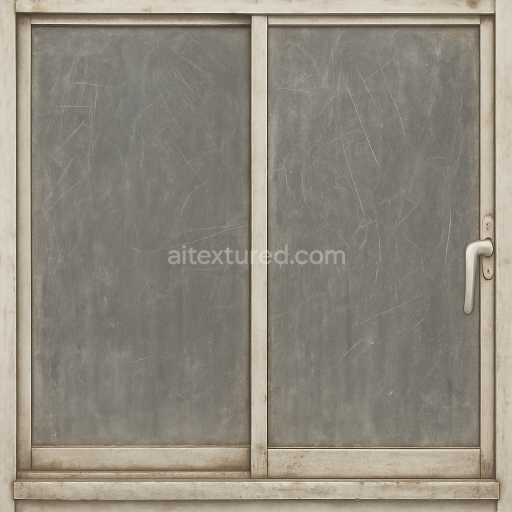
Seamless 8K PBR 3D texture of sliding window with scratched glass and subtle dirt buildup…
Seamless texture (tileable) · PNG, WEBP, PBR ZIP. License: AITextured Free Commercial License (FCL) v1.1. Free personal and commercial use. Raw resale, standalone redistribution, mirroring/scraping, competing asset packs, and AI/ML training are not allowed without written permission. Attribution is not required, but appreciated..

| ID | seamless-8k-pbr-3d-texture-of-modern-window-with-smooth-clear-glass-and-sleek-window-frame |
|---|---|
| Category | Window |
| Formats | PNG, WEBP, PBR ZIP |
| Size | 1k (1024x1024px), 2k (2048x2048px), 4k (4096x4096px), 8k (8192x8192px) |
| Color | sRGB |
| Tileable | Yes |
This seamless 8k PBR 3D texture represents a modern window characterized by a minimalist design with smooth clear glass panels set within a sleek metallic window frame. The frame itself is composed of anodized aluminum offering a lightweight yet durable substrate known for its corrosion resistance and clean aesthetic. The aluminum surface is treated with a subtle brushed finish lending a faint linear grain that enhances the frame’s visual depth without overpowering the clarity of the glass. Accents such as the window sill latch handle lock and hinges are integrated seamlessly each element modeled to reflect precise mechanical details with realistic metallic reflections and subtle variations in surface roughness.*
The glass panes exhibit exceptional clarity and smoothness achieved through a highly polished low-roughness surface that allows for accurate light transmission and reflection. The glass material includes a thin interlayer adhesive bonding the panes to the frame simulated in the texture’s height and ambient occlusion maps to define the slight recesses and edges where glass meets metal. The glass itself is virtually free of impurities or grain emphasizing a non-porous flawless finish that contributes to the window’s modern appeal. This clarity is reflected in the BaseColor (albedo) channel by soft gradients of very light blues and subtle reflections while the Normal and Height maps capture the gentle curvature and the subtle bevels around the glass edges and frame joints.*
In terms of PBR channel mapping the BaseColor channel defines the cool metallic tones of the aluminum frame and the near-transparent glass coloration. The Metallic map highlights the aluminum components with values close to 1 contrasting with the non-metallic glass at 0. Roughness values are carefully balanced: the glass maintains a low roughness (~0.05–0.1) to simulate smooth transparency while the metal frame exhibits a slightly higher roughness (~0.2–0.3) to reflect its brushed finish. The Ambient Occlusion map enhances the depth perception around hinges locks and frame intersections accentuating the mechanical details. Height and Normal maps provide subtle relief for frame edges window latch contours and the smooth curvature of the glass panes contributing to realistic parallax effects in 3D environments.*
This texture is optimized for seamless tiling at an 8k resolution ensuring exceptional detail even in close-up renders. It is fully compatible and ready for use in Blender Unreal Engine and Unity catering to high-fidelity architectural visualization game assets and real-time rendering scenarios. For practical application it is recommended to adjust the UV scale carefully to maintain the correct proportions of window components without stretching. Additionally fine-tuning the roughness channel can help achieve the desired balance between reflective highlights on the glass and the soft metallic sheen on the frame. Combining height map blending with normal maps can further enhance the perception of depth around the window’s mechanical parts adding to the overall realism in various lighting conditions.
Import the texture maps into Blender with sRGB color space for albedo/base color and Non-Color for normal, roughness, metallic, AO, height, and ORM maps. Connect normal maps through a Normal Map node, then adjust UV scale with a Mapping node so the material repeats naturally on your model.
For the full step-by-step setup, see How to Use Seamless Textures in Blender. Browse related material examples in wood, concrete, and metal.
Yes. This texture is designed as a seamless tileable PBR material, so it can repeat across large surfaces without visible borders.
You can download PNG/WEBP versions and use 1K, 2K, 4K and 8K download options when available on the page.
Yes. The download options and engine-mapped ZIP workflow are designed for Blender, Unreal Engine, Unity Standard, URP and HDRP material pipelines.
Yes. The texture is available under the AITextured free commercial license. Review the license page for redistribution and AI-training restrictions.


Generate, preview, and export seamless PBR materials for Blender, Unity, and Unreal Engine—directly in your browser.
AI text-to-texture: type a prompt and get a seamless, tileable base image ready for PBR workflows (great starting point for materials).
Create a full PBR set (Normal, Roughness, AO, Metallic, etc.) from a single image. Seamless and tiling-friendly.
Instant WebGL viewer: inspect materials on a sphere, plane, and cube. Check tiling and lighting in real time.
Re-packages maps per engine: Unreal (BaseColor + ORM), Unity (Mask/MetallicSmoothness), Blender (separate channels).
PNG ↔ JPG ↔ SVG: fast convert, SVG rasterize, embed/trace options, quality & background controls.