Seamless 8K PBR 3D texture of wire glass window with textured glass and window mullion de…
Seamless texture (tileable) · PNG, WEBP, PBR ZIP. License: AITextured Free Commercial License (FCL) v1.1. Free personal and commercial use. Raw resale, standalone redistribution, mirroring/scraping, competing asset packs, and AI/ML training are not allowed without written permission. Attribution is not required, but appreciated..

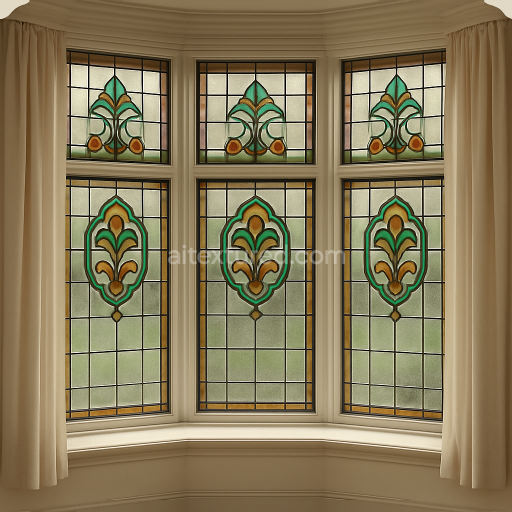
| ID | seamless-8k-pbr-3d-texture-of-stained-glass-window-with-vibrant-colored-decorative-glass |
|---|---|
| Category | Window |
| Formats | PNG, WEBP, PBR ZIP |
| Size | 1k (1024x1024px), 2k (2048x2048px), 4k (4096x4096px), 8k (8192x8192px) |
| Color | sRGB |
| Tileable | Yes |
This seamless 8K PBR 3D texture depicts a stained glass window composed of vibrant colored decorative glass panels intricately arranged within a geometric grid formed by window mullions and muntins. The primary material is hand-blown stained glass characterized by its translucent silica-based substrate enriched with mineral colorants such as cobalt chromium and gold oxides to create deep blues greens reds and ambers. These colored glass pieces are held together by lead cames which form the window grille providing structural support and contributing a dark metallic contrast. The mullions and muntins typically crafted from painted or oxidized metal or wood frame each glass panel adding a layered architectural detail that enhances depth and shadowing in the texture.
From a material composition standpoint the stained glass exhibits a smooth polished surface finish with subtle irregularities and slight waviness typical of traditional glassmaking techniques. The lead cames and window grille have a matte to semi-gloss finish with slight roughness and weathering effects indicative of oxidation and aging. The window sill visible at the base is generally rendered as a solid stone or wood substrate featuring a slightly rough brushed texture with natural grain patterns and minor wear. The window curtain if present is represented with soft fabric folds and fine weave details adding a complementary textile element to the otherwise rigid glass and metal form.
In PBR terms the BaseColor (Albedo) channel captures the vivid pigmentation of the stained glass and the muted tones of the metal and wood components without baked-in lighting ensuring versatility under various lighting conditions. The Normal map faithfully reproduces the subtle undulations of the glass surface and the raised edges of the lead cames and window frame enhancing the 3D relief. Roughness maps differentiate between the glossy glass panels and the more matte or weathered metal and wooden parts. Metallic channels highlight the lead cames and metal mullions while non-metallic areas like glass and wood remain at zero metallic. Ambient Occlusion adds shadow depth around the grille intersections and window trims. Height and displacement maps define the thickness of glass panes the raised lead strips and the carved window sill details enabling realistic parallax and depth effects.
Thanks to its seamless tiling and ultra-high 8K resolution this texture is optimized for use in Blender Unreal Engine and Unity supporting detailed close-ups and large-scale architectural scenes. For practical application it is recommended to carefully adjust the UV scale to maintain the proportional size of the stained glass panels relative to the model ensuring that the intricate patterns do not become distorted. Additionally tuning the roughness map can help simulate varying weathering levels from freshly restored glass to aged matte finishes. Blending height and normal maps subtly can further enhance the perceived depth of the lead cames and window mullions without exaggerating geometric displacement maintaining performance while maximizing visual fidelity.
Import the texture maps into Blender with sRGB color space for albedo/base color and Non-Color for normal, roughness, metallic, AO, height, and ORM maps. Connect normal maps through a Normal Map node, then adjust UV scale with a Mapping node so the material repeats naturally on your model.
For the full step-by-step setup, see How to Use Seamless Textures in Blender. Browse related material examples in wood, concrete, and metal.
Yes. This texture is designed as a seamless tileable PBR material, so it can repeat across large surfaces without visible borders.
You can download PNG/WEBP versions and use 1K, 2K, 4K and 8K download options when available on the page.
Yes. The download options and engine-mapped ZIP workflow are designed for Blender, Unreal Engine, Unity Standard, URP and HDRP material pipelines.
Yes. The texture is available under the AITextured free commercial license. Review the license page for redistribution and AI-training restrictions.
Generate, preview, and export seamless PBR materials for Blender, Unity, and Unreal Engine—directly in your browser.
AI text-to-texture: type a prompt and get a seamless, tileable base image ready for PBR workflows (great starting point for materials).
Create a full PBR set (Normal, Roughness, AO, Metallic, etc.) from a single image. Seamless and tiling-friendly.
Instant WebGL viewer: inspect materials on a sphere, plane, and cube. Check tiling and lighting in real time.
Re-packages maps per engine: Unreal (BaseColor + ORM), Unity (Mask/MetallicSmoothness), Blender (separate channels).
PNG ↔ JPG ↔ SVG: fast convert, SVG rasterize, embed/trace options, quality & background controls.