Seamless 8K PBR 3D texture of window condensation drops on textured glass with subtle win…
Seamless texture (tileable) · PNG, WEBP, PBR ZIP. License: AITextured Free Commercial License (FCL) v1.1. Free personal and commercial use. Raw resale, standalone redistribution, mirroring/scraping, competing asset packs, and AI/ML training are not allowed without written permission. Attribution is not required, but appreciated..

| ID | seamless-8k-pbr-3d-texture-of-wire-glass-window-with-textured-glass-and-window-mullion-details |
|---|---|
| Category | Window |
| Formats | PNG, WEBP, PBR ZIP |
| Size | 1k (1024x1024px), 2k (2048x2048px), 4k (4096x4096px), 8k (8192x8192px) |
| Color | sRGB |
| Tileable | Yes |
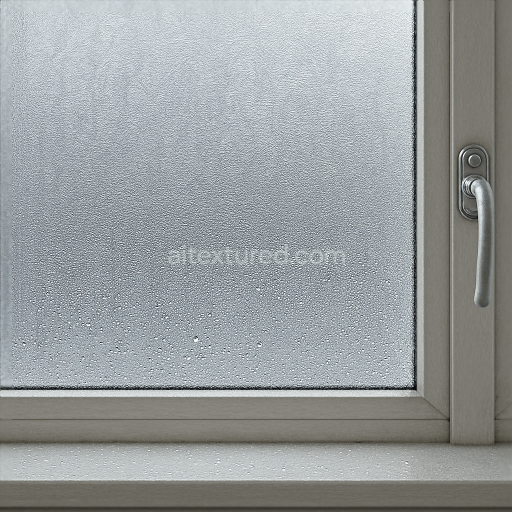
This seamless 8K PBR 3D texture intricately replicates a wire glass window featuring a robust composition of textured glass embedded with a fine wire mesh. The primary material is tempered glass chosen for its strength and safety properties fused with thin steel wires arranged in a geometric grid pattern that enhances both security and visual complexity. The glass surface exhibits a slightly frosted finish achieved through subtle etching or sandblasting which diffuses light while maintaining transparency. This textured glass substrate is supported by carefully modeled window mullions and grilles crafted from painted metal typically steel or aluminum with a matte to semi-gloss finish that reflects typical industrial window framing.
The texture accurately simulates the multi-layered structure of the window assembly. The glass layer’s BaseColor channel captures the faint greenish tint characteristic of industrial glass with embedded wire mesh rendered in a dark metallic tone. The Normal map defines the delicate embossing of the wire grid beneath the glass surface as well as the slight unevenness of the textured glass itself. Roughness values vary to distinguish between the matte finish of the textured glass and the smoother lightly reflective metal surfaces of the window mullions grilles and hardware elements. The Metallic channel highlights the steel components of the window frame and hardware including the window sill lock hinges and handle providing a realistic metallic sheen where appropriate.
The Ambient Occlusion map enhances the perception of depth and shadowing around the intricate wire mesh intersections and the recesses of the mullions and window hardware. Height or Displacement maps add subtle relief to the textured glass surface and the wire grid allowing for convincing parallax effects and enhanced tactile realism when rendered in high-detail environments. Weathering effects are minimal but present with slight oxidation and wear on the metal parts to suggest natural aging without detracting from the industrial aesthetic.
Designed for seamless tiling this texture is optimized for use in Blender Unreal Engine and Unity supporting high-fidelity architectural visualization and game asset workflows. The 8K resolution ensures crisp detail even on large surfaces making it ideal for close-up renders or VR applications. For practical use adjusting the UV scale to maintain realistic proportions of the wire mesh and mullions is recommended. Additionally fine-tuning the Roughness map can help balance the reflectivity between glass and metal while blending Height and Normal maps can enhance depth perception without over-exaggerating surface irregularities.
Import the texture maps into Blender with sRGB color space for albedo/base color and Non-Color for normal, roughness, metallic, AO, height, and ORM maps. Connect normal maps through a Normal Map node, then adjust UV scale with a Mapping node so the material repeats naturally on your model.
For the full step-by-step setup, see How to Use Seamless Textures in Blender. Browse related material examples in wood, concrete, and metal.
Yes. This texture is designed as a seamless tileable PBR material, so it can repeat across large surfaces without visible borders.
You can download PNG/WEBP versions and use 1K, 2K, 4K and 8K download options when available on the page.
Yes. The download options and engine-mapped ZIP workflow are designed for Blender, Unreal Engine, Unity Standard, URP and HDRP material pipelines.
Yes. The texture is available under the AITextured free commercial license. Review the license page for redistribution and AI-training restrictions.
Generate, preview, and export seamless PBR materials for Blender, Unity, and Unreal Engine—directly in your browser.
AI text-to-texture: type a prompt and get a seamless, tileable base image ready for PBR workflows (great starting point for materials).
Create a full PBR set (Normal, Roughness, AO, Metallic, etc.) from a single image. Seamless and tiling-friendly.
Instant WebGL viewer: inspect materials on a sphere, plane, and cube. Check tiling and lighting in real time.
Re-packages maps per engine: Unreal (BaseColor + ORM), Unity (Mask/MetallicSmoothness), Blender (separate channels).
PNG ↔ JPG ↔ SVG: fast convert, SVG rasterize, embed/trace options, quality & background controls.