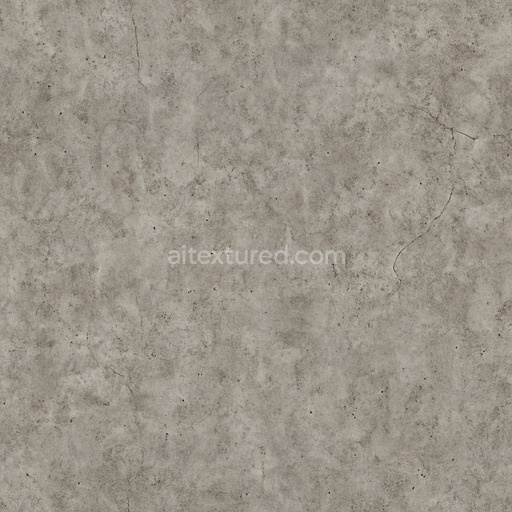
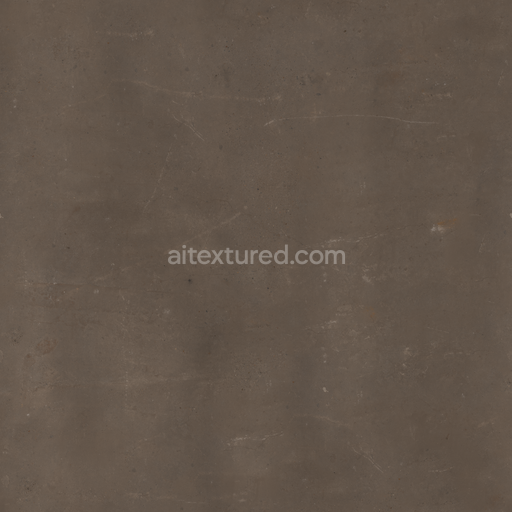
Weathered Raw Concrete Seamless Texture
Seamless texture (tileable) · PNG, WEBP, PBR ZIP. License: AITextured Free Commercial License (FCL) v1.1. Free personal and commercial use. Raw resale, standalone redistribution, mirroring/scraping, competing asset packs, and AI/ML training are not allowed without written permission. Attribution is not required, but appreciated..

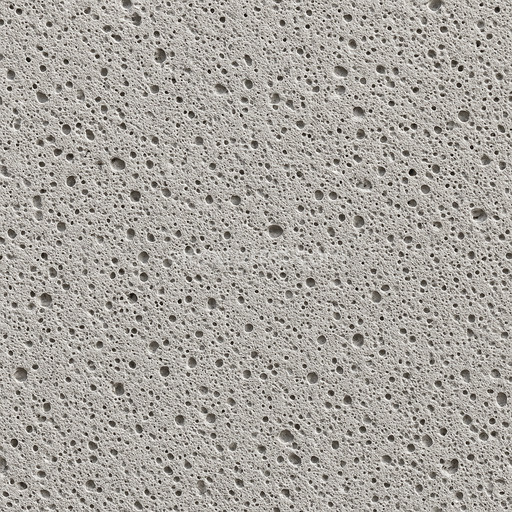
| ID | weathered-concrete-darkened-patches |
|---|---|
| Category | Concrete |
| Formats | PNG, WEBP, PBR ZIP |
| Size | 1k (1024x1024px), 2k (2048x2048px), 4k (4096x4096px), 8k (8192x8192px) |
| Color | sRGB |
| Tileable | Yes |
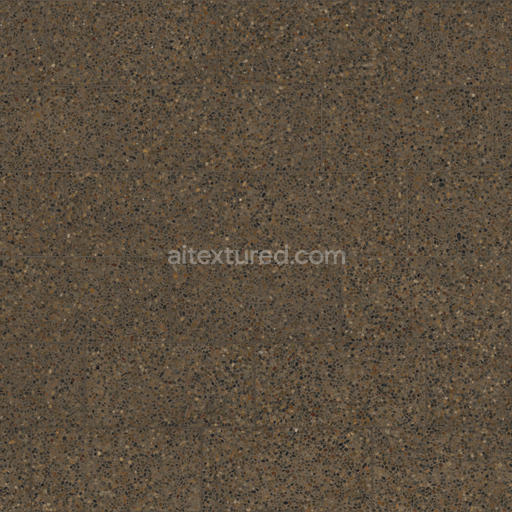
The Weathered Concrete Darkened Patches texture offers a meticulously crafted representation of aged concrete surfaces characterized by a mineral-rich cementitious base interspersed with fine aggregates and subtle fiber inclusions that mimic the original composite material. The surface exhibits natural porosity and weathering effects revealing darkened patches caused by prolonged exposure to environmental factors such as moisture dirt accumulation and oxidation of iron oxides within the concrete matrix. This texture captures the nuanced interplay between rough and smooth areas—where worn slightly polished cement contrasts with rougher more eroded sections—highlighting the material’s authentic weathered finish through a carefully balanced color palette of muted greys charcoal tones and faint ochre undertones. Pigment variations and oxide layers are visually encoded in the BaseColor/Albedo map while the Normal and Height/Displacement maps recreate the fine surface relief including cracks and pitted sections to add tactile depth and realism in 3D applications.
This premium seamless weathered concrete darkened patches texture comes with a comprehensive PBR map set designed for modern workflows ensuring exceptional clarity and cohesion even on large UV islands. The Roughness channel expertly modulates surface reflectivity reflecting the natural variation between matte porous areas and smoother more compacted patches while the Ambient Occlusion map enhances shadowing in crevices and recesses emphasizing structural detail without overpowering the material. The Metallic map remains minimal as concrete is inherently non-metallic preserving physical accuracy in renders. With support for resolutions up to 8K this tileable weathered concrete darkened patches texture maintains sharpness and fine detail for close-up shots and expansive real-time environments alike guaranteeing a high degree of realism and visual impact across different scales and perspectives.
Optimized for seamless integration with leading 3D software such as Blender Unreal Engine and Unity this PBR material weathered concrete darkened patches asset accelerates creative workflows by providing out-of-the-box compatibility and consistent results. Its seamless tiling capability ensures that repetition artifacts are eliminated preserving the natural randomness of weathered concrete surfaces without visible seams. To achieve optimal visual fidelity it is recommended to maintain consistent texel density and uniform UV mapping to prevent stretching or distortion. Additionally subtle tuning of the Roughness map can enhance the authenticity of darkened patches by varying glossiness levels while employing the Height/Displacement map with appropriate parallax settings significantly increases perceived surface depth and shadow interplay in both cinematic renders and real-time 3D preview scenes enriching material realism and environmental immersion.
Import the texture maps into Blender with sRGB color space for albedo/base color and Non-Color for normal, roughness, metallic, AO, height, and ORM maps. Connect normal maps through a Normal Map node, then adjust UV scale with a Mapping node so the material repeats naturally on your model.
For the full step-by-step setup, see How to Use Seamless Textures in Blender. Browse related material examples in wood, concrete, and metal.
Yes. This texture is designed as a seamless tileable PBR material, so it can repeat across large surfaces without visible borders.
You can download PNG/WEBP versions and use 1K, 2K, 4K and 8K download options when available on the page.
Yes. The download options and engine-mapped ZIP workflow are designed for Blender, Unreal Engine, Unity Standard, URP and HDRP material pipelines.
Yes. The texture is available under the AITextured free commercial license. Review the license page for redistribution and AI-training restrictions.


Generate, preview, and export seamless PBR materials for Blender, Unity, and Unreal Engine—directly in your browser.
AI text-to-texture: type a prompt and get a seamless, tileable base image ready for PBR workflows (great starting point for materials).
Create a full PBR set (Normal, Roughness, AO, Metallic, etc.) from a single image. Seamless and tiling-friendly.
Instant WebGL viewer: inspect materials on a sphere, plane, and cube. Check tiling and lighting in real time.
Re-packages maps per engine: Unreal (BaseColor + ORM), Unity (Mask/MetallicSmoothness), Blender (separate channels).
PNG ↔ JPG ↔ SVG: fast convert, SVG rasterize, embed/trace options, quality & background controls.