
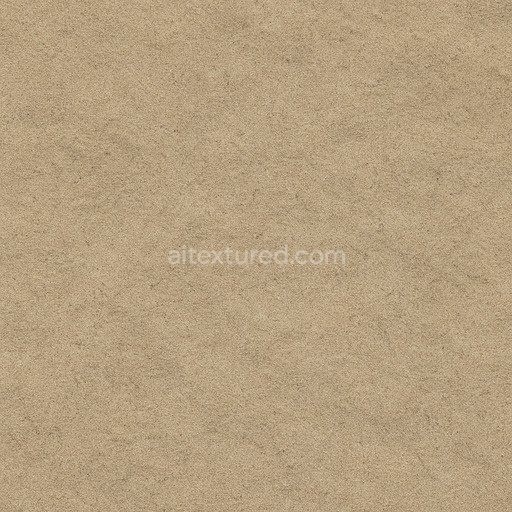
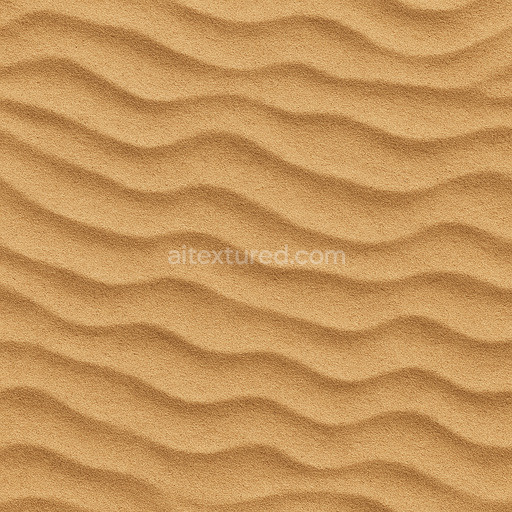
Photorealistic Sand Seamless Texture
Seamless texture (tileable) · PNG, WEBP, PBR ZIP. License: AITextured Free Commercial License (FCL) v1.1. Free personal and commercial use. Raw resale, standalone redistribution, mirroring/scraping, competing asset packs, and AI/ML training are not allowed without written permission. Attribution is not required, but appreciated..

| ID | rough-desert-sand-texture-seamless |
|---|---|
| Category | Sand-soil |
| Formats | PNG, WEBP, PBR ZIP |
| Size | 1k (1024x1024px), 2k (2048x2048px), 4k (4096x4096px), 8k (8192x8192px) |
| Color | sRGB |
| Tileable | Yes |
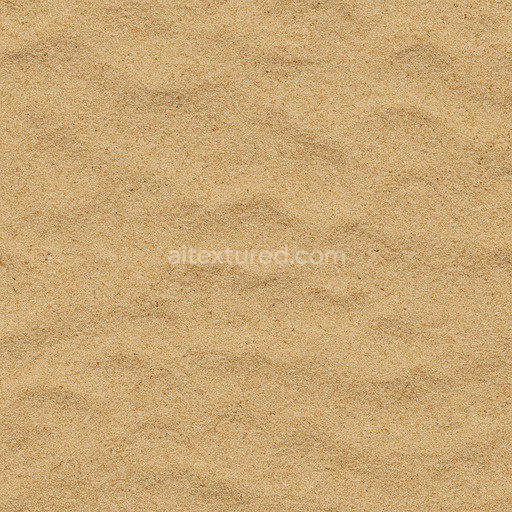
The rough desert sand texture seamless high resolution up to 8K presents a meticulously crafted AI-generated surface that authentically replicates the complex composition of arid sand-soil environments. At its foundation this texture simulates a granular mineral substrate primarily composed of fine quartz grains interspersed with subtle fragments of feldspar and mica. These mineral components are loosely bound to emulate the porous and weathered nature typical of desert terrain creating a natural roughness and unevenness in the surface. The finish is matte and coarse rather than polished capturing delicate ridges depressions and wind-sculpted erosion patterns that contribute to a highly realistic sun-bleached appearance. Warm earth tones ranging from soft ochres to muted tans reflect natural iron oxide staining and subtle mineral deposits adding nuanced color variation that enhances the authenticity of the sand-soil texture.
Designed for physically based rendering (PBR) workflows this tileable rough desert sand texture seamless high resolution up to 8K excels in delivering detailed BaseColor/Albedo maps that accurately represent the variegated hues of desert soil without oversaturation. The Normal channel emphasizes micro-relief highlighting the fine granular structure and shallow dune undulations to create convincing depth and tactile complexity under dynamic lighting conditions. Roughness maps capture the matte grainy surface finish with moderate variability balancing light diffusion to realistically simulate the dry coarse texture of desert sand. Metallic values remain minimal consistent with the non-metallic nature of the mineral substrate while Ambient Occlusion enhances subtle shadowing in grain crevices and depressions to reinforce volumetric depth. Height and Displacement maps provide precise elevation data ideal for parallax occlusion or tessellation techniques further elevating realism in 3D previews and cinematic scenes.
This PBR material rough desert sand texture seamless high resolution up to 8K is optimized for seamless tiling and scaling across large surfaces ensuring exceptional clarity and micro-detail retention even in close-up renders or expansive terrain models. It integrates smoothly into popular 3D software environments such as Blender Unreal Engine and Unity streamlining sand-soil material workflows and accelerating iteration cycles with a ready-to-use setup. For optimal results maintain consistent UV scaling to avoid texture stretching and adjust roughness parameters according to environmental lighting—lower roughness values can emphasize grain sharpness in bright sunlit scenes while higher values soften reflections for shadowed or overcast conditions enhancing overall realism.
The seamless rough desert sand texture in high resolution up to 8K provides a detailed PBR appearance that accurately captures the granular composition of sand-soil textures for realistic material rendering.
Import the texture maps into Blender with sRGB color space for albedo/base color and Non-Color for normal, roughness, metallic, AO, height, and ORM maps. Connect normal maps through a Normal Map node, then adjust UV scale with a Mapping node so the material repeats naturally on your model.
For the full step-by-step setup, see How to Use Seamless Textures in Blender. Browse related material examples in wood, concrete, and metal.
Yes. This texture is designed as a seamless tileable PBR material, so it can repeat across large surfaces without visible borders.
You can download PNG/WEBP versions and use 1K, 2K, 4K and 8K download options when available on the page.
Yes. The download options and engine-mapped ZIP workflow are designed for Blender, Unreal Engine, Unity Standard, URP and HDRP material pipelines.
Yes. The texture is available under the AITextured free commercial license. Review the license page for redistribution and AI-training restrictions.


Build, preview, and export seamless PBR materials. Generate full map sets from a single image, inspect them in a real-time WebGL viewer, and re-package maps for Unreal, Unity, and Blender—directly in your browser.
AI text-to-texture: type a prompt and get a seamless, tileable base image ready for PBR workflows (great starting point for materials).
Create a full PBR set (Normal, Roughness, AO, Metallic, etc.) from a single image. Seamless and tiling-friendly.
Instant WebGL viewer: inspect materials on a sphere, plane, and cube. Check tiling and lighting in real time.
Re-packages maps per engine: Unreal (BaseColor + ORM), Unity (Mask/MetallicSmoothness), Blender (separate channels).
PNG ↔ JPG ↔ SVG: fast convert, SVG rasterize, embed/trace options, quality & background controls.