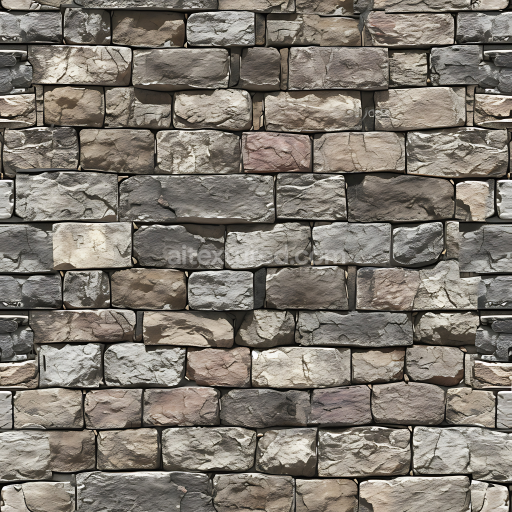
Stone Texture of Fractured Slate Rock Wall with Sharp Cracks and Layered Surfaces
Seamless texture (tileable) · PNG, WEBP, PBR ZIP. License: AITextured Free Commercial License (FCL) v1.1. Free personal and commercial use. Raw resale, standalone redistribution, mirroring/scraping, competing asset packs, and AI/ML training are not allowed without written permission. Attribution is not required, but appreciated..

| ID | gneiss-banded-metamorphic |
|---|---|
| Category | Stone |
| Formats | PNG, WEBP, PBR ZIP |
| Size | 1k (1024x1024px), 2k (2048x2048px), 4k (4096x4096px), 8k (8192x8192px) |
| Color | sRGB |
| Tileable | Yes |
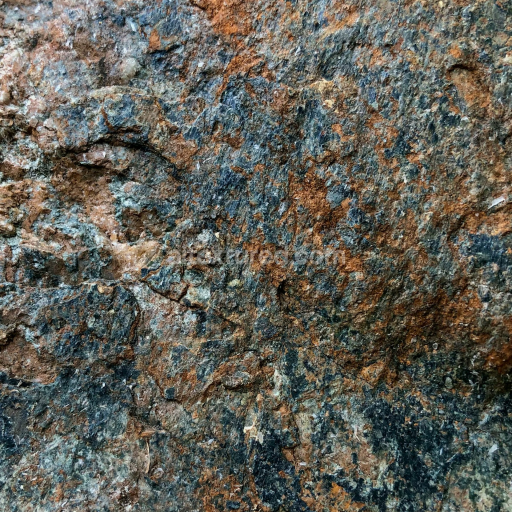
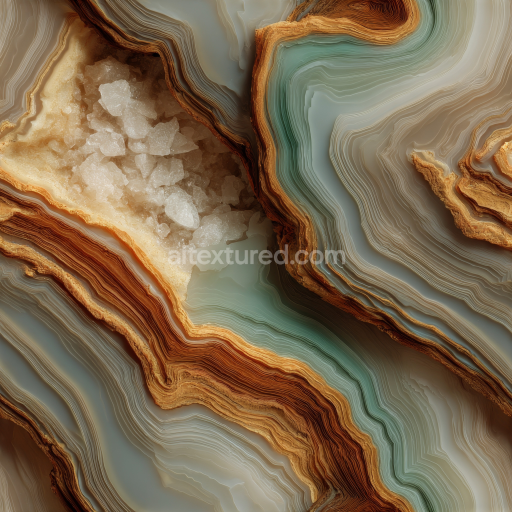
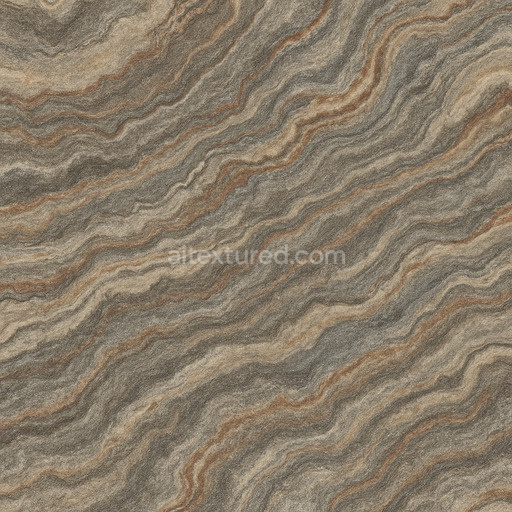
The gneiss banded metamorphic texture authentically captures the intricate natural composition of this durable stone renowned for its distinctive mineral layers and foliated grain orientation. Formed under intense heat and pressure deep within the Earth's crust gneiss exhibits alternating bands of quartz feldspar and mica minerals creating its signature striped pattern. This texture replicates the complex interplay of these mineral aggregates highlighting subtle variations in porosity and weathering that contribute to an authentic tactile stone surface. The finish balances a slightly polished sheen with naturally rugged coarse areas emphasizing the metamorphic rock’s unique textural depth and mineral stratification. Earthy colorants derived from mineral pigments and oxide layers produce a harmonious palette of warm grays muted browns and occasional flecks of white and black all meticulously rendered in the BaseColor/Albedo map for lifelike coloration and variation.
This seamless gneiss banded metamorphic texture is expertly crafted for physically based rendering workflows featuring a full PBR set that includes BaseColor/Albedo Normal Roughness Metallic Ambient Occlusion and Height/Displacement maps. The Normal map intricately captures the stone’s foliated grain orientation and micro-surface details enhancing the perception of depth and relief. Roughness values are carefully varied across the alternating mineral bands to simulate the interplay between polished and weathered surfaces while the Metallic channel remains minimal accurately reflecting gneiss’s non-metallic earthy nature. Ambient Occlusion subtly accentuates crevices and separations between layers adding realistic shadowing and light interaction. The Height/Displacement map delivers precise surface undulations that enhance tactile dimensionality ideal for close-up views and detailed renders. Rendered at up to 8K resolution this tileable gneiss banded metamorphic PBR texture ensures exceptional detail retention across large surfaces without visible repetition preserving consistent natural banding and mineral patterns throughout.
Designed for seamless integration into popular 3D software such as Blender Unreal Engine and Unity this stone texture provides a versatile solution for architectural visualization game environments and interior staging projects demanding authentic natural stone aesthetics. To optimize realism it is recommended to adjust the UV scale carefully to align the banded pattern proportionally with your scene’s dimensions preventing distortion or unnatural scaling of the foliated layers. Additionally fine-tuning the roughness and height map intensities allows customization of the stone’s reflective qualities and surface relief adapting the texture to specific lighting conditions and project requirements. Whether applied to expansive rocky terrains or detailed interior stone surfaces this seamless gneiss banded metamorphic texture delivers professional-grade material fidelity elevating your 3D visualizations with consistent high-resolution detail and a true-to-life 3D preview experience.
Import the texture maps into Blender with sRGB color space for albedo/base color and Non-Color for normal, roughness, metallic, AO, height, and ORM maps. Connect normal maps through a Normal Map node, then adjust UV scale with a Mapping node so the material repeats naturally on your model.
For the full step-by-step setup, see How to Use Seamless Textures in Blender. Browse related material examples in wood, concrete, and metal.
Yes. This texture is designed as a seamless tileable PBR material, so it can repeat across large surfaces without visible borders.
You can download PNG/WEBP versions and use 1K, 2K, 4K and 8K download options when available on the page.
Yes. The download options and engine-mapped ZIP workflow are designed for Blender, Unreal Engine, Unity Standard, URP and HDRP material pipelines.
Yes. The texture is available under the AITextured free commercial license. Review the license page for redistribution and AI-training restrictions.

Build, preview, and export seamless PBR materials. Generate full map sets from a single image, inspect them in a real-time WebGL viewer, and re-package maps for Unreal, Unity, and Blender—directly in your browser.
AI text-to-texture: type a prompt and get a seamless, tileable base image ready for PBR workflows (great starting point for materials).
Create a full PBR set (Normal, Roughness, AO, Metallic, etc.) from a single image. Seamless and tiling-friendly.
Instant WebGL viewer: inspect materials on a sphere, plane, and cube. Check tiling and lighting in real time.
Re-packages maps per engine: Unreal (BaseColor + ORM), Unity (Mask/MetallicSmoothness), Blender (separate channels).
PNG ↔ JPG ↔ SVG: fast convert, SVG rasterize, embed/trace options, quality & background controls.