
Fluted Geometric Floor Texture
Seamless texture (tileable) · PNG, WEBP, PBR ZIP. License: AITextured Free Commercial License (FCL) v1.1. Free personal and commercial use. Raw resale, standalone redistribution, mirroring/scraping, competing asset packs, and AI/ML training are not allowed without written permission. Attribution is not required, but appreciated..

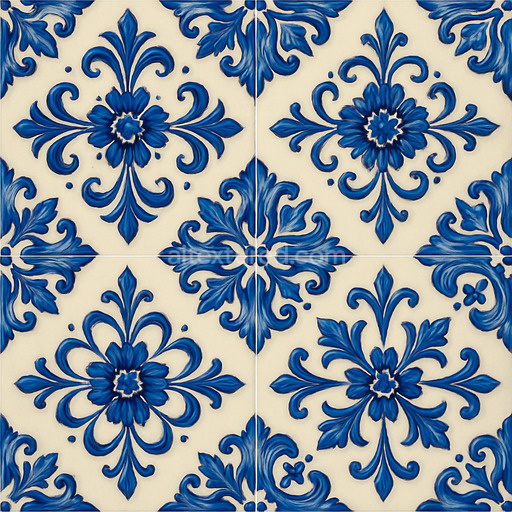
| ID | dirty-glazed-ceramic-tile-texture-seamless |
|---|---|
| Category | Ceramic-tile |
| Formats | PNG, WEBP, PBR ZIP |
| Size | 1k (1024x1024px), 2k (2048x2048px), 4k (4096x4096px), 8k (8192x8192px) |
| Color | sRGB |
| Tileable | Yes |
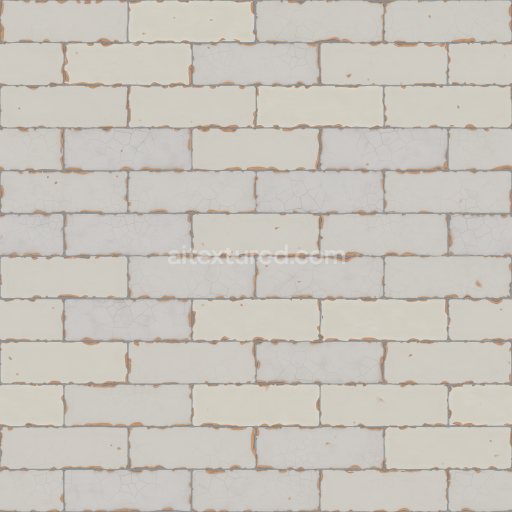
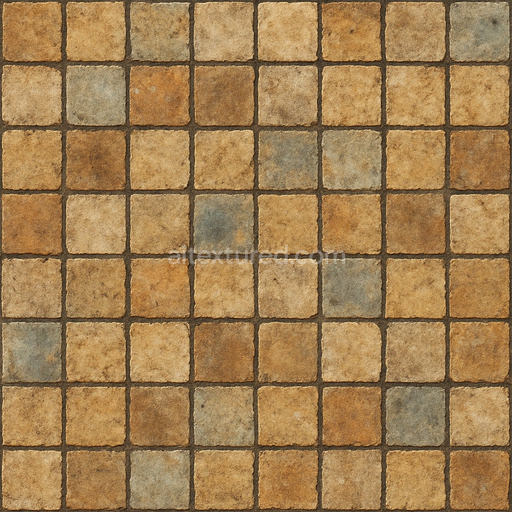
This seamless dirty glazed ceramic tile texture in high resolution up to 8K masterfully captures the intricate materials and composition characteristic of traditional ceramic tiles with a weathered slightly soiled surface. The base substrate consists of a dense mineral-rich ceramic body primarily composed of fine clays and silica which undergoes carefully controlled firing processes to develop a durable vitrified structure. This foundation is coated with a glazed layer formed from a glassy oxide matrix containing metal pigments and colorants lending the tile its distinctive reflective sheen and subtle translucency. The surface finish presents natural signs of wear and age including uneven dirt accumulation gentle abrasion and micro-cracks that highlight the porosity and texture variations typical of well-used ceramic tiles. These intricate details contribute depth and realism to the texture enhancing its appeal for realistic architectural and environmental visualization.
In terms of physically based rendering (PBR) channels the tileable dirty glazed ceramic tile texture seamless high resolution up to 8K is expertly designed to provide maximum detail and realism. The BaseColor/Albedo map features muted earth tones interspersed with natural dirt spots reflecting the aged and slightly soiled appearance. The Normal map conveys fine surface undulations glaze imperfections and subtle cracks enhancing tactile realism under varied lighting. Roughness maps balance glossy glazed patches against matte worn areas where dirt has dulled the surface while the Metallic channel remains minimal consistent with ceramic’s non-metallic nature. Ambient Occlusion and Height maps add depth by accentuating grout lines and surface texture allowing for nuanced 3D preview and interaction with light. This advanced PBR texture dirty glazed ceramic tile texture seamless high resolution up to 8K supports detailed repeatable patterns that scale flawlessly across large surfaces without visible seams making it ideal for use in Blender Unreal Engine Unity and other industry-standard 3D tools.
With an exceptionally high resolution of up to 8K this seamless dirty glazed ceramic tile texture enables close-up renders that maintain crisp detail and natural appearance even under intense scrutiny. The combination of subtle dirt and glaze wear creates a convincing aged ceramic look while preserving a clean overall aesthetic. For optimal application it is recommended to carefully adjust the UV scale to maintain realistic tile proportions within your scene. Additionally fine-tuning the Roughness channel can help balance the reflective wet-glazed areas against the rougher dirtier patches enhancing authenticity. Incorporating this tileable dirty glazed ceramic tile texture seamless high resolution up to 8K into your material library streamlines workflow efficiency and delivers high-quality render results perfectly suited for modern 3D visualization and real-time engine environments.
Import the texture maps into Blender with sRGB color space for albedo/base color and Non-Color for normal, roughness, metallic, AO, height, and ORM maps. Connect normal maps through a Normal Map node, then adjust UV scale with a Mapping node so the material repeats naturally on your model.
For the full step-by-step setup, see How to Use Seamless Textures in Blender. Browse related material examples in wood, concrete, and metal.
Yes. This texture is designed as a seamless tileable PBR material, so it can repeat across large surfaces without visible borders.
You can download PNG/WEBP versions and use 1K, 2K, 4K and 8K download options when available on the page.
Yes. The download options and engine-mapped ZIP workflow are designed for Blender, Unreal Engine, Unity Standard, URP and HDRP material pipelines.
Yes. The texture is available under the AITextured free commercial license. Review the license page for redistribution and AI-training restrictions.


Generate, preview, and export seamless PBR materials for Blender, Unity, and Unreal Engine—directly in your browser.
AI text-to-texture: type a prompt and get a seamless, tileable base image ready for PBR workflows (great starting point for materials).
Create a full PBR set (Normal, Roughness, AO, Metallic, etc.) from a single image. Seamless and tiling-friendly.
Instant WebGL viewer: inspect materials on a sphere, plane, and cube. Check tiling and lighting in real time.
Re-packages maps per engine: Unreal (BaseColor + ORM), Unity (Mask/MetallicSmoothness), Blender (separate channels).
PNG ↔ JPG ↔ SVG: fast convert, SVG rasterize, embed/trace options, quality & background controls.