Seamless Carpet 004 by Textures - PBR 3D Texture (8K ready)
Seamless texture (tileable) · PNG, WEBP, PBR ZIP. License: AITextured Free Commercial License (FCL) v1.1. Free personal and commercial use. Raw resale, standalone redistribution, mirroring/scraping, competing asset packs, and AI/ML training are not allowed without written permission. Attribution is not required, but appreciated..

| ID | woven-reed-or-ratten-wicker-texture-free-pbr |
|---|---|
| Category | Fabric |
| Formats | PNG, WEBP, PBR ZIP |
| Size | 1k (1024x1024px), 2k (2048x2048px), 4k (4096x4096px), 8k (8192x8192px) |
| Color | sRGB |
| Tileable | Yes |
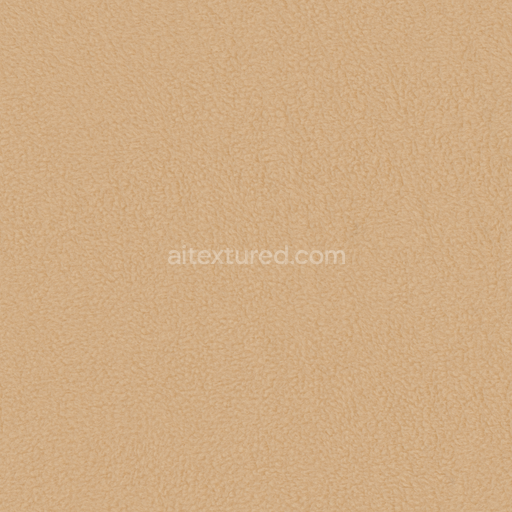
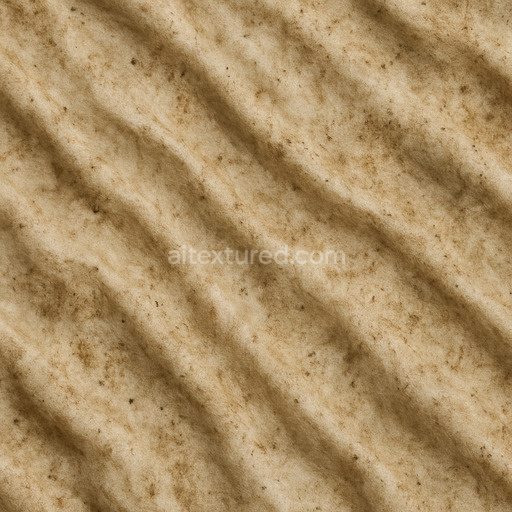
This woven reed or ratten wicker texture showcases the intricate interlacing of natural organic fibers commonly derived from reeds or similar plant materials. The base substrate consists of slender, flexible strands of reed, tightly woven to create a durable yet breathable surface. This natural fiber composition provides subtle variations in color and texture due to the inherent porosity and occasional weathering effects, such as slight fraying or discoloration from exposure to sunlight and moisture. The surface finish appears matte with a lightly textured, fibrous feel, reflecting the natural appearance of untreated or minimally processed wickerwork. The coloration typically ranges from pale beige to warm honey tones, with soft gradients caused by natural pigments within the reeds and occasional darker accents from aging or environmental exposure.
In the PBR workflow, these material characteristics translate into multiple texture maps to ensure photorealistic rendering. The BaseColor (Albedo) channel captures the nuanced, warm hues and subtle tonal variations inherent in the woven fibers. The Normal map emphasizes the three-dimensional weave pattern, highlighting the raised ridges and interlaced strands for enhanced surface detail. Roughness values are moderately high, reflecting the fibrous, non-glossy finish of natural wicker, which scatters light softly without sharp reflections. The Metallic channel remains close to zero, as organic fibers lack metallic properties. Ambient Occlusion maps add depth to the intersections of the weave, intensifying the perception of shadows cast by overlapping strands. Height or Displacement maps provide accurate relief, enabling realistic surface bumps and subtle undulations that replicate the unevenness of handcrafted wicker.
Rendered at up to 8K resolution, this seamless texture is optimized for use in popular 3D engines such as Blender, Unreal Engine, and Unity. Its high fidelity ensures crisp close-up details suitable for interior design visualizations, furniture modeling, and environmental asset creation. A practical tip for optimal results involves adjusting the UV scale to maintain the natural density of the weave pattern, preventing distortion or blurring when applied to larger surfaces. Additionally, fine-tuning the roughness parameter can simulate different finishes—from freshly woven and clean to weathered and aged—to better match the desired scene ambiance or lighting conditions. This detailed PBR texture provides a versatile and realistic material solution for any project requiring authentic woven reed or ratten wicker surfaces.
Import the texture maps into Blender with sRGB color space for albedo/base color and Non-Color for normal, roughness, metallic, AO, height, and ORM maps. Connect normal maps through a Normal Map node, then adjust UV scale with a Mapping node so the material repeats naturally on your model.
For the full step-by-step setup, see How to Use Seamless Textures in Blender. Browse related material examples in wood, concrete, and metal.
Yes. This texture is designed as a seamless tileable PBR material, so it can repeat across large surfaces without visible borders.
You can download PNG/WEBP versions and use 1K, 2K, 4K and 8K download options when available on the page.
Yes. The download options and engine-mapped ZIP workflow are designed for Blender, Unreal Engine, Unity Standard, URP and HDRP material pipelines.
Yes. The texture is available under the AITextured free commercial license. Review the license page for redistribution and AI-training restrictions.


Build, preview, and export seamless PBR materials. Generate full map sets from a single image, inspect them in a real-time WebGL viewer, and re-package maps for Unreal, Unity, and Blender—directly in your browser.
AI text-to-texture: type a prompt and get a seamless, tileable base image ready for PBR workflows (great starting point for materials).
Create a full PBR set (Normal, Roughness, AO, Metallic, etc.) from a single image. Seamless and tiling-friendly.
Instant WebGL viewer: inspect materials on a sphere, plane, and cube. Check tiling and lighting in real time.
Re-packages maps per engine: Unreal (BaseColor + ORM), Unity (Mask/MetallicSmoothness), Blender (separate channels).
PNG ↔ JPG ↔ SVG: fast convert, SVG rasterize, embed/trace options, quality & background controls.