
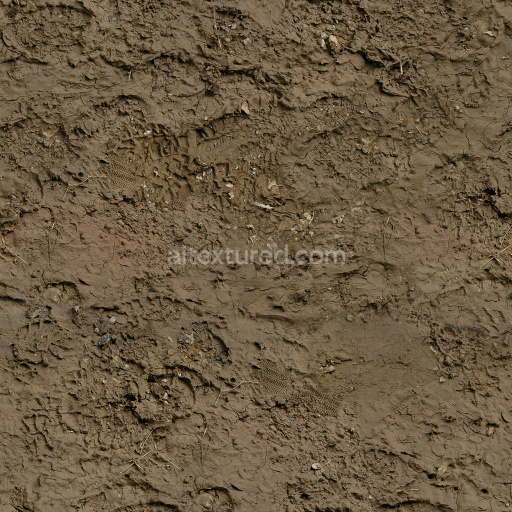
Hand Painted Stylized Dirt Floor Ground Grounding - Seamless PBR Texture
Seamless texture (tileable) · PNG, WEBP, PBR ZIP. License: AITextured Free Commercial License (FCL) v1.1. Free personal and commercial use. Raw resale, standalone redistribution, mirroring/scraping, competing asset packs, and AI/ML training are not allowed without written permission. Attribution is not required, but appreciated..

| ID | sandy-seashore-ground-texture-with-water-puddles-free-pbr |
|---|---|
| Category | Ground surface |
| Formats | PNG, WEBP, PBR ZIP |
| Size | 1k (1024x1024px), 2k (2048x2048px), 4k (4096x4096px), 8k (8192x8192px) |
| Color | sRGB |
| Tileable | Yes |
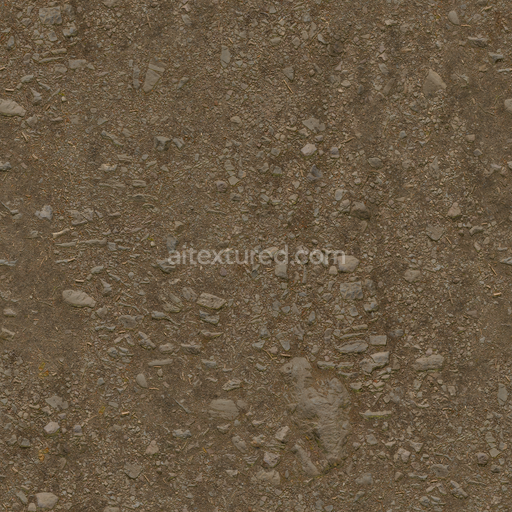
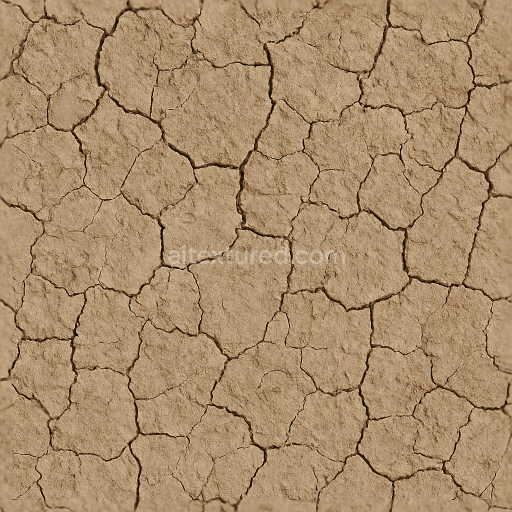
This sandy seashore ground texture features a finely detailed composition of natural mineral grains and organic sediments, characteristic of coastal environments where water and earth converge. The base substrate consists primarily of compacted quartz sand mixed with small shell fragments and organic matter, bound together by natural moisture and subtle clay particles that act as mild adhesives. The texture’s surface exhibits slight porosity and weathering effects from tidal movements, creating varied pockets where water puddles collect and reflect ambient light. The color palette includes warm beige and soft tan hues, with subtle variations caused by mineral oxide layers and occasional darker organic deposits, contributing to a realistic and inviting shoreline appearance.
In the PBR channels, the BaseColor/Albedo map captures the nuanced sandy tones and subtle wet areas where water puddles shimmer, enhancing the authenticity of the surface. The Normal map reveals the intricate grain orientation and micro-relief of the sand and shell fragments, adding depth to the texture’s tactile feel. The Roughness map balances matte and glossy areas, simulating dry sand’s coarse finish alongside the smooth, reflective puddles of water. The Metallic channel remains minimal, as natural sand and organic material have negligible metallic properties, while Ambient Occlusion enhances shadowed crevices between grains and around puddles. The Height/Displacement map effectively portrays the shallow undulations and small depressions caused by water pooling and wind erosion, making it ideal for detailed surface displacement in 3D rendering.
Rendered in up to 8K resolution, this texture is optimized for seamless tiling and versatile use across multiple platforms, including Blender, Unreal Engine, and Unity. Its realistic detailing and physically based properties make it suitable for a wide range of environments, from game landscapes and architectural visualizations to virtual reality coastal scenes. For best results, users should adjust UV scale to match the intended scene scale, ensuring the grain size appears natural, and fine-tune the roughness parameter to enhance wetness on puddle surfaces, creating a convincing interplay of light and shadow on the shoreline.
Import the texture maps into Blender with sRGB color space for albedo/base color and Non-Color for normal, roughness, metallic, AO, height, and ORM maps. Connect normal maps through a Normal Map node, then adjust UV scale with a Mapping node so the material repeats naturally on your model.
For the full step-by-step setup, see How to Use Seamless Textures in Blender. Browse related material examples in wood, concrete, and metal.
Yes. This texture is designed as a seamless tileable PBR material, so it can repeat across large surfaces without visible borders.
You can download PNG/WEBP versions and use 1K, 2K, 4K and 8K download options when available on the page.
Yes. The download options and engine-mapped ZIP workflow are designed for Blender, Unreal Engine, Unity Standard, URP and HDRP material pipelines.
Yes. The texture is available under the AITextured free commercial license. Review the license page for redistribution and AI-training restrictions.

Generate, preview, and export seamless PBR materials for Blender, Unity, and Unreal Engine—directly in your browser.
AI text-to-texture: type a prompt and get a seamless, tileable base image ready for PBR workflows (great starting point for materials).
Create a full PBR set (Normal, Roughness, AO, Metallic, etc.) from a single image. Seamless and tiling-friendly.
Instant WebGL viewer: inspect materials on a sphere, plane, and cube. Check tiling and lighting in real time.
Re-packages maps per engine: Unreal (BaseColor + ORM), Unity (Mask/MetallicSmoothness), Blender (separate channels).
PNG ↔ JPG ↔ SVG: fast convert, SVG rasterize, embed/trace options, quality & background controls.