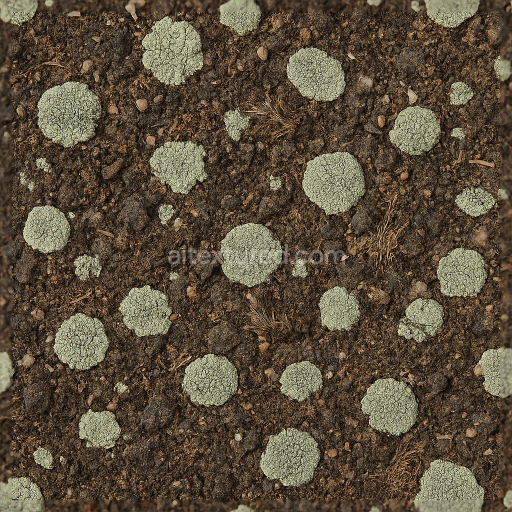
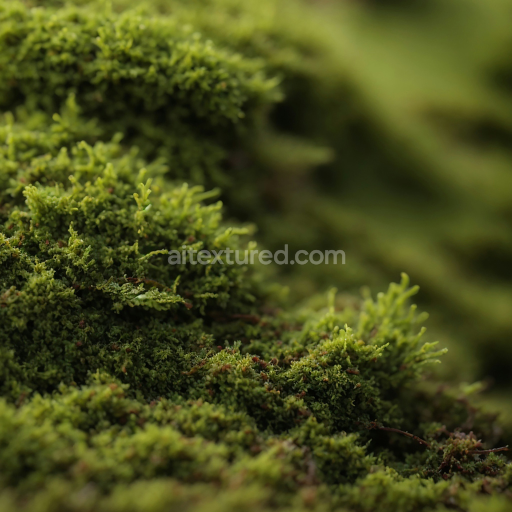
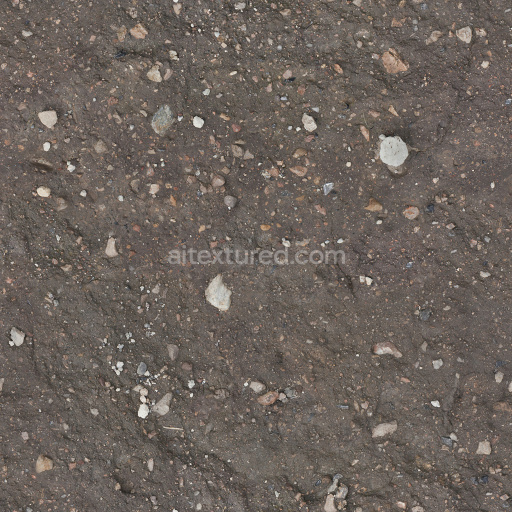
Lichen Crust Ground Surface With Lichen Patches And Organic Debris
Seamless texture (tileable) · PNG, WEBP, PBR ZIP. License: AITextured Free Commercial License (FCL) v1.1. Free personal and commercial use. Raw resale, standalone redistribution, mirroring/scraping, competing asset packs, and AI/ML training are not allowed without written permission. Attribution is not required, but appreciated..

| ID | seamless-3d-texture-pbr-8k-of-peat-moss-ground-with-lichen-spots-and-organic-debris |
|---|---|
| Category | Ground surface |
| Formats | PNG, WEBP, PBR ZIP |
| Size | 1k (1024x1024px), 2k (2048x2048px), 4k (4096x4096px), 8k (8192x8192px) |
| Color | sRGB |
| Tileable | Yes |
This high-quality seamless 3D texture at an impressive 8K resolution captures the intricate details of peat moss ground richly layered with lichen spots and scattered organic debris such as leaf litter and dead leaves. The base substrate is predominantly composed of organic peat material characterized by its porous fibrous structure formed from decayed vegetation accumulated over time in wetland environments. This natural matrix is bound together by a combination of moss carpet fibers and lichen crusts which add varied textures and subtle color variations ranging from deep earthy browns and greens to pale grayish lichen tones. The surface finish appears naturally weathered and slightly rough reflecting the damp uneven quality of forest floor and wetland ground surfaces. Pigments within the organic matter and lichen contribute to the nuanced base color while scattered debris introduces irregularities that enhance realism and visual complexity.
The photorealistic PBR material channels are meticulously crafted to reflect these physical characteristics. The BaseColor/Albedo map displays the rich variation in moss greens peat browns and lichen grays without any baked-in shadows or highlights ensuring versatility under different lighting conditions. The Normal map emphasizes the fine fibrous texture of the moss carpet and the crusty cracked surfaces of the lichen spots providing depth and tactile detail. Roughness values vary naturally across the texture with damp moss areas appearing glossier and the lichen and organic debris presenting a more matte rough finish. The Metallic channel remains minimal or black consistent with the organic non-metallic composition. Ambient Occlusion enhances subtle crevices and depressions adding depth especially where leaf litter and peat intersect while Height/Displacement maps outline the uneven terrain useful for parallax effects in real-time engines.
Designed for seamless tiling this texture integrates flawlessly into 3D environments making it ideal for realistic forest floors wetlands or natural ground surfaces in Blender Unreal Engine and Unity projects. Its neutral flat lighting and absence of shadows or text ensure maximum adaptability across various scene setups. For optimal results adjusting the UV scale to replicate natural moss patch sizes and fine-tuning roughness values can help achieve specific moisture or weathering effects. Utilizing the height map for subtle parallax displacement will enhance the three-dimensional feel especially in close-up renders or interactive applications. This 8K peat moss seamless PBR texture offers a versatile richly detailed solution for artists and developers seeking authenticity and refinement in natural environment materials.
Import the texture maps into Blender with sRGB color space for albedo/base color and Non-Color for normal, roughness, metallic, AO, height, and ORM maps. Connect normal maps through a Normal Map node, then adjust UV scale with a Mapping node so the material repeats naturally on your model.
For the full step-by-step setup, see How to Use Seamless Textures in Blender. Browse related material examples in wood, concrete, and metal.
Yes. This texture is designed as a seamless tileable PBR material, so it can repeat across large surfaces without visible borders.
You can download PNG/WEBP versions and use 1K, 2K, 4K and 8K download options when available on the page.
Yes. The download options and engine-mapped ZIP workflow are designed for Blender, Unreal Engine, Unity Standard, URP and HDRP material pipelines.
Yes. The texture is available under the AITextured free commercial license. Review the license page for redistribution and AI-training restrictions.

Generate, preview, and export seamless PBR materials for Blender, Unity, and Unreal Engine—directly in your browser.
AI text-to-texture: type a prompt and get a seamless, tileable base image ready for PBR workflows (great starting point for materials).
Create a full PBR set (Normal, Roughness, AO, Metallic, etc.) from a single image. Seamless and tiling-friendly.
Instant WebGL viewer: inspect materials on a sphere, plane, and cube. Check tiling and lighting in real time.
Re-packages maps per engine: Unreal (BaseColor + ORM), Unity (Mask/MetallicSmoothness), Blender (separate channels).
PNG ↔ JPG ↔ SVG: fast convert, SVG rasterize, embed/trace options, quality & background controls.