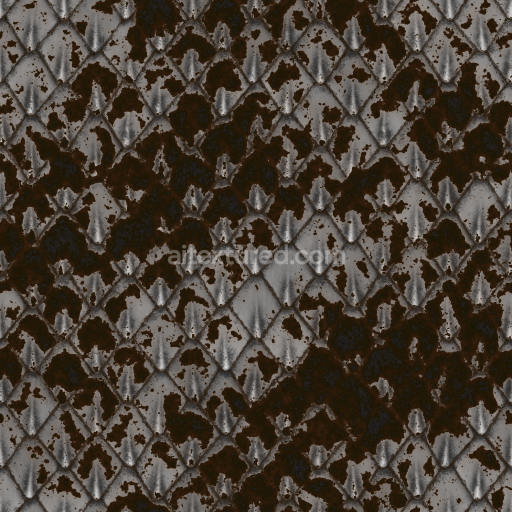
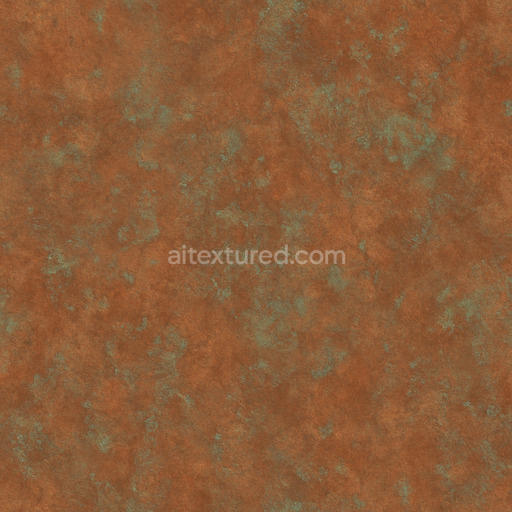
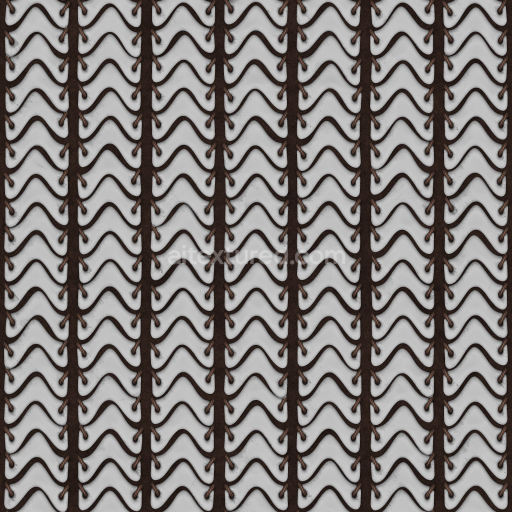
Black Brushed Steel Tile PBR Texture with Varied Grain Patterns
Seamless texture (tileable) · PNG, WEBP, PBR ZIP. License: AITextured Free Commercial License (FCL) v1.1. Free personal and commercial use. Raw resale, standalone redistribution, mirroring/scraping, competing asset packs, and AI/ML training are not allowed without written permission. Attribution is not required, but appreciated..

| ID | rusty-metal-treadplate-texture-with-classic-pattern-free-pbr |
|---|---|
| Category | Metal |
| Formats | PNG, WEBP, PBR ZIP |
| Size | 1k (1024x1024px), 2k (2048x2048px), 4k (4096x4096px), 8k (8192x8192px) |
| Color | sRGB |
| Tileable | Yes |
This high-quality rusty metal treadplate texture features a classic diamond plate pattern, expertly capturing the rugged industrial aesthetic of oxidized steel surfaces. The base substrate is a durable metal, typically steel or iron, which has undergone natural weathering and corrosion due to prolonged exposure to moisture and air. This exposure results in a heavily oxidized surface finish characterized by rough patches, subtle pitting, and visible porosity that reveals the material’s age and wear. The distinctive rusty coloration derives from iron oxide pigments, presenting a range of tones from deep reds to rich browns that combine to form an authentic, timeworn appearance typical of aged industrial metal plates.
Within the physically based rendering (PBR) workflow, the texture’s composition is meticulously represented across multiple channels to simulate realistic material behavior. The BaseColor (Albedo) channel displays the diffuse rust hues intertwined with the classic diamond treadplate pattern, showcasing the complex interaction between corroded and exposed metal areas. The Normal map emphasizes the raised diamond shapes and surface irregularities caused by corrosion and mechanical wear, adding pronounced depth and tactile detail. Roughness values vary naturally, with oxidized regions exhibiting higher roughness for a matte, weathered effect, while less corroded metal patches appear smoother and slightly reflective. The Metallic channel conveys the inherent reflectivity of the metal, which diminishes in rusted portions but still contributes subtle specular highlights. Ambient Occlusion enhances the perception of shadows within crevices and recesses of the plate pattern, while Height or Displacement maps accentuate the relief of the raised diamonds and surface imperfections, enriching the overall realism.
Rendered at up to 8K resolution, this seamless texture ensures crisp detail suitable for large-scale applications and close-up views. It is fully optimized for compatibility with major 3D software platforms such as Blender, Unreal Engine, and Unity, providing reliable performance and realistic material responses across diverse lighting environments. For practical use, adjusting the UV scale is recommended to balance the treadplate pattern size relative to your 3D model, which significantly enhances the visual authenticity of the rusted metal surface. Additionally, fine-tuning the roughness channel can simulate various environmental conditions—for example, lowering roughness slightly to mimic wet or recently cleaned metal surfaces improves visual impact without compromising the weathered character.
Import the texture maps into Blender with sRGB color space for albedo/base color and Non-Color for normal, roughness, metallic, AO, height, and ORM maps. Connect normal maps through a Normal Map node, then adjust UV scale with a Mapping node so the material repeats naturally on your model.
For the full step-by-step setup, see How to Use Seamless Textures in Blender. Browse related material examples in wood, concrete, and metal.
Yes. This texture is designed as a seamless tileable PBR material, so it can repeat across large surfaces without visible borders.
You can download PNG/WEBP versions and use 1K, 2K, 4K and 8K download options when available on the page.
Yes. The download options and engine-mapped ZIP workflow are designed for Blender, Unreal Engine, Unity Standard, URP and HDRP material pipelines.
Yes. The texture is available under the AITextured free commercial license. Review the license page for redistribution and AI-training restrictions.

Build, preview, and export seamless PBR materials. Generate full map sets from a single image, inspect them in a real-time WebGL viewer, and re-package maps for Unreal, Unity, and Blender—directly in your browser.
AI text-to-texture: type a prompt and get a seamless, tileable base image ready for PBR workflows (great starting point for materials).
Create a full PBR set (Normal, Roughness, AO, Metallic, etc.) from a single image. Seamless and tiling-friendly.
Instant WebGL viewer: inspect materials on a sphere, plane, and cube. Check tiling and lighting in real time.
Re-packages maps per engine: Unreal (BaseColor + ORM), Unity (Mask/MetallicSmoothness), Blender (separate channels).
PNG ↔ JPG ↔ SVG: fast convert, SVG rasterize, embed/trace options, quality & background controls.