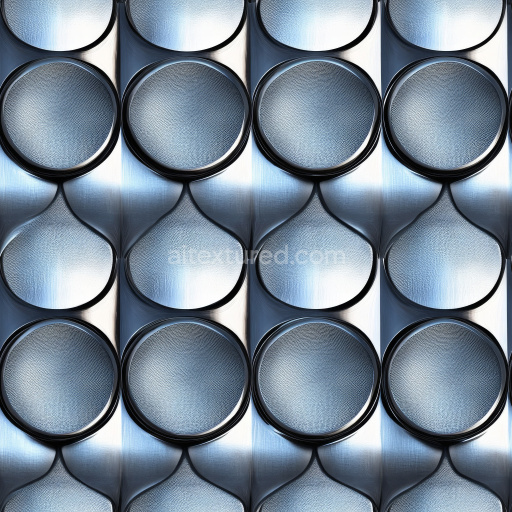
Steel Metal PBR Texture Featuring Patterned Embossed Circular Plates
Seamless texture (tileable) · PNG, WEBP, PBR ZIP. License: AITextured Free Commercial License (FCL) v1.1. Free personal and commercial use. Raw resale, standalone redistribution, mirroring/scraping, competing asset packs, and AI/ML training are not allowed without written permission. Attribution is not required, but appreciated..

| ID | wavy-corrugated-metal-plate-with-rivets-free-pbr |
|---|---|
| Category | Metal |
| Formats | PNG, WEBP, PBR ZIP |
| Size | 1k (1024x1024px), 2k (2048x2048px), 4k (4096x4096px), 8k (8192x8192px) |
| Color | sRGB |
| Tileable | Yes |
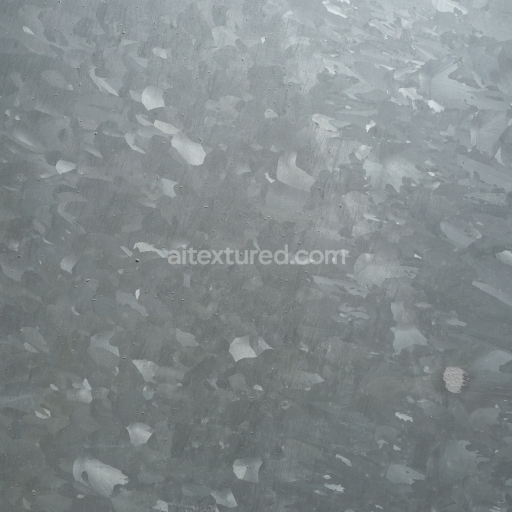
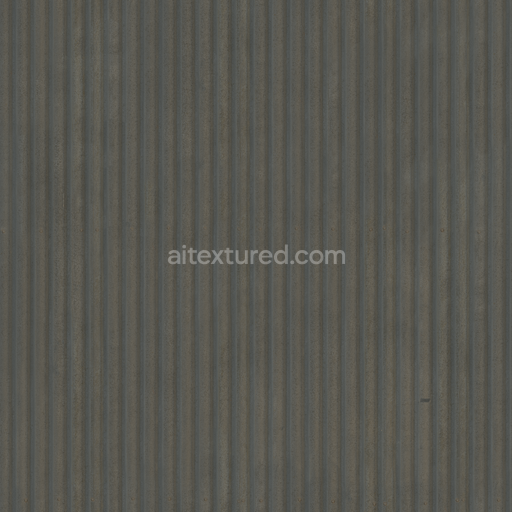
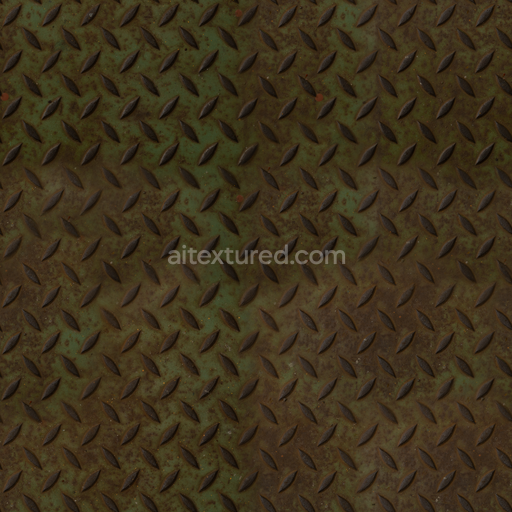
This Wavy Corrugated Metal Plate texture is a meticulously crafted PBR material designed to authentically represent an aged industrial metal surface. The base substrate consists of a durable metal alloy, chosen for its robust structural properties and resistance to wear. The surface features thin, wavy corrugations that provide enhanced rigidity and characteristic industrial aesthetics. Evenly spaced rivets punctuate the metal plate, each exhibiting subtle signs of natural oxidation and wear that reflect years of exposure to environmental elements. The finish balances polished metallic areas with patches of slight oxidation, creating a dynamic interplay between reflective sheen and matte, weathered textures. Variations in pigmentation and oxide layers introduce a realistic color palette ranging from cool silvery grays to warmer rusted tones, contributing to the plate’s authentic visual complexity and depth.
Within the PBR texture channels, this metal plate’s material properties are carefully represented to maximize realism. The BaseColor or Albedo channel captures the nuanced coloration resulting from natural pigment deposits and oxidation patterns. The Normal map emphasizes the undulating corrugated waves and the rivet details, providing pronounced depth cues that enhance surface realism when lit. The Roughness channel varies spatially, contrasting smoother polished regions with rougher, oxidized patches to simulate the plate’s worn finish. High Metallic values affirm the inherently metallic nature of the substrate, while Ambient Occlusion deepens shading around rivets and corrugation troughs to accentuate dimensionality. The Height or Displacement map further highlights the corrugated profile and rivet protrusions, enabling enhanced parallax and displacement effects in supported rendering engines.
Rendered at resolutions up to 8K, this seamless texture delivers crisp detail even on expansive surfaces, making it ideal for use in Blender, Unreal Engine, Unity, and other 3D software. Its seamless design ensures versatile tiling without visible repetition, suitable for industrial visualizations, architectural renders, or game environments requiring authentic metal surfaces. For optimal results, users are advised to adjust the UV scale to match the real-world dimensions of corrugated metal sheets, and to fine-tune the Roughness channel to adapt surface reflectivity according to specific lighting scenarios. Additionally, subtle application of the Height map can significantly enhance parallax occlusion effects, adding a convincing sense of depth and tactile realism on close inspection.
Import the texture maps into Blender with sRGB color space for albedo/base color and Non-Color for normal, roughness, metallic, AO, height, and ORM maps. Connect normal maps through a Normal Map node, then adjust UV scale with a Mapping node so the material repeats naturally on your model.
For the full step-by-step setup, see How to Use Seamless Textures in Blender. Browse related material examples in wood, concrete, and metal.
Yes. This texture is designed as a seamless tileable PBR material, so it can repeat across large surfaces without visible borders.
You can download PNG/WEBP versions and use 1K, 2K, 4K and 8K download options when available on the page.
Yes. The download options and engine-mapped ZIP workflow are designed for Blender, Unreal Engine, Unity Standard, URP and HDRP material pipelines.
Yes. The texture is available under the AITextured free commercial license. Review the license page for redistribution and AI-training restrictions.


Build, preview, and export seamless PBR materials. Generate full map sets from a single image, inspect them in a real-time WebGL viewer, and re-package maps for Unreal, Unity, and Blender—directly in your browser.
AI text-to-texture: type a prompt and get a seamless, tileable base image ready for PBR workflows (great starting point for materials).
Create a full PBR set (Normal, Roughness, AO, Metallic, etc.) from a single image. Seamless and tiling-friendly.
Instant WebGL viewer: inspect materials on a sphere, plane, and cube. Check tiling and lighting in real time.
Re-packages maps per engine: Unreal (BaseColor + ORM), Unity (Mask/MetallicSmoothness), Blender (separate channels).
PNG ↔ JPG ↔ SVG: fast convert, SVG rasterize, embed/trace options, quality & background controls.