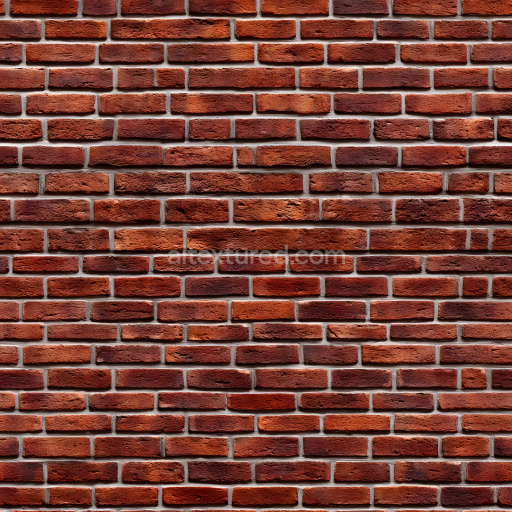
Painted Brick Seamless Texture
Seamless texture (tileable) · PNG, WEBP, PBR ZIP. License: AITextured Free Commercial License (FCL) v1.1. Free personal and commercial use. Raw resale, standalone redistribution, mirroring/scraping, competing asset packs, and AI/ML training are not allowed without written permission. Attribution is not required, but appreciated..

| ID | aged-old-brick-texture-seamless |
|---|---|
| Category | Brick |
| Formats | PNG, WEBP, PBR ZIP |
| Size | 1k (1024x1024px), 2k (2048x2048px), 4k (4096x4096px), 8k (8192x8192px) |
| Color | sRGB |
| Tileable | Yes |
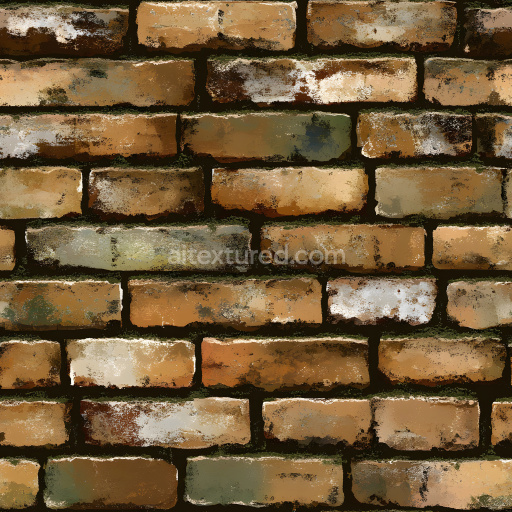
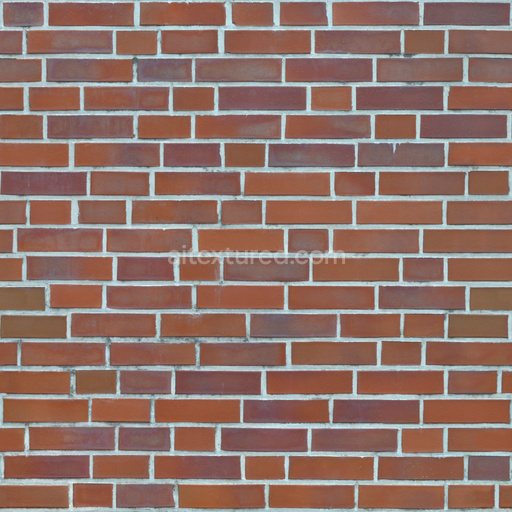
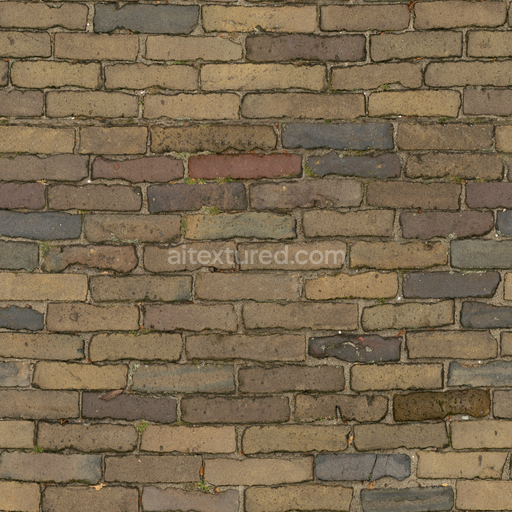
The Aged Old Brick Texture Seamless high resolution up to 8K captures the authentic character of weathered masonry showcasing a timeworn brick surface that balances natural aging with structural integrity. This tileable aged old brick texture seamless high resolution up to 8K is meticulously crafted to reflect the mineral-rich ceramic composition of traditional bricks bonded by aged lime or cement-based mortar that has subtly eroded over time. The texture reveals fine aggregates and grain orientation within the brick’s body highlighting porous regions where decades of exposure have softened edges and introduced slight surface roughness. Colorants in this material range from deep reds and burnt siennas to muted ochres and grays replicating oxide layers and pigment variations caused by oxidation and environmental wear. The surface finish is matte with occasional micro-cracks and chipped areas evoking a naturally weathered look that remains visually compelling across large tiled surfaces without visible seams.
In physically based rendering (PBR) workflows this texture aged old brick texture seamless high resolution up to 8K excels by providing comprehensive channel data for realistic lighting responses. The BaseColor/Albedo map faithfully conveys the brick’s rich variegated hues and subtle discolorations from aging while the Normal map details the tactile roughness and micro-geometry of chipped edges mortar joints and surface irregularities. The Roughness channel balances polished and rough patches simulating areas where the brick’s surface has been worn smooth or pitted by weathering. Metallic values remain minimal reflecting the non-metallic nature of brick materials while Ambient Occlusion enhances depth perception in crevices and mortar joints. Height/Displacement maps deliver depth cues that add dimensionality to walls and structures when used with parallax or tessellation further grounding the aged old brick texture seamless high resolution up to 8K in realistic 3D scenes.
Optimized for seamless tiling and up to 8K resolution this texture integrates flawlessly with industry-standard 3D software such as Blender Unreal Engine and Unity requiring minimal setup to achieve high-fidelity results. Its detailed tileable pattern scales elegantly across large architectural visualizations game environments product mockups and interior staging projects without visible repetition or seams. For the best visual outcome it is recommended to adjust the roughness intensity to match your scene’s lighting conditions ensuring the texture maintains a natural believable appearance whether under direct sunlight or softer indoor lighting. Additionally fine-tuning the UV scale can help emphasize the brick’s aged character by controlling the perceived size and repetition of the weathered details enhancing realism in your materials library and speeding up iteration workflows.
This seamless aged old brick texture offers seamless high resolution up to 8K providing detailed brick textures with a realistic PBR appearance enhanced by an interactive 3D preview.
Import the texture maps into Blender with sRGB color space for albedo/base color and Non-Color for normal, roughness, metallic, AO, height, and ORM maps. Connect normal maps through a Normal Map node, then adjust UV scale with a Mapping node so the material repeats naturally on your model.
For the full step-by-step setup, see How to Use Seamless Textures in Blender. Browse related material examples in wood, concrete, and metal.
Yes. This texture is designed as a seamless tileable PBR material, so it can repeat across large surfaces without visible borders.
You can download PNG/WEBP versions and use 1K, 2K, 4K and 8K download options when available on the page.
Yes. The download options and engine-mapped ZIP workflow are designed for Blender, Unreal Engine, Unity Standard, URP and HDRP material pipelines.
Yes. The texture is available under the AITextured free commercial license. Review the license page for redistribution and AI-training restrictions.


Generate, preview, and export seamless PBR materials for Blender, Unity, and Unreal Engine—directly in your browser.
AI text-to-texture: type a prompt and get a seamless, tileable base image ready for PBR workflows (great starting point for materials).
Create a full PBR set (Normal, Roughness, AO, Metallic, etc.) from a single image. Seamless and tiling-friendly.
Instant WebGL viewer: inspect materials on a sphere, plane, and cube. Check tiling and lighting in real time.
Re-packages maps per engine: Unreal (BaseColor + ORM), Unity (Mask/MetallicSmoothness), Blender (separate channels).
PNG ↔ JPG ↔ SVG: fast convert, SVG rasterize, embed/trace options, quality & background controls.