Seamless Bricks 083 by Textures - PBR 3D Texture (8K ready)
Seamless texture (tileable) · PNG, WEBP, PBR ZIP. License: AITextured Free Commercial License (FCL) v1.1. Free personal and commercial use. Raw resale, standalone redistribution, mirroring/scraping, competing asset packs, and AI/ML training are not allowed without written permission. Attribution is not required, but appreciated..

| ID | seamless-burnt-brick-3d-texture-pbr-8k-charred-rough-surface-industrial-wall |
|---|---|
| Category | Brick |
| Formats | PNG, WEBP, PBR ZIP |
| Size | 1k (1024x1024px), 2k (2048x2048px), 4k (4096x4096px), 8k (8192x8192px) |
| Color | sRGB |
| Tileable | Yes |
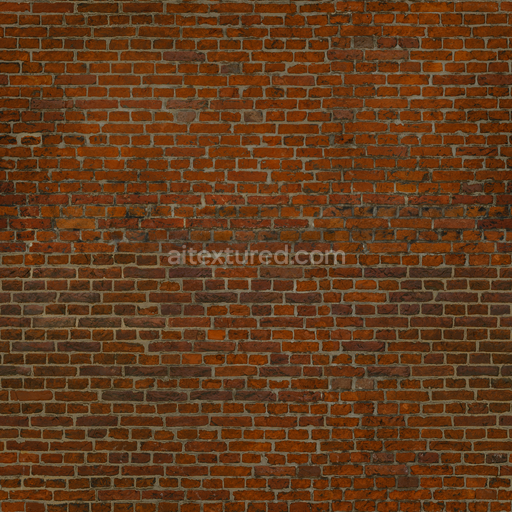
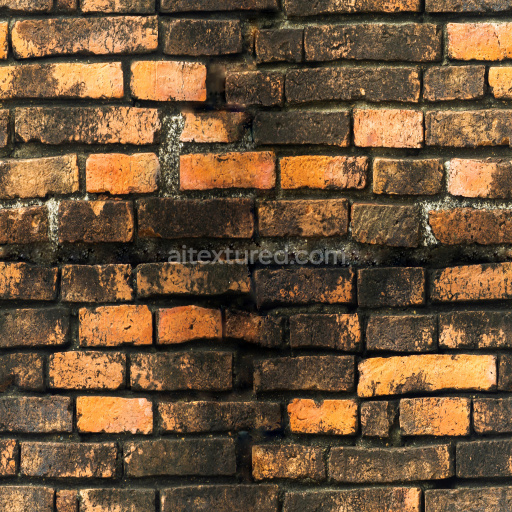
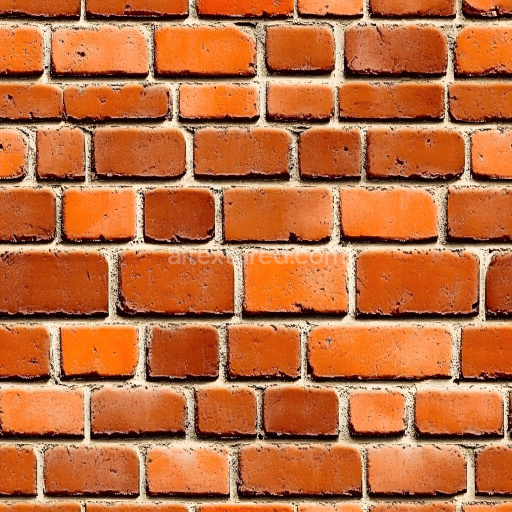
This seamless burnt brick 3D texture features a detailed representation of charred brickwork arranged in a classic stack bond pattern where rectangular bricks are aligned horizontally with thick mortar joints accentuating the form. The base material is primarily composed of fired clay bricks whose original red-orange hues have been transformed by intense burning and weathering into deep blacks and dark browns. The rough grainy surface texture reveals a porous structure typical of high-temperature exposure with micro-cracks and surface irregularities giving a tactile aged appearance. The mortar thick and coarse is a cementitious blend with high aggregate content contributing to its rugged and uneven finish contrasting effectively with the brick surfaces while maintaining a cohesive industrial aesthetic.
From a materials science perspective the burnt bricks consist of a silica and alumina-rich ceramic body where the clay substrate is bonded by vitrified glass phases formed during firing. The charred effect introduces a layer of carbonized residue on the surface altering the optical properties by increasing light absorption and creating matte non-reflective patches. This is captured in the PBR workflow through the BaseColor map which encodes the burnt black and dark brown pigments complemented by the Normal map that simulates the coarse grain and porous pits of the brick surface. The Roughness channel is tuned to emphasize the contrast between rough brick faces and slightly smoother mortar while the Height/Displacement map provides subtle depth cues for the unevenness of the charred surfaces and mortar joints enhancing realism in close-up renders.
The metallic channel is minimal to nonexistent reflecting the non-metallic ceramic nature of the bricks and the cement mortar which have negligible specular reflection. Ambient Occlusion is carefully baked to accentuate shadowing within the deep crevices and mortar recesses adding depth and realism without oversaturation. The texture’s 8K resolution ensures exceptional detail fidelity making it highly suitable for high-end rendering pipelines in Blender Unreal Engine and Unity where it can be utilized to create authentic industrial fire-damaged or post-apocalyptic environments with photorealistic surface detail.
For practical implementation it is recommended to adjust the UV scale to maintain the natural size and proportion of the burnt bricks avoiding repetitive patterns that could break immersion. Additionally fine-tuning the roughness map can help balance the matte charred areas with any residual glossiness on less affected bricks. When working with displacement or parallax mapping blending the height map with the normal map will enhance the perceived depth of the porous and cracked surfaces ensuring the charred texture reads convincingly from multiple viewing angles and lighting conditions.
Import the texture maps into Blender with sRGB color space for albedo/base color and Non-Color for normal, roughness, metallic, AO, height, and ORM maps. Connect normal maps through a Normal Map node, then adjust UV scale with a Mapping node so the material repeats naturally on your model.
For the full step-by-step setup, see How to Use Seamless Textures in Blender. Browse related material examples in wood, concrete, and metal.
Yes. This texture is designed as a seamless tileable PBR material, so it can repeat across large surfaces without visible borders.
You can download PNG/WEBP versions and use 1K, 2K, 4K and 8K download options when available on the page.
Yes. The download options and engine-mapped ZIP workflow are designed for Blender, Unreal Engine, Unity Standard, URP and HDRP material pipelines.
Yes. The texture is available under the AITextured free commercial license. Review the license page for redistribution and AI-training restrictions.

Generate, preview, and export seamless PBR materials for Blender, Unity, and Unreal Engine—directly in your browser.
AI text-to-texture: type a prompt and get a seamless, tileable base image ready for PBR workflows (great starting point for materials).
Create a full PBR set (Normal, Roughness, AO, Metallic, etc.) from a single image. Seamless and tiling-friendly.
Instant WebGL viewer: inspect materials on a sphere, plane, and cube. Check tiling and lighting in real time.
Re-packages maps per engine: Unreal (BaseColor + ORM), Unity (Mask/MetallicSmoothness), Blender (separate channels).
PNG ↔ JPG ↔ SVG: fast convert, SVG rasterize, embed/trace options, quality & background controls.