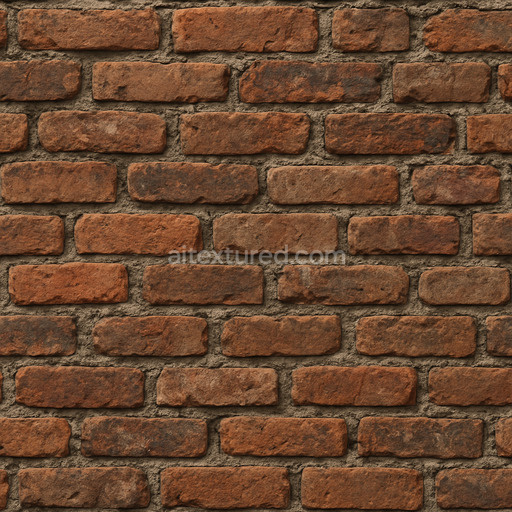
Cracked Brick Wall Texture With Chipped Paint And Weathered Mortar
Seamless texture (tileable) · PNG, WEBP, PBR ZIP. License: AITextured Free Commercial License (FCL) v1.1. Free personal and commercial use. Raw resale, standalone redistribution, mirroring/scraping, competing asset packs, and AI/ML training are not allowed without written permission. Attribution is not required, but appreciated..

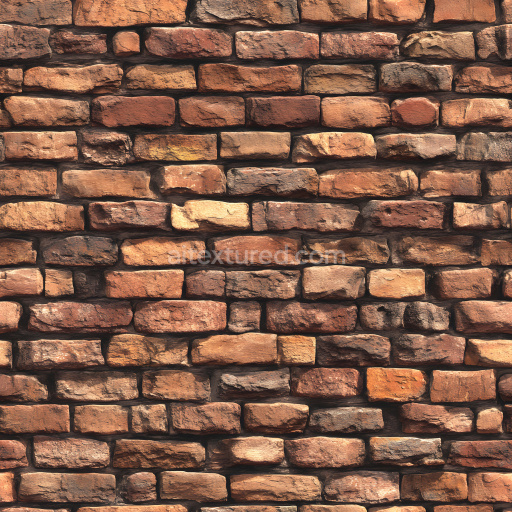
| ID | seamless-whitewashed-brick-3d-texture-pbr-8k-smooth-aged-facade-surface |
|---|---|
| Category | Brick |
| Formats | PNG, WEBP, PBR ZIP |
| Size | 1k (1024x1024px), 2k (2048x2048px), 4k (4096x4096px), 8k (8192x8192px) |
| Color | sRGB |
| Tileable | Yes |
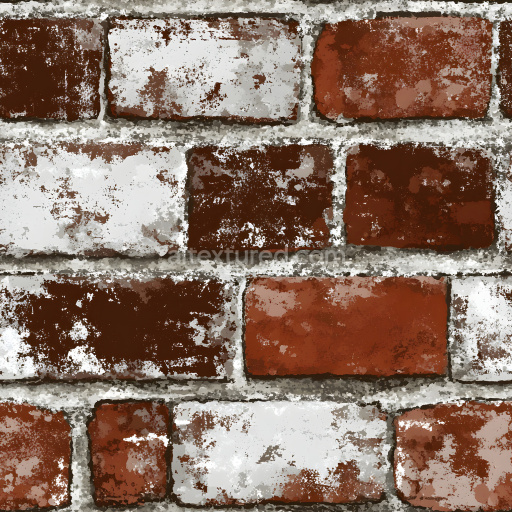
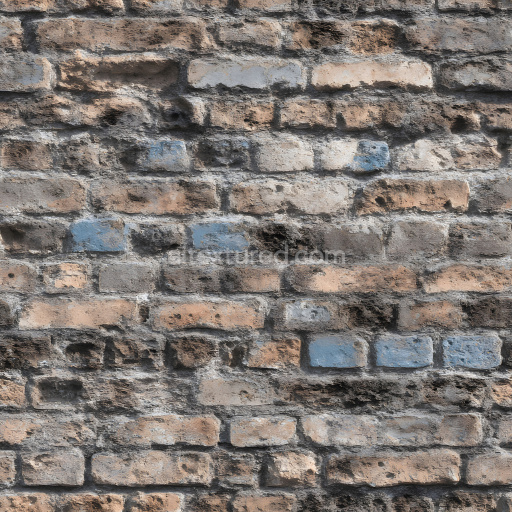
This seamless whitewashed brick 3D texture depicts a meticulously crafted brick facade composed of traditional fired clay bricks arranged in a Flemish bond pattern where alternating headers and stretchers create a visually rhythmic and structurally stable surface. The base material consists primarily of dense fine-grained clay fired to achieve a moderate hardness and durability. The bricks exhibit a smooth slightly glossy finish due to a thin even layer of whitewash paint which not only imparts a clean muted white tone but also allows subtle variations in color and brightness from weathering effects to show through. The weathered mortar joints composed of lime and sand with traces of aged binding agents reveal natural porosity and micro-cracks contributing to the overall aged appearance by softening edges and adding depth to the facade’s geometry.
The texture’s surface form captures the nuanced interplay between the smooth painted brick faces and the rougher recessed mortar lines. The mortar’s weathered condition is characterized by slight erosion and textural irregularities enhancing the realism through micro-displacement and height variations. These subtle surface details are meticulously represented in the PBR channels: the BaseColor map conveys the whitewashed pigment with low saturation and gentle tonal shifts; the Normal map encodes fine surface relief including brick edges mortar cracks and paint wear; the Roughness map balances the glossiness of the whitewash against the matte texture of the mortar with lower roughness on brick faces and higher roughness in mortar areas; the Metallic channel remains consistently near zero reflecting the non-metallic nature of the materials; Ambient Occlusion accentuates crevices and joint recesses lending depth; and the Height/Displacement map provides precise elevation data for realistic shadowing and parallax effects.
Rendered at an impressive 8K resolution this texture supports ultra-high fidelity visuals and is fully optimized for PBR workflows in Blender Unreal Engine and Unity. The high resolution ensures fine detail preservation even on close-up views capturing the intricate grain of the clay bricks the subtle imperfections of the whitewash paint and the granular texture of weathered mortar. This makes it particularly suitable for architectural visualizations requiring authenticity in aged urban or rustic environments as well as for game assets where realistic surface interaction with light is essential.
For practical application it is advisable to carefully adjust the UV scale to maintain the natural proportions of the Flemish bond pattern and avoid distortion preserving the recognizability of the brick layout. Additionally tuning the Roughness map can help simulate different levels of surface wear or moisture accumulation—lower roughness values will enhance the subtle gloss of fresh whitewash whereas increasing roughness can convey more pronounced weathering. When combining with other height or normal maps blending should be done cautiously to avoid unnatural surface exaggerations ensuring the seamless integration of this texture into complex material setups.
Import the texture maps into Blender with sRGB color space for albedo/base color and Non-Color for normal, roughness, metallic, AO, height, and ORM maps. Connect normal maps through a Normal Map node, then adjust UV scale with a Mapping node so the material repeats naturally on your model.
For the full step-by-step setup, see How to Use Seamless Textures in Blender. Browse related material examples in wood, concrete, and metal.
Yes. This texture is designed as a seamless tileable PBR material, so it can repeat across large surfaces without visible borders.
You can download PNG/WEBP versions and use 1K, 2K, 4K and 8K download options when available on the page.
Yes. The download options and engine-mapped ZIP workflow are designed for Blender, Unreal Engine, Unity Standard, URP and HDRP material pipelines.
Yes. The texture is available under the AITextured free commercial license. Review the license page for redistribution and AI-training restrictions.
Generate, preview, and export seamless PBR materials for Blender, Unity, and Unreal Engine—directly in your browser.
AI text-to-texture: type a prompt and get a seamless, tileable base image ready for PBR workflows (great starting point for materials).
Create a full PBR set (Normal, Roughness, AO, Metallic, etc.) from a single image. Seamless and tiling-friendly.
Instant WebGL viewer: inspect materials on a sphere, plane, and cube. Check tiling and lighting in real time.
Re-packages maps per engine: Unreal (BaseColor + ORM), Unity (Mask/MetallicSmoothness), Blender (separate channels).
PNG ↔ JPG ↔ SVG: fast convert, SVG rasterize, embed/trace options, quality & background controls.