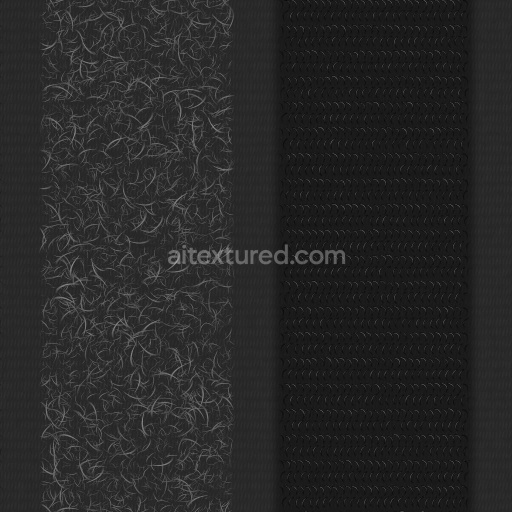
Velcro-like Hook and Loop Tape | Free PBR
Seamless texture (tileable) · PNG, WEBP, PBR ZIP. License: AITextured Free Commercial License (FCL) v1.1. Free personal and commercial use. Raw resale, standalone redistribution, mirroring/scraping, competing asset packs, and AI/ML training are not allowed without written permission. Attribution is not required, but appreciated..

| ID | curly-teddy-checkered-fluffy-teal-blanket-fleece-plush-soft |
|---|---|
| Category | Fabric |
| Formats | PNG, WEBP, PBR ZIP |
| Size | 1k (1024x1024px), 2k (2048x2048px), 4k (4096x4096px), 8k (8192x8192px) |
| Color | sRGB |
| Tileable | Yes |
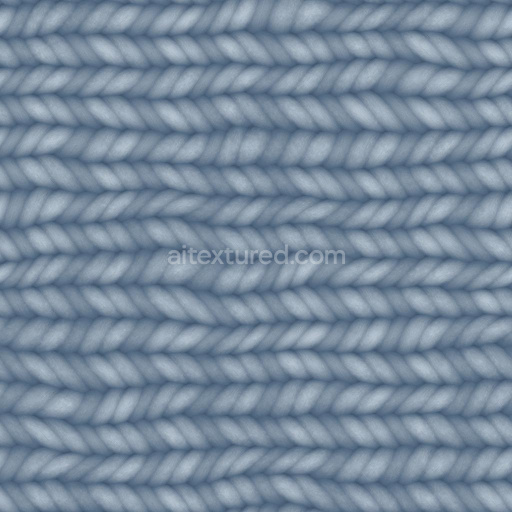
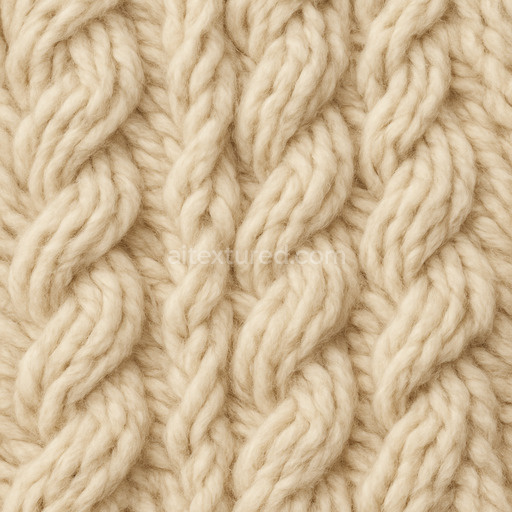
This seamless PBR texture represents a napped woolly fabric with a plush fleece-like surface ideal for creating soft fluffy and fuzzy textile appearances. The base substrate mimics organic wool fibers densely packed and interwoven producing a shaggy tactile quality that resembles a cozy blanket or curly teddy checkered pattern. The fabric’s surface finish is matte with subtle sheen variations reflecting its soft plush nature. Colorants emulate natural wool dyes with a balanced teal hue enhanced by the physically based rendering properties that accurately simulate fiber translucency and depth. The porous structure and fiber orientation are expressed through the height and normal maps giving a realistic tactile relief and fabric pile height that enhances the perception of softness and volume in 3D environments.
The included PBR maps—albedo normal roughness metallic ambient occlusion and height—work together to produce a highly realistic material response across modern pipelines. The albedo channel captures the rich teal color with subtle tonal variations typical for woolly textiles while the normal map defines the intricate fiber directions and fluffy surface irregularities. Roughness is finely calibrated to convey the soft matte finish without glossiness reflecting light diffusely to emphasize the plush fleece texture. Metallic values remain minimal appropriate for organic fabric materials and ambient occlusion adds depth to fiber intersections and napped folds. The height map provides parallax and displacement cues that enhance the tactile feel of the shaggy fuzzy surface making it ideal for close-up renders in Blender Unreal Engine and Unity.
Provided in 4K resolution with an optional 8K upgrade this tileable 3D texture ensures detailed fidelity and performance balance suitable for both real-time game engines and offline renderers. Its physically based design supports the metal-rough workflow enabling consistent shading and lighting calibration across different digital content creation tools. For optimal results it is recommended to adjust the UV scale to match the desired fabric weave size and fine-tune roughness values slightly higher to preserve the soft matte appearance of fleece or plush surfaces. This texture delivers reliable high-quality visual output without manual tweaking making it a practical choice for adding authentic woolly fabric or fur elements to any 3D project.
Import the texture maps into Blender with sRGB color space for albedo/base color and Non-Color for normal, roughness, metallic, AO, height, and ORM maps. Connect normal maps through a Normal Map node, then adjust UV scale with a Mapping node so the material repeats naturally on your model.
For the full step-by-step setup, see How to Use Seamless Textures in Blender. Browse related material examples in wood, concrete, and metal.
Yes. This texture is designed as a seamless tileable PBR material, so it can repeat across large surfaces without visible borders.
You can download PNG/WEBP versions and use 1K, 2K, 4K and 8K download options when available on the page.
Yes. The download options and engine-mapped ZIP workflow are designed for Blender, Unreal Engine, Unity Standard, URP and HDRP material pipelines.
Yes. The texture is available under the AITextured free commercial license. Review the license page for redistribution and AI-training restrictions.


Build, preview, and export seamless PBR materials. Generate full map sets from a single image, inspect them in a real-time WebGL viewer, and re-package maps for Unreal, Unity, and Blender—directly in your browser.
AI text-to-texture: type a prompt and get a seamless, tileable base image ready for PBR workflows (great starting point for materials).
Create a full PBR set (Normal, Roughness, AO, Metallic, etc.) from a single image. Seamless and tiling-friendly.
Instant WebGL viewer: inspect materials on a sphere, plane, and cube. Check tiling and lighting in real time.
Re-packages maps per engine: Unreal (BaseColor + ORM), Unity (Mask/MetallicSmoothness), Blender (separate channels).
PNG ↔ JPG ↔ SVG: fast convert, SVG rasterize, embed/trace options, quality & background controls.