
Fur Texture of Animals | Free PBR
Seamless texture (tileable) · PNG, WEBP, PBR ZIP. License: AITextured Free Commercial License (FCL) v1.1. Free personal and commercial use. Raw resale, standalone redistribution, mirroring/scraping, competing asset packs, and AI/ML training are not allowed without written permission. Attribution is not required, but appreciated..

| ID | synthetic-denim-texture-seamless |
|---|---|
| Category | Fabric |
| Formats | PNG, WEBP, PBR ZIP |
| Size | 1k (1024x1024px), 2k (2048x2048px), 4k (4096x4096px), 8k (8192x8192px) |
| Color | sRGB |
| Tileable | Yes |
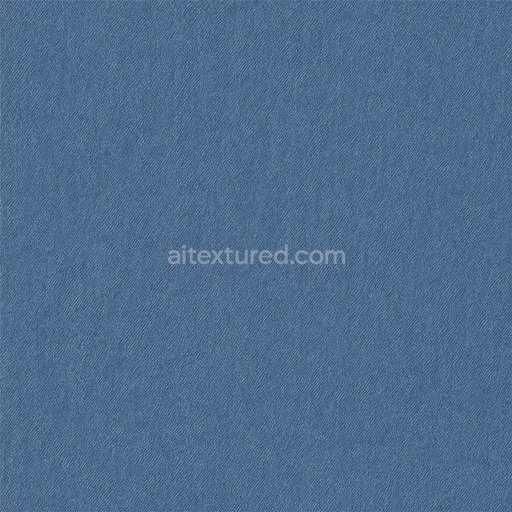
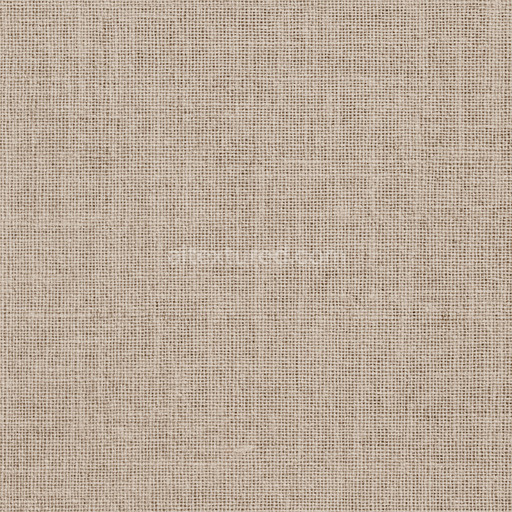
The Synthetic Denim Texture Seamless high resolution up to 8K offers a meticulously crafted fabric surface that captures the intricate composition and look of synthetic denim materials. This tileable synthetic denim texture seamless high resolution up to 8K is designed to emulate the base substrate of tightly woven polymer fibers combined with synthetic binders that replicate the durable yet flexible qualities of denim blends commonly used in modern textiles. The pattern reveals a subtle grain orientation reflecting the typical twill weave with carefully balanced porosity to suggest wear resistance and breathability. Its surface finish is smooth but matte mirroring the brushed look often applied to synthetic denim to reduce glare and enhance realism in digital scenes. Pigments and synthetic dyes provide the characteristic deep blue-gray hues visible in the BaseColor/Albedo channel while slight variations simulate natural dye absorption and subtle weathering effects.
In physically based rendering (PBR) workflows this texture synthetic denim texture seamless high resolution up to 8K excels across multiple channels for true-to-life representation. The Normal map captures the fine weave relief and fabric grain adding depth and tactile detail to close-up views. The Roughness channel is calibrated to reflect the soft slightly textured surface typical of synthetic denim avoiding overly glossy or flat appearances. As expected for fabric the Metallic channel remains near zero to reflect the non-metallic nature of the fibers. Ambient Occlusion enhances the subtle shadowing between threads increasing dimensionality and realism in cinematic renders and real-time scenes alike. Additionally the Height/Displacement map allows for enhanced parallax effects or micro-relief adjustments lending further authenticity to level dressing or material studies at high zoom levels.
With an ultra-high resolution reaching up to 8k this tileable synthetic denim texture seamless high resolution up to 8K is optimized for seamless repetition across large surfaces without visible seams or distortion providing unparalleled clarity and stability. It works out-of-the-box with popular 3D software such as Blender Unity and Unreal Engine ensuring a fast iteration loop and smooth integration into production pipelines. For best results it is recommended to fine-tune the roughness values according to the lighting conditions of your scene to maintain the fabric’s grounded appearance. Adjusting the UV scale can also help emphasize the weave pattern appropriately depending on the object's size enhancing the visual impact in real-time environments or detailed cinematic workflows.
The seamless synthetic denim texture offers a seamless high resolution up to 8K showcasing detailed fabric textures with a realistic 3D preview that highlights its precise PBR appearance.
Import the texture maps into Blender with sRGB color space for albedo/base color and Non-Color for normal, roughness, metallic, AO, height, and ORM maps. Connect normal maps through a Normal Map node, then adjust UV scale with a Mapping node so the material repeats naturally on your model.
For the full step-by-step setup, see How to Use Seamless Textures in Blender. Browse related material examples in wood, concrete, and metal.
Yes. This texture is designed as a seamless tileable PBR material, so it can repeat across large surfaces without visible borders.
You can download PNG/WEBP versions and use 1K, 2K, 4K and 8K download options when available on the page.
Yes. The download options and engine-mapped ZIP workflow are designed for Blender, Unreal Engine, Unity Standard, URP and HDRP material pipelines.
Yes. The texture is available under the AITextured free commercial license. Review the license page for redistribution and AI-training restrictions.


Generate, preview, and export seamless PBR materials for Blender, Unity, and Unreal Engine—directly in your browser.
AI text-to-texture: type a prompt and get a seamless, tileable base image ready for PBR workflows (great starting point for materials).
Create a full PBR set (Normal, Roughness, AO, Metallic, etc.) from a single image. Seamless and tiling-friendly.
Instant WebGL viewer: inspect materials on a sphere, plane, and cube. Check tiling and lighting in real time.
Re-packages maps per engine: Unreal (BaseColor + ORM), Unity (Mask/MetallicSmoothness), Blender (separate channels).
PNG ↔ JPG ↔ SVG: fast convert, SVG rasterize, embed/trace options, quality & background controls.