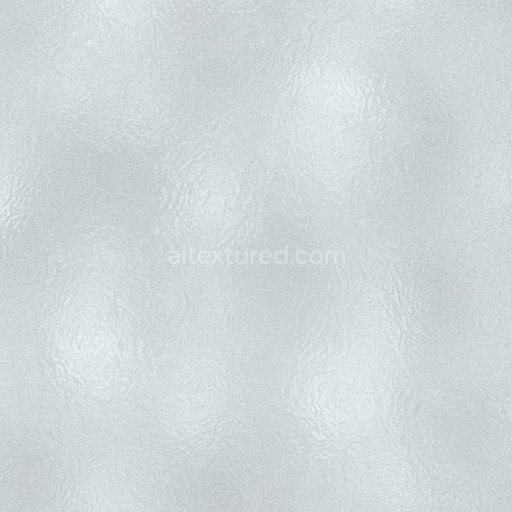
Dirty Clear Glass Seamless Texture
Seamless texture (tileable) · PNG, WEBP, PBR ZIP. License: AITextured Free Commercial License (FCL) v1.1. Free personal and commercial use. Raw resale, standalone redistribution, mirroring/scraping, competing asset packs, and AI/ML training are not allowed without written permission. Attribution is not required, but appreciated..

| ID | mirror-glass-pure-reflection |
|---|---|
| Category | Glass |
| Formats | PNG, WEBP, PBR ZIP |
| Size | 1k (1024x1024px), 2k (2048x2048px), 4k (4096x4096px), 8k (8192x8192px) |
| Color | sRGB |
| Tileable | Yes |
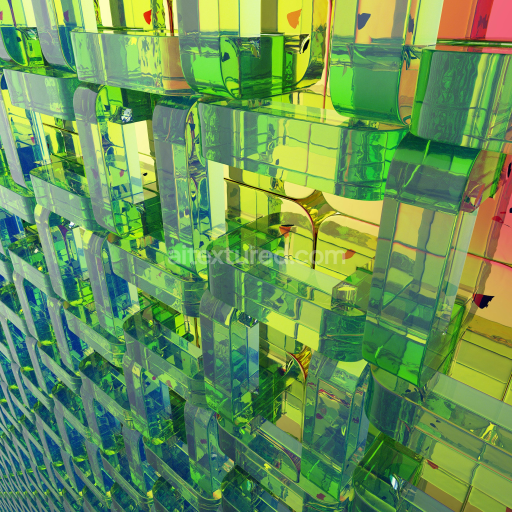
The Mirror Glass Pure Reflection texture is an expertly engineered PBR texture tailored specifically for the glass category presenting a seamless mirror glass pure reflection pattern that flawlessly covers extensive surfaces. Its base substrate emulates premium glass material characterized by a polished ultra-smooth finish that captures the intrinsic clarity and transparency inherent to mirror-like surfaces. This texture set intricately simulates the layered composition of oxide films and subtle micro-roughness found in real-world mirror glass which significantly influence the quality and behavior of reflections. The minimal porosity and absence of weathering effects maintain a pristine unblemished appearance while the carefully controlled binders and molecular alignments within the simulated glass structure ensure consistent reflectivity and visual purity across all applications.
From a materials perspective the texture’s composition translates into the PBR channels with remarkable fidelity. The BaseColor/Albedo map features a near-neutral lightly tinted palette that mirrors the subtle coloration of pure glass while the Normal map captures delicate surface undulations that gently diffuse light without compromising the mirror’s clarity. The Roughness channel expertly balances reflective sharpness with microscopic imperfections preserving pure reflections without appearing unnaturally perfect or overly diffuse. Metallic values remain low to moderate representing the slight conductive properties of the mirror’s reflective backing layer enhancing realism within PBR workflows. Ambient Occlusion subtly emphasizes ambient depth around edges and recesses reinforcing natural light interaction and Height/Displacement maps add refined depth for parallax effects increasing immersion when viewed from close range. With resolution options scaling up to an impressive 8K this tileable mirror glass pure reflection texture guarantees crisp detailed visuals even on large-scale assets making it ideal for architectural visualization environment art and detailed concept prototyping.
Designed for flawless integration with leading 3D engines such as Blender Unreal Engine and Unity this PBR material mirror glass pure reflection delivers reliable predictable results that enhance any project focused on high-quality reflective glass surfaces. Its seamless tiling and consistent pattern prevent visible seams or distortions ensuring a natural and visually appealing finish across diverse surfaces. For optimal results it is recommended to maintain a uniform UV scale on 3D assets to avoid pattern stretching and preserve the pristine mirror effect. Additionally fine-tuning the roughness map allows precise control over reflection intensity enabling artists to adapt the glass appearance to various lighting environments and artistic directions. This practical approach maximizes the texture’s versatility and effectiveness within a wide range of workflows.
Incorporating this seamless mirror glass pure reflection texture into your material library accelerates iteration and elevates visual fidelity across 3D projects. The comprehensive PBR map set and high-resolution output provide extensive flexibility and realism supporting everything from rapid look development to highly detailed architectural visualization. Whether crafting sleek modern interiors or intricate concept prototypes this texture’s meticulous design and real-time 3D preview compatibility streamline the creative process delivering stunning natural glass reflections with unmatched clarity and consistency.
Import the texture maps into Blender with sRGB color space for albedo/base color and Non-Color for normal, roughness, metallic, AO, height, and ORM maps. Connect normal maps through a Normal Map node, then adjust UV scale with a Mapping node so the material repeats naturally on your model.
For the full step-by-step setup, see How to Use Seamless Textures in Blender. Browse related material examples in wood, concrete, and metal.
Yes. This texture is designed as a seamless tileable PBR material, so it can repeat across large surfaces without visible borders.
You can download PNG/WEBP versions and use 1K, 2K, 4K and 8K download options when available on the page.
Yes. The download options and engine-mapped ZIP workflow are designed for Blender, Unreal Engine, Unity Standard, URP and HDRP material pipelines.
Yes. The texture is available under the AITextured free commercial license. Review the license page for redistribution and AI-training restrictions.

Build, preview, and export seamless PBR materials. Generate full map sets from a single image, inspect them in a real-time WebGL viewer, and re-package maps for Unreal, Unity, and Blender—directly in your browser.
AI text-to-texture: type a prompt and get a seamless, tileable base image ready for PBR workflows (great starting point for materials).
Create a full PBR set (Normal, Roughness, AO, Metallic, etc.) from a single image. Seamless and tiling-friendly.
Instant WebGL viewer: inspect materials on a sphere, plane, and cube. Check tiling and lighting in real time.
Re-packages maps per engine: Unreal (BaseColor + ORM), Unity (Mask/MetallicSmoothness), Blender (separate channels).
PNG ↔ JPG ↔ SVG: fast convert, SVG rasterize, embed/trace options, quality & background controls.