
Metal Metallic Pattern Rust - Seamless PBR Texture
Seamless texture (tileable) · PNG, WEBP, PBR ZIP. License: AITextured Free Commercial License (FCL) v1.1. Free personal and commercial use. Raw resale, standalone redistribution, mirroring/scraping, competing asset packs, and AI/ML training are not allowed without written permission. Attribution is not required, but appreciated..

| ID | orange-painted-wall-texture-with-silver-networking-pattern-free-pbr |
|---|---|
| Category | Metal |
| Formats | PNG, WEBP, PBR ZIP |
| Size | 1k (1024x1024px), 2k (2048x2048px), 4k (4096x4096px), 8k (8192x8192px) |
| Color | sRGB |
| Tileable | Yes |
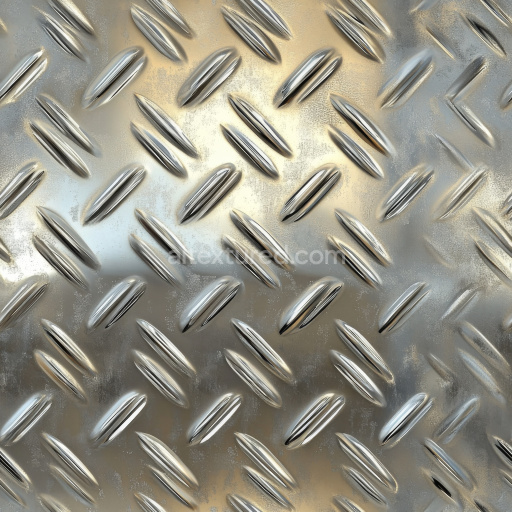
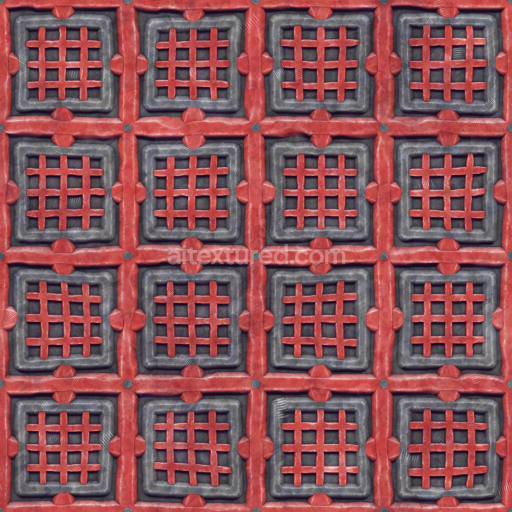
The Orange Painted Wall Texture with Silver Networking Pattern (Others 0035) presents a sophisticated and visually compelling surface ideal for modern interior design applications. At its core, the texture mimics a high-quality mineral substrate, reminiscent of polished concrete or finely plastered walls, offering a durable and solid foundation. This base layer is enhanced with a vibrant orange pigment, carefully applied to recessed concave holes that punctuate the surface, ensuring consistent saturation and rich color depth throughout. Between these concave areas lies an intricate, network-like pattern rendered in a striking silver finish. This metallic overlay captures subtle oxidation effects and a brushed texture, creating a refined contrast that elevates the warm orange backdrop while conveying a sense of aged yet well-maintained materials.
From a materials perspective, the texture’s composition suggests the presence of binding agents or adhesives that seamlessly unify the painted mineral substrate with the metallic silver elements. The surface exhibits balanced porosity, hinting at mild weathering or natural wear that enhances the tactile realism without compromising a polished appearance. The silver networking pattern features moderate roughness, allowing it to reflect light variably and convey a tangible metallic quality. This interplay between the matte orange painted areas and the glossier silver network demonstrates a thoughtful material layering, with subtle variations in surface finish contributing to an authentic and sophisticated look.
In physically based rendering (PBR) workflows, this texture excels with its detailed channel mapping. The BaseColor (Albedo) channel vividly captures the bright orange pigment and the reflective silver network, while the Normal map defines the concave geometry of the holes alongside the raised metallic grid to emphasize depth and dimensionality. The Roughness map carefully balances the matte painted wall against the semi-glossy silver elements, and the Metallic channel distinctly marks the silver network as fully metallic, enhancing realistic specular reflections. Ambient Occlusion enriches shadowing around the recessed holes, adding depth and contrast, while the Height/Displacement map provides precise relief for improved parallax effects. Rendered in ultra-high 8K resolution, this texture maintains exceptional clarity and sharpness, making it fully compatible and optimized for leading 3D engines such as Blender, Unreal Engine, and Unity.
For practical application, adjusting the UV scale to slightly enlarge the silver networking pattern can showcase its intricate details more prominently without overpowering the orange base. Additionally, fine-tuning the Roughness values within your shader settings can help harmonize the reflectivity between the painted and metallic surfaces, enhancing overall material authenticity and creating a striking focal point in any interior visualization project.
Import the texture maps into Blender with sRGB color space for albedo/base color and Non-Color for normal, roughness, metallic, AO, height, and ORM maps. Connect normal maps through a Normal Map node, then adjust UV scale with a Mapping node so the material repeats naturally on your model.
For the full step-by-step setup, see How to Use Seamless Textures in Blender. Browse related material examples in wood, concrete, and metal.
Yes. This texture is designed as a seamless tileable PBR material, so it can repeat across large surfaces without visible borders.
You can download PNG/WEBP versions and use 1K, 2K, 4K and 8K download options when available on the page.
Yes. The download options and engine-mapped ZIP workflow are designed for Blender, Unreal Engine, Unity Standard, URP and HDRP material pipelines.
Yes. The texture is available under the AITextured free commercial license. Review the license page for redistribution and AI-training restrictions.


Build, preview, and export seamless PBR materials. Generate full map sets from a single image, inspect them in a real-time WebGL viewer, and re-package maps for Unreal, Unity, and Blender—directly in your browser.
AI text-to-texture: type a prompt and get a seamless, tileable base image ready for PBR workflows (great starting point for materials).
Create a full PBR set (Normal, Roughness, AO, Metallic, etc.) from a single image. Seamless and tiling-friendly.
Instant WebGL viewer: inspect materials on a sphere, plane, and cube. Check tiling and lighting in real time.
Re-packages maps per engine: Unreal (BaseColor + ORM), Unity (Mask/MetallicSmoothness), Blender (separate channels).
PNG ↔ JPG ↔ SVG: fast convert, SVG rasterize, embed/trace options, quality & background controls.