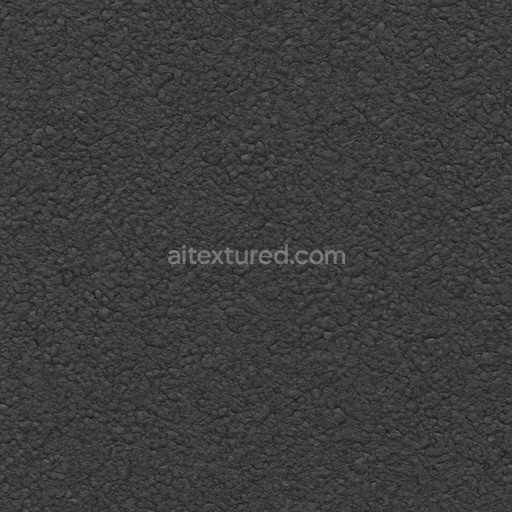
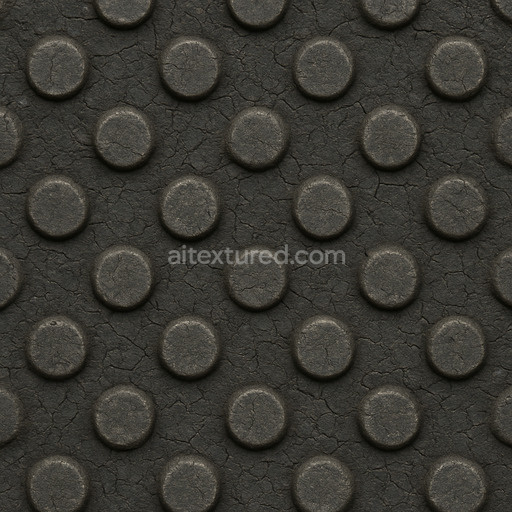
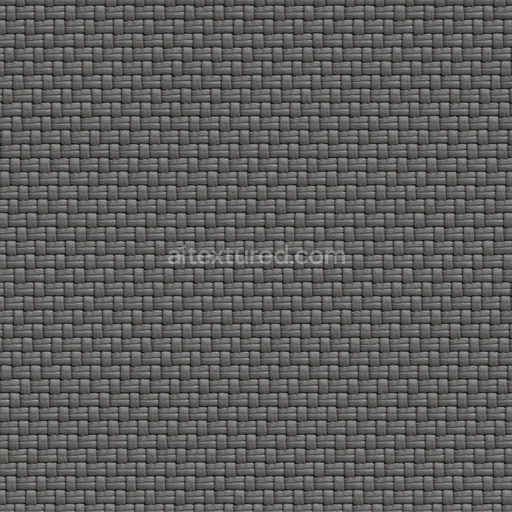
Worn Textured Rubber Seamless Texture
Seamless texture (tileable) · PNG, WEBP, PBR ZIP. License: AITextured Free Commercial License (FCL) v1.1. Free personal and commercial use. Raw resale, standalone redistribution, mirroring/scraping, competing asset packs, and AI/ML training are not allowed without written permission. Attribution is not required, but appreciated..

| ID | vulcanized-rubber-dense |
|---|---|
| Category | Rubber |
| Formats | PNG, WEBP, PBR ZIP |
| Size | 1k (1024x1024px), 2k (2048x2048px), 4k (4096x4096px), 8k (8192x8192px) |
| Color | sRGB |
| Tileable | Yes |
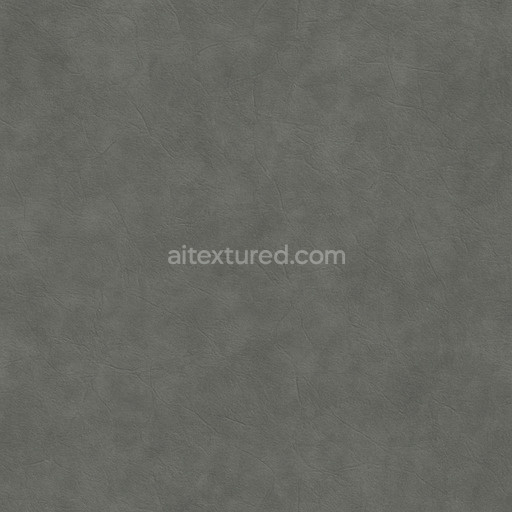
The vulcanized rubber dense texture is an expertly AI-generated seamless vulcanized rubber dense surface crafted to elevate and accelerate modern 3D material workflows. This tileable vulcanized rubber dense texture faithfully emulates the intricate polymer matrix characteristic of vulcanized rubber featuring a dense cross-linked network formed by sulfur-based binders that impart notable strength elasticity and durability. Within the texture microscopic filler particles and subtle grain orientation are embedded in the rubber substrate reflecting a slightly porous yet compact structure that mimics real-world material behavior. The natural matte finish is punctuated by occasional soft gloss highlights suggesting minimal wear and a finely controlled vulcanization process. Rich deep base colors with nuanced shading are captured in the BaseColor/Albedo channel while the Normal and Height/Displacement maps reveal refined surface irregularities and dense grain patterns enhancing tactile realism without harsh edges. The Roughness channel balances smooth and slightly coarse areas to emulate the authentic feel of rubber avoiding metallic reflections which are appropriately absent from the minimal Metallic channel consistent with the polymeric non-metallic nature of vulcanized rubber. Ambient Occlusion mapping further enhances depth by shading pores and crevices realistically adding to the overall material authenticity.
This high-resolution vulcanized rubber dense texture supports up to 8K clarity ensuring crystal-clear detail and sharp visuals suitable for close-up renders and expansive environments alike. It performs exceptionally well on large UV islands maintaining seamless cohesion and preventing visible repetition or distortion—critical factors when applying realistic rubber textures in architectural visualization environment art concept prototyping and quick look development. Designed for compatibility across popular 3D platforms like Blender Unreal Engine and Unity the seamless vulcanized rubber dense texture includes a comprehensive PBR map set—BaseColor/Albedo Normal Roughness Metallic Ambient Occlusion and Height/Displacement—offering a complete toolkit to recreate the natural dense vulcanized rubber surface with high fidelity. The included real-time 3D preview facilitates rapid material adjustments and visualization streamlining the creative pipeline and enabling precise control over the texture’s appearance in diverse lighting conditions.
To optimize the application of this PBR material vulcanized rubber dense it is advisable to adjust the UV scale to control pattern density relative to your model’s proportions ensuring the texture complements rather than overwhelms surface details. Fine-tuning the Roughness channel can subtly shift the finish from matte to a soft gloss reflecting varying degrees of vulcanization or wear states. Additionally integrating the Height or Displacement maps with a gentle parallax effect enhances the perception of depth and tactile quality creating a more immersive and authentic rubber material experience without introducing harsh edges or artifacts. This texture is ideal for artists and designers who need reliable high-quality rubber textures that integrate seamlessly into modern 3D workflows and deliver consistent realistic results across multiple rendering engines and platforms.
Import the texture maps into Blender with sRGB color space for albedo/base color and Non-Color for normal, roughness, metallic, AO, height, and ORM maps. Connect normal maps through a Normal Map node, then adjust UV scale with a Mapping node so the material repeats naturally on your model.
For the full step-by-step setup, see How to Use Seamless Textures in Blender. Browse related material examples in wood, concrete, and metal.
Yes. This texture is designed as a seamless tileable PBR material, so it can repeat across large surfaces without visible borders.
You can download PNG/WEBP versions and use 1K, 2K, 4K and 8K download options when available on the page.
Yes. The download options and engine-mapped ZIP workflow are designed for Blender, Unreal Engine, Unity Standard, URP and HDRP material pipelines.
Yes. The texture is available under the AITextured free commercial license. Review the license page for redistribution and AI-training restrictions.

Build, preview, and export seamless PBR materials. Generate full map sets from a single image, inspect them in a real-time WebGL viewer, and re-package maps for Unreal, Unity, and Blender—directly in your browser.
AI text-to-texture: type a prompt and get a seamless, tileable base image ready for PBR workflows (great starting point for materials).
Create a full PBR set (Normal, Roughness, AO, Metallic, etc.) from a single image. Seamless and tiling-friendly.
Instant WebGL viewer: inspect materials on a sphere, plane, and cube. Check tiling and lighting in real time.
Re-packages maps per engine: Unreal (BaseColor + ORM), Unity (Mask/MetallicSmoothness), Blender (separate channels).
PNG ↔ JPG ↔ SVG: fast convert, SVG rasterize, embed/trace options, quality & background controls.