Seamless Gravel 008 by Textures - PBR 3D Texture (8K ready)
Seamless texture (tileable) · PNG, WEBP, PBR ZIP. License: AITextured Free Commercial License (FCL) v1.1. Free personal and commercial use. Raw resale, standalone redistribution, mirroring/scraping, competing asset packs, and AI/ML training are not allowed without written permission. Attribution is not required, but appreciated..

| ID | gravel-025-by-textures-pbr-seamless-8k |
|---|---|
| Category | Gravel |
| Formats | PNG, WEBP, PBR ZIP |
| Size | 1k (1024x1024px), 2k (2048x2048px), 4k (4096x4096px), 8k (8192x8192px) |
| Color | sRGB |
| Tileable | Yes |
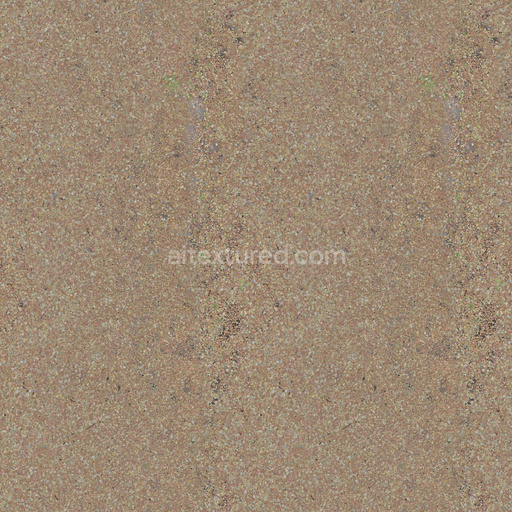
Seamless Gravel 025 by Textures is a premium physically based rendering (PBR) 3D texture expertly crafted to replicate the complex and natural appearance of gravel surfaces with exceptional realism. This texture mimics a heterogeneous ground substrate primarily composed of mineral aggregates including a diverse mix of small stones and pebbles embedded within a matrix of compacted dirt and weathered soil. The composition captures subtle variations in grain size orientation and porosity accurately reflecting how natural gravel accumulates and settles over time. The surface finish is rough and slightly irregular featuring scattered organic debris and dirt that contribute to its authentic weathered appearance. The coloration encompasses warm earth tones such as reds oranges and yellows which arise from naturally occurring mineral pigments and oxidized iron oxides giving the texture its distinctive and vibrant look across the entire surface.
In the PBR workflow each material attribute of this gravel texture is carefully represented to maximize realism and flexibility. The Base Color (Albedo) map conveys the rich natural hues of the gravel and soil without baked-in lighting allowing accurate adaptation to various lighting conditions. The Normal map provides intricate surface depth by simulating the bumps crevices and unevenness caused by the pebbles and compacted dirt enhancing the tactile three-dimensional feel. Roughness values vary throughout the texture reflecting the uneven matte finish typical of weathered gravel where some areas appear coarser due to dust or loose aggregates while others are smoother from compaction. Metallic values are absent consistent with the non-metallic mineral and organic composition. Ambient Occlusion emphasizes shadows in crevices and between stones adding subtle depth and contrast while the Height/Displacement map supports detailed surface relief for advanced rendering techniques such as parallax occlusion mapping or actual mesh displacement.
Seamless Gravel 025 is designed for consistent seamless tiling and performs reliably across modern rendering engines and workflows. It is fully compatible with Blender’s Principled BSDF shader Unreal Engine (utilizing Base Color Roughness Normal and AO maps) and Unity’s URP/HDRP Lit shaders. Available at resolutions up to 8K this texture ensures crisp detail even on large surfaces preserving fidelity and minimizing visible pattern repetition. For optimal results maintain uniform texel density on your models and consider using triplanar or layered tiling methods to further disguise repetition. When importing set the Base Color texture to sRGB and all data-driven maps like Normal Ambient Occlusion and Height to Non-Color to preserve accurate shading and color balance. Slightly adjusting roughness values can help tailor the weathered surface finish to specific lighting environments or artistic needs enhancing the natural realism of your 3D scenes.
Import the texture maps into Blender with sRGB color space for albedo/base color and Non-Color for normal, roughness, metallic, AO, height, and ORM maps. Connect normal maps through a Normal Map node, then adjust UV scale with a Mapping node so the material repeats naturally on your model.
For the full step-by-step setup, see How to Use Seamless Textures in Blender. Browse related material examples in wood, concrete, and metal.
Yes. This texture is designed as a seamless tileable PBR material, so it can repeat across large surfaces without visible borders.
You can download PNG/WEBP versions and use 1K, 2K, 4K and 8K download options when available on the page.
Yes. The download options and engine-mapped ZIP workflow are designed for Blender, Unreal Engine, Unity Standard, URP and HDRP material pipelines.
Yes. The texture is available under the AITextured free commercial license. Review the license page for redistribution and AI-training restrictions.
Build, preview, and export seamless PBR materials. Generate full map sets from a single image, inspect them in a real-time WebGL viewer, and re-package maps for Unreal, Unity, and Blender—directly in your browser.
AI text-to-texture: type a prompt and get a seamless, tileable base image ready for PBR workflows (great starting point for materials).
Create a full PBR set (Normal, Roughness, AO, Metallic, etc.) from a single image. Seamless and tiling-friendly.
Instant WebGL viewer: inspect materials on a sphere, plane, and cube. Check tiling and lighting in real time.
Re-packages maps per engine: Unreal (BaseColor + ORM), Unity (Mask/MetallicSmoothness), Blender (separate channels).
PNG ↔ JPG ↔ SVG: fast convert, SVG rasterize, embed/trace options, quality & background controls.