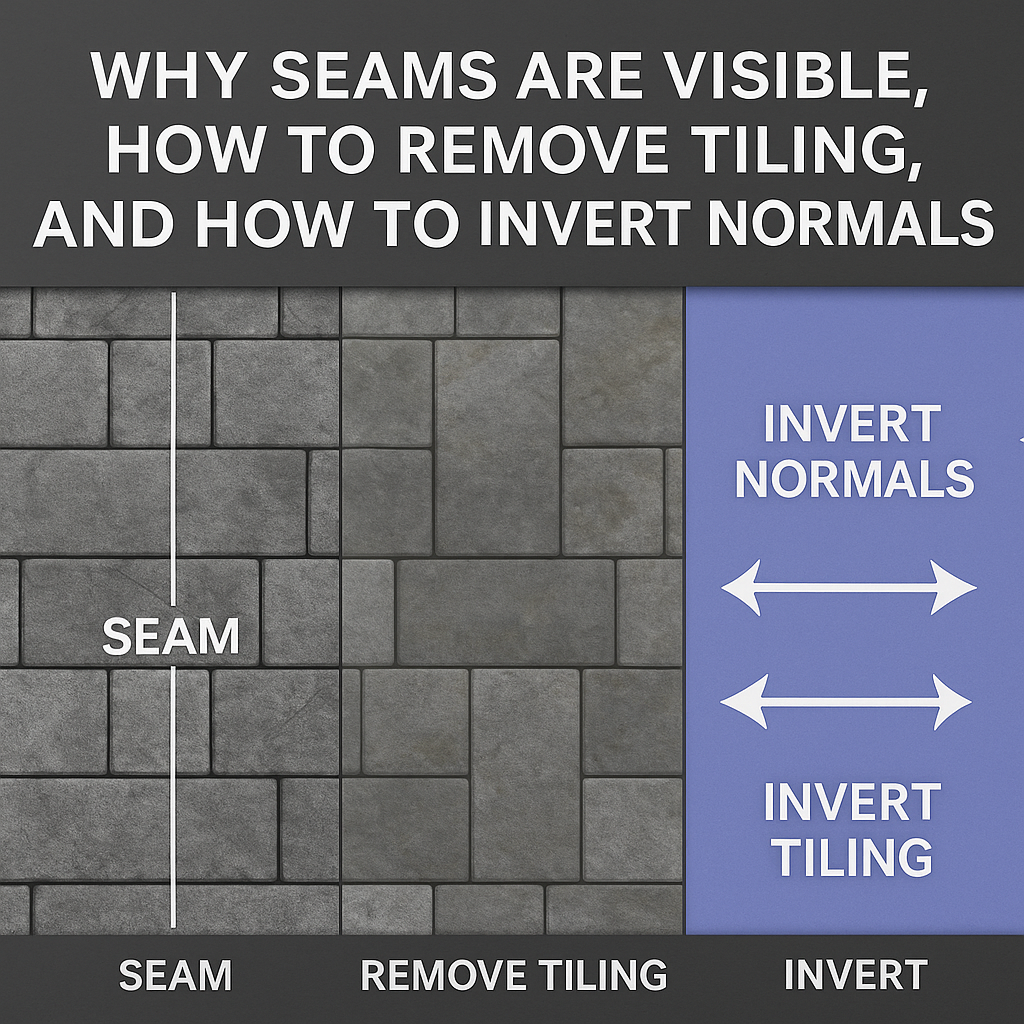
Why Seams Are Visible, How to Remove Tiling, and How to Invert Normals in PBR Textures
1) Understanding What “Seams” Mean in Texturing
A seam is any visible boundary between repeated tiles of a texture when applied to a 3D surface. In theory, a seamless texture should repeat infinitely without visible joins, but in practice, several technical factors can make edges stand out — color mismatch, lighting differences, filtering errors, or UV distortion.
Seams typically appear in two situations:
- During UV mapping — when the texture is cut and wrapped around a 3D model.
- During tiling — when the texture is repeated multiple times over a surface (e.g., floor, wall, terrain).
In both cases, the human eye quickly detects regularity or small mismatches in brightness, hue, or direction. Seamless materials must therefore be tileable and consistent both in color and normal direction.
2) Why Seams Become Visible
Seams are not always the result of bad textures. Often, they come from how software interprets and displays data. Below are the main causes:
2.1. Edge mismatch in source image
If opposite sides of a texture (left-right, top-bottom) don’t perfectly align in color, brightness, or pattern, seams will appear at the borders. This usually happens when a texture was cropped from a photo without proper seamless processing.
2.2. Linear filtering and mipmaps
Rendering engines use texture filtering (bilinear, trilinear, anisotropic) and mipmaps to smooth textures. At UV seams, the filtering may blend pixels from outside the tile boundary, creating a faint line or blur.
2.3. Lighting differences baked into Albedo
Real-world photos often contain shadows or highlights. When converted into a texture, those lighting cues repeat with every tile, making edges appear lighter or darker. A proper Albedo/Base Color map should have no directional lighting.
2.4. Normal map handedness mismatch (DX vs GL)
Different engines interpret the green channel of normal maps differently. If a normal map’s Y (green) direction is inverted, the lighting appears reversed — convex surfaces look concave, and vice versa. This can cause “fake seams” at tile boundaries.
2.5. Roughness or AO inconsistencies
If the Roughness or AO maps are not seamless, specular reflections will break continuity. Even minor noise or contrast mismatches can create visible tile edges under directional light.
2.6. UV Stretching
On curved or complex surfaces, UV coordinates may stretch or compress parts of the texture. When repeated across seams, stretched pixels appear brighter or darker, exaggerating the border effect.
3) How to Diagnose Seam Problems
Before fixing, it’s important to identify what kind of seam you have. Use this checklist:
- Render a large plane with the material tiled 4–8 times in both directions.
- Check in neutral lighting — disable AO, shadows, and reflections.
- Inspect each map individually (Albedo, Normal, Roughness, AO) in the shader viewer.
- Toggle normal orientation (invert green channel) to see if the problem reverses.
- Use UV > Offset preview in Photoshop, GIMP, or Blender to locate non-seamless borders.
Once you isolate whether it’s color mismatch, normal flip, or roughness edge, you can apply the right fix.
4) How to Remove Visible Seams (Seamless Texture Creation)
4.1. Use wrap-padding filters
When generating PBR maps (e.g., with AITEXTURED PBR Generator), filters like blur, contrast, and normal computation must use BORDER_WRAP mode. This tells the algorithm to treat edges as continuous, eliminating mismatched gradients.
4.2. Manual offset editing
In Photoshop or GIMP, use Filter → Other → Offset to shift the image by half its width and height. Then, retouch the center seam area using clone and healing tools until it disappears. Shift back to verify seamless edges.
4.3. AI and procedural tools
AITEXTURED’s internal pipeline uses procedural sampling and AI-based edge synthesis to create true seamless loops even from uneven photos. You can simulate this by using Photoshop’s Content-Aware Fill or specialized seamless texture software.
4.4. Remove directional lighting
Before baking a PBR material, normalize your Albedo by removing any visible shadows. Use High Pass + Soft Light or histogram equalization to even out brightness. This step prevents tile-based light repetition.
4.5. Normalize color and tone
For photographic textures, convert to LAB color mode and smooth the L channel to remove uneven brightness while keeping texture detail. Seam visibility often disappears when brightness differences are equalized.
5) How to Eliminate Tiling Patterns
Even perfectly seamless textures can look repetitive over large areas. This phenomenon is called tiling repetition or pattern fatigue. It happens when small-scale features repeat at predictable intervals, breaking realism.
5.1. Add macro variation
Blend two or more versions of the same texture with different offsets, rotations, or tints. In shaders, this is often implemented via triplanar mapping or stochastic tiling. You can also use noise masks to mix between textures randomly.
5.2. Use UV randomization
Many engines support random rotation or scaling of tiles per instance. In Unreal, use the WorldAlignedTexture node or PerInstanceRandom parameter. In Blender, use object info → random → vector mapping for per-instance offsets.
5.3. Blend detail + macro layers
Combine two layers: a large-scale low-frequency color variation map and a small high-frequency detail map. This preserves sharpness while breaking pattern repetition.
5.4. Paint variation masks
In environment art, use vertex colors or weight maps to manually blend different materials. For example, slightly different gravel textures can blend at random intervals to hide pattern repetition.
5.5. Procedural projection
Tools like Triplanar Mapping automatically project textures without explicit UV seams. This method is ideal for terrain and complex geometry where manual UV unwrapping would produce visible tile lines.
6) How to Invert Normals (DX vs GL)
One of the most confusing topics for artists is the difference between DirectX (DX) and OpenGL (GL) normal map conventions. The only difference between the two is how the Y (green) channel is interpreted.
- OpenGL convention: +Y points upward (toward the viewer).
- DirectX convention: +Y points downward (into the surface).
If you apply a GL normal map in a DX engine (or vice versa), lighting directions invert — bumps become dents. To fix this, simply invert the green channel.
6.1. Manual inversion
In Photoshop or GIMP:
- Open the normal map.
- Select the Green channel only.
- Apply
Image → Adjustments → Invert(Ctrl+I). - Save the result.
6.2. Command-line conversion
Using ImageMagick:
magick normal_gl.png -channel G -negate +channel normal_dx.png6.3. Using AITEXTURED Mapper Tool
The Unity / Unreal / Blender Mapper automatically detects and converts normal handedness. It flips the green channel if the source convention doesn’t match your target engine (e.g., GL → DX for Unreal, or DX → GL for Blender).
6.4. Engine-specific defaults
- Unreal Engine — uses DirectX normals (green channel inverted).
- Unity — uses DirectX normals (green inverted) for HDRP/URP.
- Blender — uses OpenGL normals (green not inverted).
- Substance Painter — can export both; check export preset.
When mixing materials from different sources, always verify the normal orientation by checking how light moves across the surface. If lighting seems to “sink in,” invert the green channel.
7) Real-World Examples
Example 1 — Visible seams on tiled concrete
A 4K concrete texture repeated over a large wall shows faint lines every 4 meters. After analysis, the cause was Albedo mismatch due to uneven lighting in the source photo. Solution: applied High Pass filter and rebalanced brightness — seams vanished.
Example 2 — Terrain pattern repetition
Ground material looked artificial due to obvious repetition. Solution: layered two 2K seamless dirt textures using a noise blend mask with large-scale variation. The result looked natural and infinite.
Example 3 — Wrong normal direction in Blender
Imported Unreal material into Blender — shading looked inverted. Solution: inverted green channel in the normal map. Lighting direction matched again.
8) Automation Tips
AITEXTURED provides multiple tools to automate these tasks:
- PBR Texture Generator — automatically creates seamless maps with wrap-padding and no visible seams.
- Mapper Tool — converts normal maps and repacks ORM/MaskMap automatically for each engine.
- Image Converter — convert PNG/JPG/WEBP for texture optimization without losing color fidelity.
9) Debugging Checklist
- ✅ Check map alignment (Offset method).
- ✅ Remove baked shadows in Albedo.
- ✅ Ensure wrap-padding in PBR generator.
- ✅ Verify green channel orientation for engine.
- ✅ Randomize UVs or use macro blend for large surfaces.
- ✅ Balance roughness levels; avoid sudden transitions.
10) Advanced: Seamless UV Projection
For complex meshes like rocks or organic models, UV seams are inevitable. Use Triplanar Projection to project the texture in three directions (X, Y, Z). This removes hard UV seams and produces consistent blending even on irregular geometry.
In Blender, use the Box Mapping mode in the Image Texture node. In Unreal, use WorldAlignedTexture. In Unity, implement triplanar shaders or use the Shader Graph sample.
11) The Role of Height Maps and Displacement
When height maps have mismatched edges, even perfect color textures will show seams when displaced. Ensure your height data is wrapped seamlessly and properly normalized. Use displacement subdivision carefully — mismatched scales between neighboring tiles exaggerate edge differences.
AITEXTURED’s generators always normalize height maps and wrap edges automatically using cv2.BORDER_WRAP filtering in OpenCV, preserving seamless continuity across PBR channels.
12) Summary
Visible seams, tiling, and inverted normals are symptoms of small but fixable technical issues. By understanding their causes, you can eliminate them completely:
- Seams → caused by color mismatch or unwrapped filtering → fix with wrap-padding and offset correction.
- Tiling → caused by pattern repetition → fix with randomization and blending.
- Normals → caused by DX/GL mismatch → fix by flipping green channel.
Following these principles, all textures from AITEXTURED are guaranteed seamless and cross-engine ready — no visible joins, no directional errors, no broken shading.
FAQ
What is covered in this guide?
This guide explains Why Seams Are Visible, How to Remove Tiling, and How to Invert Normals in PBR Textures with practical notes for seamless PBR materials, texture setup, and production use.
Can I use these texture techniques in Blender, Unreal Engine, and Unity?
Yes. The workflow focuses on standard PBR maps and tileable materials that can be used in Blender, Unreal Engine, Unity, archviz, games, and VFX pipelines.
Where can I find textures for this workflow?
Use the AITextured texture library and the related texture links on this page to find seamless PBR materials and preview them before download.
Related Textures
 Seamless 3D Pattern PBR Texture Featuring Playful Zebra Motifs with Foliage
 Seamless 3D Pattern PBR Texture Featuring Cute Zebra Motifs and Tropical Leaves
 Seamless 3D Pattern PBR Texture Featuring Hand-Drawn Zebras & Tropical Leaves
 Seamless 3D Pattern PBR Texture with Playful Cartoon Zebra and Green Foliage
 Seamless 3D Wildflower Pattern PBR Texture with Delicate Watercolor Floral Motifs
 Seamless 3D Pattern PBR Texture Featuring Delicate Watercolor Wildflower Botanicals on White Background
 Seamless 3D Pattern PBR Texture Featuring Delicate Wild Flower Motifs on Soft Yellow
 Seamless 3D PBR Pattern Texture Featuring Delicate Wildflower Motifs on White