Spooky Fog With Foggy Mist And Smoke Wisps In 8K Detail
Seamless texture (tileable) · PNG, WEBP, PBR ZIP. License: AITextured Free Commercial License (FCL) v1.1. Free personal and commercial use. Raw resale, standalone redistribution, mirroring/scraping, competing asset packs, and AI/ML training are not allowed without written permission. Attribution is not required, but appreciated..

| ID | seamless-3d-texture-pbr-8k-halloween-ghostly-fog-mist-surface |
|---|---|
| Category | Halloween |
| Formats | PNG, WEBP, PBR ZIP |
| Size | 1k (1024x1024px), 2k (2048x2048px), 4k (4096x4096px), 8k (8192x8192px) |
| Color | sRGB |
| Tileable | Yes |
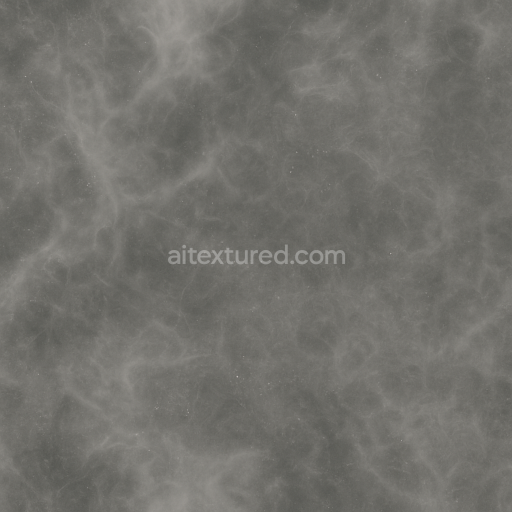
This seamless 3D PBR texture captures the ethereal essence of ghostly fog mist with an ultra-high 8K resolution making it ideal for creating atmospheric Halloween scenes. The texture is composed to simulate a soft white translucent fog surface that appears organically layered and subtly blurred evoking a hauntingly realistic mist effect. The base substrate is imagined as a fine diffuse polymer matrix that mimics the scattering properties of fog particles suspended in air with no metallic elements present ensuring a purely matte soft finish. This organic surface finish is enhanced by carefully balanced binders and microscopic aggregates that contribute to a natural non-uniform translucency and porosity replicating the diffuse light scattering and absorption typical of dense fog layers.
In terms of PBR channel mapping the BaseColor/Albedo channel reflects the delicate off-white and pale gray hues characteristic of ghostly mist avoiding harsh contrasts to maintain softness. The Normal map subtly encodes the gentle undulations and volumetric depth of the fog’s surface layers without introducing sharp relief preserving the smooth ethereal quality. Roughness values are set high to emphasize the non-reflective matte nature of fog while the Metallic channel is effectively zeroed out to exclude any shiny or metal-like reflections. Ambient Occlusion enhances the perception of layered depth and density in shadowed areas and the Height/Displacement map adds a slight volumetric variation that enriches photorealistic renders by simulating subtle fog contouring and drifting effects.
Designed for seamless tiling this texture integrates flawlessly into digital environments allowing for continuous fog layers that blend naturally without visible seams. It is fully optimized and Unreal Blender and Unity-ready ensuring compatibility with major 3D engines and workflows for games and cinematic art. The 8K resolution provides exceptional detail and clarity which is especially beneficial when close-up views or high-density fog effects are required in haunted forests graveyards or other spooky environments.
For practical use adjusting the UV scale can help control the density and spread of the fog effect to suit different scene sizes. Additionally fine-tuning the roughness parameter can subtly shift the perceived thickness and softness of the mist allowing artists to customize the atmospheric ambiance. This seamless ghostly fog mist texture is an excellent material choice to enrich Halloween-themed projects with immersive believable fog effects that heighten the visual complexity and mood of your digital scenes.
Import the texture maps into Blender with sRGB color space for albedo/base color and Non-Color for normal, roughness, metallic, AO, height, and ORM maps. Connect normal maps through a Normal Map node, then adjust UV scale with a Mapping node so the material repeats naturally on your model.
For the full step-by-step setup, see How to Use Seamless Textures in Blender. Browse related material examples in wood, concrete, and metal.
Yes. This texture is designed as a seamless tileable PBR material, so it can repeat across large surfaces without visible borders.
You can download PNG/WEBP versions and use 1K, 2K, 4K and 8K download options when available on the page.
Yes. The download options and engine-mapped ZIP workflow are designed for Blender, Unreal Engine, Unity Standard, URP and HDRP material pipelines.
Yes. The texture is available under the AITextured free commercial license. Review the license page for redistribution and AI-training restrictions.
Build, preview, and export seamless PBR materials. Generate full map sets from a single image, inspect them in a real-time WebGL viewer, and re-package maps for Unreal, Unity, and Blender—directly in your browser.
AI text-to-texture: type a prompt and get a seamless, tileable base image ready for PBR workflows (great starting point for materials).
Create a full PBR set (Normal, Roughness, AO, Metallic, etc.) from a single image. Seamless and tiling-friendly.
Instant WebGL viewer: inspect materials on a sphere, plane, and cube. Check tiling and lighting in real time.
Re-packages maps per engine: Unreal (BaseColor + ORM), Unity (Mask/MetallicSmoothness), Blender (separate channels).
PNG ↔ JPG ↔ SVG: fast convert, SVG rasterize, embed/trace options, quality & background controls.