Witch Hat Fabric With Eerie Mystical Patterns
Seamless texture (tileable) · PNG, WEBP, PBR ZIP. License: AITextured Free Commercial License (FCL) v1.1. Free personal and commercial use. Raw resale, standalone redistribution, mirroring/scraping, competing asset packs, and AI/ML training are not allowed without written permission. Attribution is not required, but appreciated..

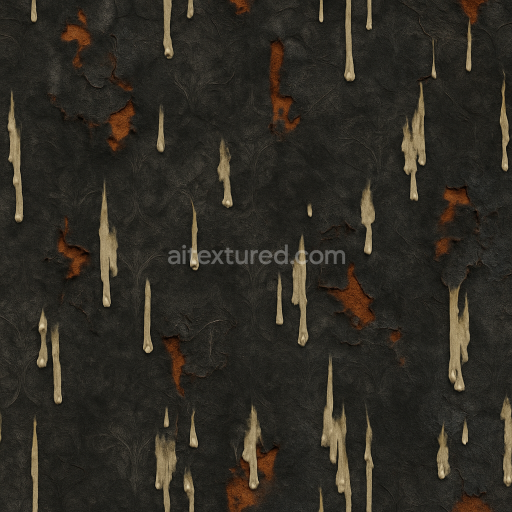
| ID | seamless-3d-texture-pbr-8k-dark-velvet-fabric-with-blood-red-stains-for-halloween-decor |
|---|---|
| Category | Halloween |
| Formats | PNG, WEBP, PBR ZIP |
| Size | 1k (1024x1024px), 2k (2048x2048px), 4k (4096x4096px), 8k (8192x8192px) |
| Color | sRGB |
| Tileable | Yes |
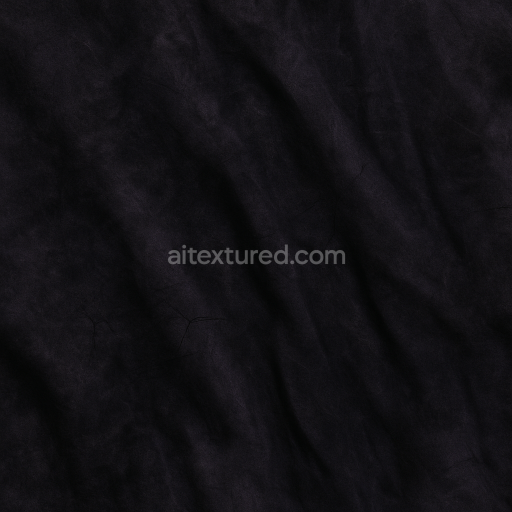
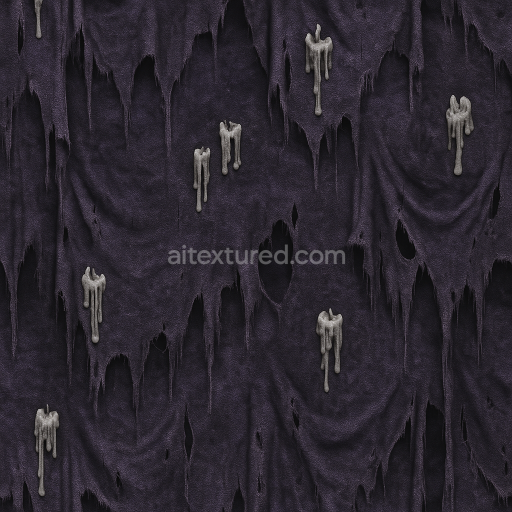
This seamless 3D texture showcases a richly detailed dark velvet fabric base meticulously crafted to emulate the luxurious yet eerie surface ideal for Halloween or horror-themed projects. The fabric’s organic textile substrate features tightly woven velvet fibers with a subtle pile enhanced by a complex interplay of blood red stains that appear deeply absorbed into the material. The dark velvet's natural pigments and dye layers are represented in the BaseColor/Albedo channel capturing the intense contrast between the saturated crimson splashes and the muted blackish fabric. The photorealistic surface finish simulates a slightly worn matte velvet with delicate faded and tattered cloth details conveying a sense of age and decay through subtle wear tear and minute cracks that add texture depth and visual interest.
In the PBR workflow the Normal map accurately reproduces the velvet’s fine fiber orientation and the irregularities caused by the blood splatter and fabric distressing. The Roughness channel balances smooth velvety softness with rougher patches where the stains and fabric damage have altered the surface finish while the Metallic channel remains near zero reflecting the organic non-metallic nature of the textile. Ambient Occlusion enhances shadowing around fabric folds and tattered edges intensifying the worn spooky ambiance. The Height or Displacement map introduces subtle surface relief emphasizing the depth of the blood red stains and the fabric’s weathered texture creating a tactile realism that holds up at close inspection especially at the 8K resolution level.
Designed for seamless tiling this 8K resolution texture is fully optimized and ready for integration into Unreal Engine Blender and Unity ensuring high fidelity and performance across diverse 3D environments. Its high detail level allows for large-scale close-ups without loss of clarity perfect for atmospheric props gothic costumes and horror-themed decorative elements. For practical use adjusting the UV scale to slightly enlarge the texture can emphasize the dramatic blood stain details while fine-tuning the Roughness parameter in your material settings can enhance the realistic velvet sheen or accentuate the worn fabric appearance depending on the desired visual effect.
Import the texture maps into Blender with sRGB color space for albedo/base color and Non-Color for normal, roughness, metallic, AO, height, and ORM maps. Connect normal maps through a Normal Map node, then adjust UV scale with a Mapping node so the material repeats naturally on your model.
For the full step-by-step setup, see How to Use Seamless Textures in Blender. Browse related material examples in wood, concrete, and metal.
Yes. This texture is designed as a seamless tileable PBR material, so it can repeat across large surfaces without visible borders.
You can download PNG/WEBP versions and use 1K, 2K, 4K and 8K download options when available on the page.
Yes. The download options and engine-mapped ZIP workflow are designed for Blender, Unreal Engine, Unity Standard, URP and HDRP material pipelines.
Yes. The texture is available under the AITextured free commercial license. Review the license page for redistribution and AI-training restrictions.


Build, preview, and export seamless PBR materials. Generate full map sets from a single image, inspect them in a real-time WebGL viewer, and re-package maps for Unreal, Unity, and Blender—directly in your browser.
AI text-to-texture: type a prompt and get a seamless, tileable base image ready for PBR workflows (great starting point for materials).
Create a full PBR set (Normal, Roughness, AO, Metallic, etc.) from a single image. Seamless and tiling-friendly.
Instant WebGL viewer: inspect materials on a sphere, plane, and cube. Check tiling and lighting in real time.
Re-packages maps per engine: Unreal (BaseColor + ORM), Unity (Mask/MetallicSmoothness), Blender (separate channels).
PNG ↔ JPG ↔ SVG: fast convert, SVG rasterize, embed/trace options, quality & background controls.