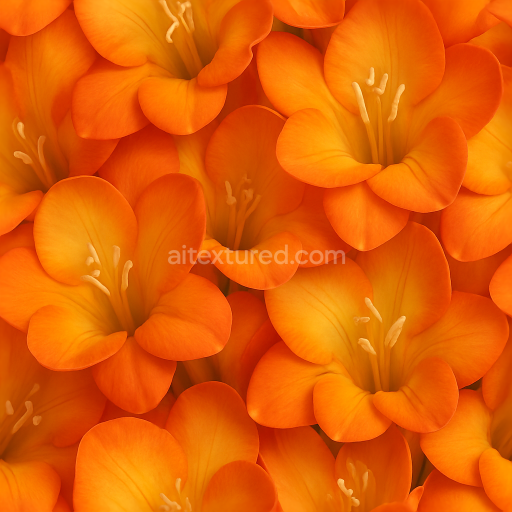
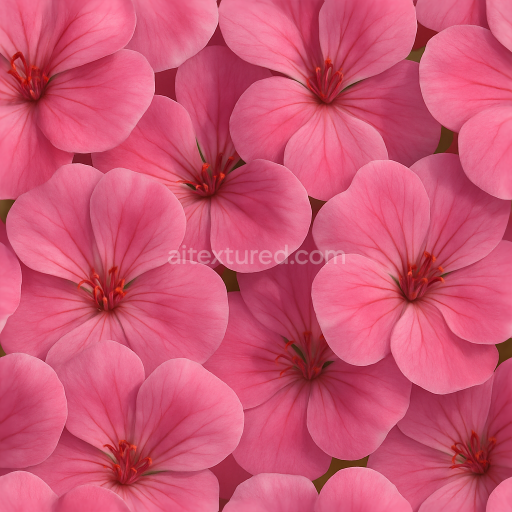
Freesia Petals Flower Petals Closeup Flower Bouquet Photorealistic
Seamless texture (tileable) · PNG, WEBP, PBR ZIP. License: AITextured Free Commercial License (FCL) v1.1. Free personal and commercial use. Raw resale, standalone redistribution, mirroring/scraping, competing asset packs, and AI/ML training are not allowed without written permission. Attribution is not required, but appreciated..

| ID | seamless-3d-texture-pbr-8k-lily-petals-flower-arrangement-flower-petals-closeup-natural-lighting |
|---|---|
| Category | Flowers |
| Formats | PNG, WEBP, PBR ZIP |
| Size | 1k (1024x1024px), 2k (2048x2048px), 4k (4096x4096px), 8k (8192x8192px) |
| Color | sRGB |
| Tileable | Yes |
This seamless 3D texture presents an intricate closeup of lily petals in stunning 8K resolution, crafted with physically based rendering (PBR) for maximum realism. The material simulates the natural form of lily petals, characterized by their delicate, slightly translucent membranes featuring fine veins and subtle curvature. The geometric pattern is organic and flowing, with overlapping petals arranged in a natural flower formation. Each petal exhibits gentle undulations and softly tapered edges, conveying a lifelike softness and fragile structure. The visible flower stamens add complexity to the composition, enhancing the botanical authenticity of the texture.
The base material mimics the thin, fibrous epidermis of real lily petals, composed primarily of cellulose fibers interwoven with a natural adhesive matrix, giving the surface a smooth yet slightly textured feel. The petal substrate is semi-translucent, allowing light scattering that creates soft highlights and shadows, captured through the detailed BaseColor and normal maps. Pigmentation arises from organic colorants within the petals, reflected in the BaseColor channel as subtle gradients of pale pinks, whites, and gentle yellows, enhanced by natural vein patterns that provide fine linear details. The roughness map balances between smooth, almost satin-like finishes on the petal surfaces and slightly rougher textures along veins and edges, creating realistic light diffusion without any metallic reflections, which is consistent with the purely organic composition.
The PBR workflow is carefully utilized to replicate these material properties. The Normal map captures the micro-relief of veins and soft folds, crucial for rendering light interaction and depth. The Roughness map varies smoothly, emphasizing the contrast between glossy highlights on petal tips and matte sections within the fibrous areas. The Ambient Occlusion map enhances depth perception around petal overlaps and stamens, subtly darkening crevices to improve spatial realism. Height or Displacement maps provide precise surface variations, enabling realistic parallax effects and enhancing the 3D feel when viewed at close range. The Metallic channel is uniformly set to zero, consistent with the non-metallic nature of natural flower petals.
This texture is optimized for seamless tiling, allowing it to be applied continuously across models without visible repetition or seams, making it ideal for detailed flower arrangements, botanical visualizations, or decorative floral elements in 3D scenes. Its high 8K resolution ensures crisp detail even in close-up renders or animations. Compatibility with Blender, Unreal Engine, and Unity means it integrates smoothly into a wide range of workflows, supporting physically accurate shading and lighting setups in real-time or offline rendering environments.
For best results, it is recommended to carefully adjust the UV scale to maintain natural petal proportions and avoid distortion. Tuning the roughness values slightly higher can help soften reflections in more diffuse lighting conditions, while blending normal and height maps allows fine control over surface detail intensity, especially useful for close inspection or macro shots. This approach ensures the texture remains visually convincing and flexible across diverse artistic and technical applications.
Import the texture maps into Blender with sRGB color space for albedo/base color and Non-Color for normal, roughness, metallic, AO, height, and ORM maps. Connect normal maps through a Normal Map node, then adjust UV scale with a Mapping node so the material repeats naturally on your model.
For the full step-by-step setup, see How to Use Seamless Textures in Blender. Browse related material examples in wood, concrete, and metal.
Yes. This texture is designed as a seamless tileable PBR material, so it can repeat across large surfaces without visible borders.
You can download PNG/WEBP versions and use 1K, 2K, 4K and 8K download options when available on the page.
Yes. The download options and engine-mapped ZIP workflow are designed for Blender, Unreal Engine, Unity Standard, URP and HDRP material pipelines.
Yes. The texture is available under the AITextured free commercial license. Review the license page for redistribution and AI-training restrictions.

Build, preview, and export seamless PBR materials. Generate full map sets from a single image, inspect them in a real-time WebGL viewer, and re-package maps for Unreal, Unity, and Blender—directly in your browser.
AI text-to-texture: type a prompt and get a seamless, tileable base image ready for PBR workflows (great starting point for materials).
Create a full PBR set (Normal, Roughness, AO, Metallic, etc.) from a single image. Seamless and tiling-friendly.
Instant WebGL viewer: inspect materials on a sphere, plane, and cube. Check tiling and lighting in real time.
Re-packages maps per engine: Unreal (BaseColor + ORM), Unity (Mask/MetallicSmoothness), Blender (separate channels).
PNG ↔ JPG ↔ SVG: fast convert, SVG rasterize, embed/trace options, quality & background controls.