
Wallpaper With Vintage Floral Damask Embossed Design
Seamless texture (tileable) · PNG, WEBP, PBR ZIP. License: AITextured Free Commercial License (FCL) v1.1. Free personal and commercial use. Raw resale, standalone redistribution, mirroring/scraping, competing asset packs, and AI/ML training are not allowed without written permission. Attribution is not required, but appreciated..

| ID | seamless-3d-texture-pbr-8k-oriental-paisley-classic-wallpaper-with-embossed-jacquard-and-matte-cotton-weave |
|---|---|
| Category | Wallpaper |
| Formats | PNG, WEBP, PBR ZIP |
| Size | 1k (1024x1024px), 2k (2048x2048px), 4k (4096x4096px), 8k (8192x8192px) |
| Color | sRGB |
| Tileable | Yes |
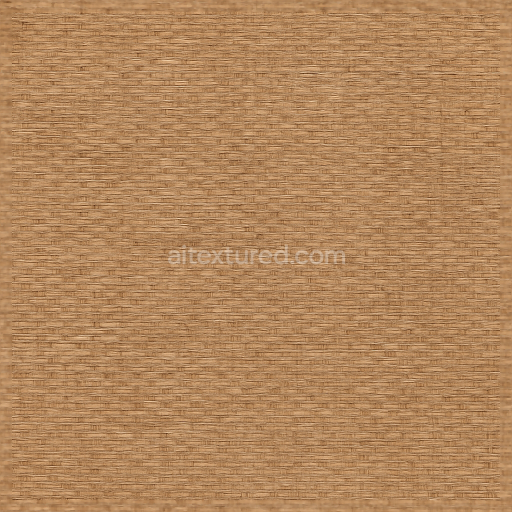
This seamless 3D texture represents an oriental paisley wallpaper crafted with a classic jacquard pattern rendered at ultra-high 8K resolution for exceptional detail and clarity. The base material is a woven cotton fabric substrate chosen for its natural softness and matte finish. This cotton weave provides a tactile fibrous surface with subtle porosity enhancing light diffusion and contributing to the wallpaper’s understated matte appearance. The jacquard design is embossed onto the fabric creating a raised relief that mimics the intricate weaving technique traditionally used in textile production. This geometric form features elongated paisley motifs interlaced with delicate floral elements giving a rhythmic yet organic flow that emphasizes depth and texture across the surface.
In terms of composition the wallpaper texture combines a dense cotton fiber network with a binding resin that simulates the adhesive used in real jacquard weaving to hold the threads and embossed sections in place. The pigment layer is applied through base color (Albedo) maps showcasing rich muted oriental tones that enhance the classic aesthetic without overpowering the fine details. The Normal map captures the subtle embossing and woven fiber relief while the Height map provides additional displacement for parallax effects accentuating the tactile quality of the jacquard pattern. Roughness maps define the matte non-reflective cotton weave ensuring soft light scattering whereas the Metallic channel remains near zero to maintain a purely textile non-metallic appearance. Ambient Occlusion maps deepen the shadowing within the embossed crevices and folds adding realism to the interplay of light and form.
This 8K PBR texture is fully optimized for real-time rendering engines such as Blender Unreal Engine and Unity allowing for seamless integration into both architectural visualizations and virtual environments. The high resolution ensures that the fine weave and embossing remain crisp even in close-up views while the PBR workflow delivers physically accurate light interaction across all material channels. The combination of embossed jacquard relief and matte cotton weave offers a balance between intricate detail and natural softness suitable for creating interiors with a refined traditional feel that still benefits from modern rendering technology.
For practical use it is recommended to carefully adjust the UV scale when applying this texture to avoid repetition artifacts especially given the complexity of the paisley pattern. Additionally tuning the roughness map can help adapt the surface reflectivity to different lighting conditions from softer indoor light to brighter daylight scenarios. When working with displacement or parallax effects blending the height and normal maps can enhance the three-dimensional quality of the embossed details without introducing harsh edges preserving the fabric’s gentle curvature and organic form.
Import the texture maps into Blender with sRGB color space for albedo/base color and Non-Color for normal, roughness, metallic, AO, height, and ORM maps. Connect normal maps through a Normal Map node, then adjust UV scale with a Mapping node so the material repeats naturally on your model.
For the full step-by-step setup, see How to Use Seamless Textures in Blender. Browse related material examples in wood, concrete, and metal.
Yes. This texture is designed as a seamless tileable PBR material, so it can repeat across large surfaces without visible borders.
You can download PNG/WEBP versions and use 1K, 2K, 4K and 8K download options when available on the page.
Yes. The download options and engine-mapped ZIP workflow are designed for Blender, Unreal Engine, Unity Standard, URP and HDRP material pipelines.
Yes. The texture is available under the AITextured free commercial license. Review the license page for redistribution and AI-training restrictions.


Generate, preview, and export seamless PBR materials for Blender, Unity, and Unreal Engine—directly in your browser.
AI text-to-texture: type a prompt and get a seamless, tileable base image ready for PBR workflows (great starting point for materials).
Create a full PBR set (Normal, Roughness, AO, Metallic, etc.) from a single image. Seamless and tiling-friendly.
Instant WebGL viewer: inspect materials on a sphere, plane, and cube. Check tiling and lighting in real time.
Re-packages maps per engine: Unreal (BaseColor + ORM), Unity (Mask/MetallicSmoothness), Blender (separate channels).
PNG ↔ JPG ↔ SVG: fast convert, SVG rasterize, embed/trace options, quality & background controls.