
Wallpaper With Tropical Botanical Ivy Vine Leafy Canvas Texture
Seamless texture (tileable) · PNG, WEBP, PBR ZIP. License: AITextured Free Commercial License (FCL) v1.1. Free personal and commercial use. Raw resale, standalone redistribution, mirroring/scraping, competing asset packs, and AI/ML training are not allowed without written permission. Attribution is not required, but appreciated..

| ID | seamless-3d-texture-pbr-8k-distressed-cracked-paint-stucco-wallpaper-with-embossed-plaster-texture-finish |
|---|---|
| Category | Wallpaper |
| Formats | PNG, WEBP, PBR ZIP |
| Size | 1k (1024x1024px), 2k (2048x2048px), 4k (4096x4096px), 8k (8192x8192px) |
| Color | sRGB |
| Tileable | Yes |
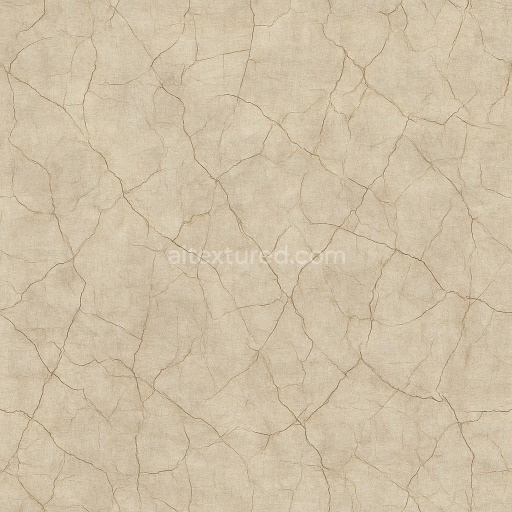
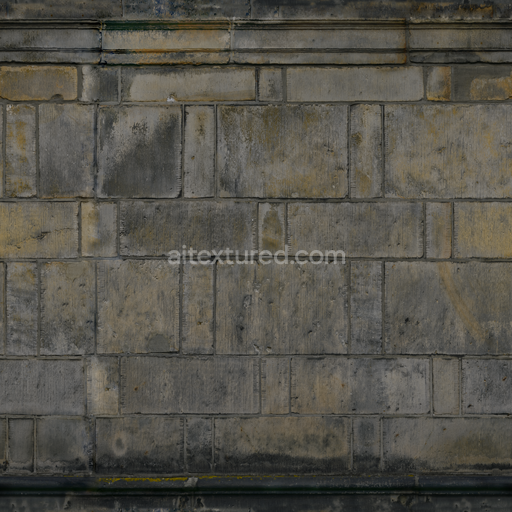
This seamless 3D texture features a highly detailed stucco wallpaper design characterized by distressed and cracked paint layers atop an embossed plaster substrate. The base material simulates a traditional lime-based plaster mixed with fine aggregates giving the surface a naturally rough and porous structure. The plaster’s embossed geometric form mimics irregular hand-applied trowel patterns creating subtle undulations and raised motifs that enhance tactile depth. Over time the painted surface has weathered resulting in authentic cracks and peeling effects that expose portions of the underlying stucco conveying a sense of aged craftsmanship and material erosion.
The composition includes a mineral-rich plaster base bound with calcium carbonate and silica combined with organic binders to replicate adhesion and flexibility. The paint layer employs muted earth-toned pigments with varying opacity to simulate worn sun-faded coloration. Fine dust and micro-fissures are subtly integrated within the aggregate grain reinforcing the texture’s natural roughness and porosity. This contributes to realistic light scattering and shadowing on the surface critical for achieving believable ambient occlusion and displacement in PBR workflows. The surface finish is matte with moderate roughness reflecting the unpolished weathered plaster rather than glossy paint which enhances diffuse light interaction and reduces specular highlights.
In terms of PBR mapping the BaseColor texture captures the muted aged paint pigments with subtle tonal variations that emphasize cracks and peeling edges. The Normal map conveys the embossed plaster relief and fine surface imperfections creating convincing depth and surface complexity. Roughness maps define the uneven matte finish varying from slightly smoother paint remnants to coarse exposed plaster areas. Metallic values remain near zero fitting the non-metallic nature of plaster and paint materials. Ambient Occlusion intensifies shadowed crevices within cracks and embossed patterns while the Height/Displacement map supports realistic parallax and micro-geometry effects enhancing the three-dimensionality of the stucco surface.
Rendered at an impressive 8K resolution this texture is optimized for high-fidelity use in Blender Unreal Engine and Unity ensuring exceptional detail and realism even in close-up views. The seamless tiling allows for extensive wall coverage without visible repetition ideal for architectural visualizations and interior design projects requiring authentic aged plaster surfaces. For practical application adjusting UV scale can help fit the embossed pattern to different wall sizes while fine-tuning roughness values can simulate varying degrees of surface wear. Additionally blending height and normal maps carefully will maximize depth perception without excessive displacement artifacts.
Import the texture maps into Blender with sRGB color space for albedo/base color and Non-Color for normal, roughness, metallic, AO, height, and ORM maps. Connect normal maps through a Normal Map node, then adjust UV scale with a Mapping node so the material repeats naturally on your model.
For the full step-by-step setup, see How to Use Seamless Textures in Blender. Browse related material examples in wood, concrete, and metal.
Yes. This texture is designed as a seamless tileable PBR material, so it can repeat across large surfaces without visible borders.
You can download PNG/WEBP versions and use 1K, 2K, 4K and 8K download options when available on the page.
Yes. The download options and engine-mapped ZIP workflow are designed for Blender, Unreal Engine, Unity Standard, URP and HDRP material pipelines.
Yes. The texture is available under the AITextured free commercial license. Review the license page for redistribution and AI-training restrictions.


Generate, preview, and export seamless PBR materials for Blender, Unity, and Unreal Engine—directly in your browser.
AI text-to-texture: type a prompt and get a seamless, tileable base image ready for PBR workflows (great starting point for materials).
Create a full PBR set (Normal, Roughness, AO, Metallic, etc.) from a single image. Seamless and tiling-friendly.
Instant WebGL viewer: inspect materials on a sphere, plane, and cube. Check tiling and lighting in real time.
Re-packages maps per engine: Unreal (BaseColor + ORM), Unity (Mask/MetallicSmoothness), Blender (separate channels).
PNG ↔ JPG ↔ SVG: fast convert, SVG rasterize, embed/trace options, quality & background controls.