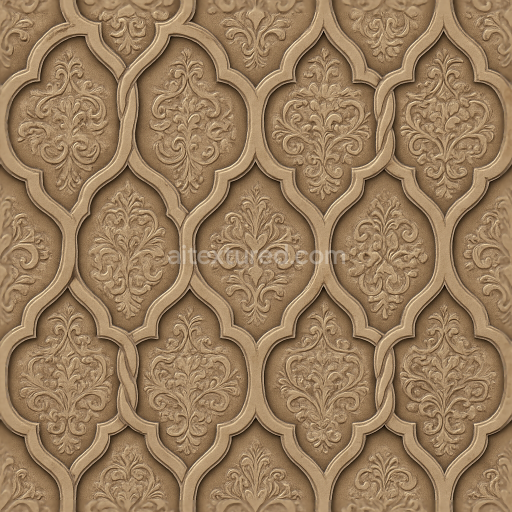
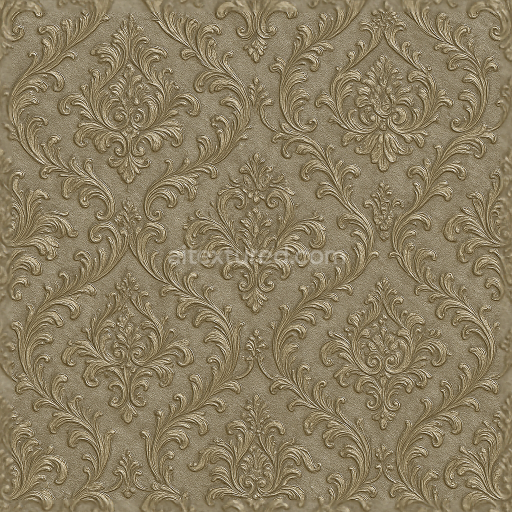
Wallpaper With Oriental Arabesque Trellis And Chain Link Pattern
Seamless texture (tileable) · PNG, WEBP, PBR ZIP. License: AITextured Free Commercial License (FCL) v1.1. Free personal and commercial use. Raw resale, standalone redistribution, mirroring/scraping, competing asset packs, and AI/ML training are not allowed without written permission. Attribution is not required, but appreciated..

| ID | seamless-3d-texture-pbr-8k-ornate-scrollwork-wallpaper-with-embossed-satin-finish |
|---|---|
| Category | Wallpaper |
| Formats | PNG, WEBP, PBR ZIP |
| Size | 1k (1024x1024px), 2k (2048x2048px), 4k (4096x4096px), 8k (8192x8192px) |
| Color | sRGB |
| Tileable | Yes |
This seamless 3D texture features an ornate scrollwork wallpaper design crafted with meticulous attention to material realism and form. The base substrate is a fine woven fabric or high-quality vinyl chosen for its durability and subtle texture that supports embossing. Embedded within the substrate are adhesive binders that securely hold the intricate scrollwork patterns which are raised in a refined embossed relief. The form is characterized by flowing interlaced scroll motifs that create a rhythmic repeating pattern ideal for large-scale wall coverings. The satin finish overlays a smooth softly reflective surface enhancing light diffusion and lending an elegant sheen without harsh glare. This satin effect is achieved through a carefully balanced surface treatment that moderates roughness and highlights the tactile depth of the embossing.
In terms of material composition the wallpaper’s surface is composed of pigmented layers that deliver rich consistent color while maintaining subtle variations typical of fabric or vinyl coatings. The pigments are finely dispersed within the binder matrix to avoid clumping ensuring uniformity across the pattern. The embossing introduces micro-variations in height and normal vectors which are captured through the height/displacement and normal maps respectively. These maps convey the tactile dimensionality of the scrollwork simulating the raised curvilinear geometry with precise light interaction. The roughness map is calibrated to reflect the satin finish presenting a balanced mid-level roughness that softly scatters light and accentuates the smooth yet textured surface. Metallic values remain minimal reflecting the non-metallic nature of the wallpaper while ambient occlusion enhances the perception of depth within recessed scroll details.
All texture maps are rendered at a high 8K resolution ensuring exceptional clarity and detail fidelity suitable for close-up visualization and large interior surfaces. This texture is fully PBR-compliant providing accurate physical light response and material interaction. It is optimized for use in Blender Unreal Engine and Unity supporting workflows that demand high-quality architectural visualization or game environment realism. The seamless tiling ensures that when applied the scrollwork pattern repeats flawlessly without visible seams or distortions preserving the immersive quality of the design across expansive walls.
For practical application it is recommended to carefully adjust the UV scale to maintain the integrity of the ornate scroll details without excessive repetition that could detract from realism. Fine-tuning the roughness map can help tailor the satin finish to specific lighting conditions—lower roughness for brighter glossier effects or higher roughness for a more muted matte appearance. Additionally blending height and normal maps can enhance parallax effects giving the embossed scrollwork a more pronounced three-dimensional feel in interactive environments or close camera angles.
Import the texture maps into Blender with sRGB color space for albedo/base color and Non-Color for normal, roughness, metallic, AO, height, and ORM maps. Connect normal maps through a Normal Map node, then adjust UV scale with a Mapping node so the material repeats naturally on your model.
For the full step-by-step setup, see How to Use Seamless Textures in Blender. Browse related material examples in wood, concrete, and metal.
Yes. This texture is designed as a seamless tileable PBR material, so it can repeat across large surfaces without visible borders.
You can download PNG/WEBP versions and use 1K, 2K, 4K and 8K download options when available on the page.
Yes. The download options and engine-mapped ZIP workflow are designed for Blender, Unreal Engine, Unity Standard, URP and HDRP material pipelines.
Yes. The texture is available under the AITextured free commercial license. Review the license page for redistribution and AI-training restrictions.


Generate, preview, and export seamless PBR materials for Blender, Unity, and Unreal Engine—directly in your browser.
AI text-to-texture: type a prompt and get a seamless, tileable base image ready for PBR workflows (great starting point for materials).
Create a full PBR set (Normal, Roughness, AO, Metallic, etc.) from a single image. Seamless and tiling-friendly.
Instant WebGL viewer: inspect materials on a sphere, plane, and cube. Check tiling and lighting in real time.
Re-packages maps per engine: Unreal (BaseColor + ORM), Unity (Mask/MetallicSmoothness), Blender (separate channels).
PNG ↔ JPG ↔ SVG: fast convert, SVG rasterize, embed/trace options, quality & background controls.