
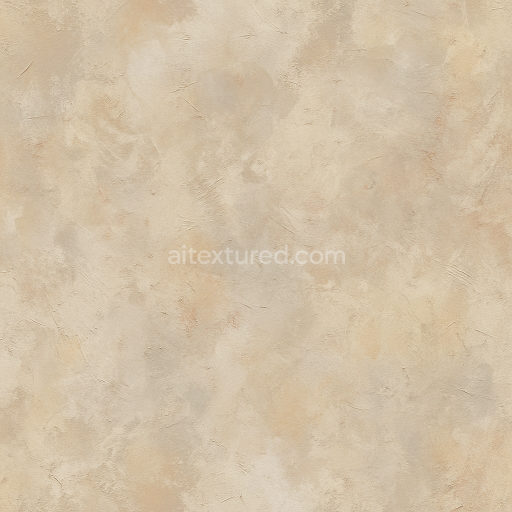
Peeling Scratched Wallpaper
Seamless texture (tileable) · PNG, WEBP, PBR ZIP. License: AITextured Free Commercial License (FCL) v1.1. Free personal and commercial use. Raw resale, standalone redistribution, mirroring/scraping, competing asset packs, and AI/ML training are not allowed without written permission. Attribution is not required, but appreciated..

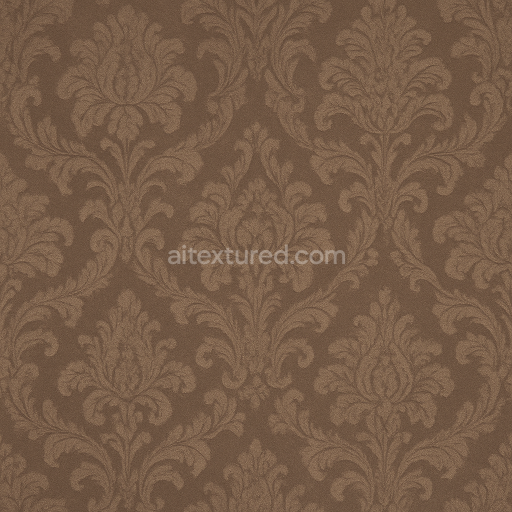
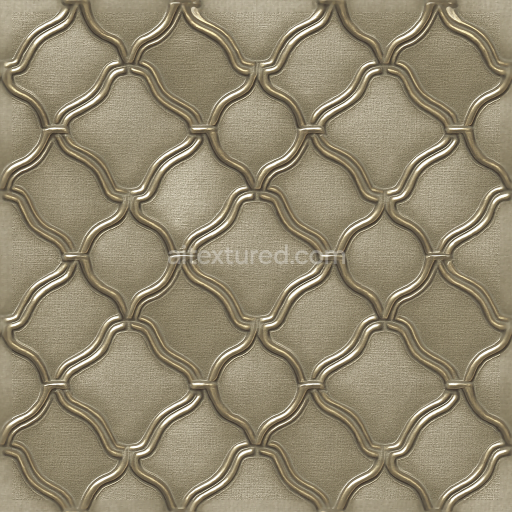
| ID | seamless-3d-texture-pbr-8k-wallpaper-with-baroque-medallion-and-velvet-finish-embossed-pattern |
|---|---|
| Category | Wallpaper |
| Formats | PNG, WEBP, PBR ZIP |
| Size | 1k (1024x1024px), 2k (2048x2048px), 4k (4096x4096px), 8k (8192x8192px) |
| Color | sRGB |
| Tileable | Yes |
This seamless 3D texture wallpaper features a richly detailed baroque medallion pattern meticulously crafted to emulate a luxurious velvet finish with an embossed relief. The base material is a high-quality textile substrate designed to replicate the softness and depth of plush velvet fabric. This substrate is combined with a fine binder system that ensures durability and flexibility while delicate microfibers create a slightly raised tactile surface. These fibers lend a natural porosity to the material allowing subtle light diffusion and shadow play enhancing the three-dimensional feel of the embossed medallions. The color palette is carefully composed using deep saturated pigments that replicate traditional brocade hues applied with precision to maintain visual consistency and richness across the entire wallpaper surface.
The wallpaper’s geometric form is characterized by repeating symmetrical baroque medallions arranged in a seamless pattern creating a continuous brocade effect without visible seams or breaks. The embossed pattern is achieved through finely detailed height and displacement channels which simulate the raised velvet motifs with remarkable accuracy. The PBR texture set includes a BaseColor (Albedo) map capturing the rich velvet tones a Normal map defining the intricate embossing and fabric weave and a Roughness map that controls the surface’s soft sheen typical of velvet balancing matte and subtle gloss. The Metallic channel is minimal reflecting the non-metallic nature of the textile while Ambient Occlusion enhances the depth perception around the medallion edges and folds. Height/Displacement maps further reinforce the tactile dimensionality ideal for close-up renders and realistic lighting.
Rendered at an ultra-high 8K resolution this wallpaper texture ensures exceptional detail and clarity suitable for high-fidelity visualizations in Blender Unreal Engine and Unity. The high resolution allows for crisp finely detailed representations of the embossed velvet and baroque motifs even on large surface areas making it appropriate for architectural visualization interior design projects or virtual staging that demands luxurious classical aesthetics. The seamless nature of the texture guarantees flawless tiling enabling expansive wall coverage without interruption or distortion of the ornate pattern.
For optimal results it is recommended to carefully adjust the UV scale to maintain the proportionate size of the medallions relative to the space being designed avoiding overly large or compressed details. Additionally fine-tuning the roughness map can help achieve the desired balance between softness and subtle reflectivity typical of velvet surfaces. When working with height and normal maps blending these channels thoughtfully will enhance the embossed effect without creating unnatural exaggerations or artifacts ensuring a realistic tactile impression suitable for both real-time rendering and offline ray tracing workflows.
Import the texture maps into Blender with sRGB color space for albedo/base color and Non-Color for normal, roughness, metallic, AO, height, and ORM maps. Connect normal maps through a Normal Map node, then adjust UV scale with a Mapping node so the material repeats naturally on your model.
For the full step-by-step setup, see How to Use Seamless Textures in Blender. Browse related material examples in wood, concrete, and metal.
Yes. This texture is designed as a seamless tileable PBR material, so it can repeat across large surfaces without visible borders.
You can download PNG/WEBP versions and use 1K, 2K, 4K and 8K download options when available on the page.
Yes. The download options and engine-mapped ZIP workflow are designed for Blender, Unreal Engine, Unity Standard, URP and HDRP material pipelines.
Yes. The texture is available under the AITextured free commercial license. Review the license page for redistribution and AI-training restrictions.


Generate, preview, and export seamless PBR materials for Blender, Unity, and Unreal Engine—directly in your browser.
AI text-to-texture: type a prompt and get a seamless, tileable base image ready for PBR workflows (great starting point for materials).
Create a full PBR set (Normal, Roughness, AO, Metallic, etc.) from a single image. Seamless and tiling-friendly.
Instant WebGL viewer: inspect materials on a sphere, plane, and cube. Check tiling and lighting in real time.
Re-packages maps per engine: Unreal (BaseColor + ORM), Unity (Mask/MetallicSmoothness), Blender (separate channels).
PNG ↔ JPG ↔ SVG: fast convert, SVG rasterize, embed/trace options, quality & background controls.