
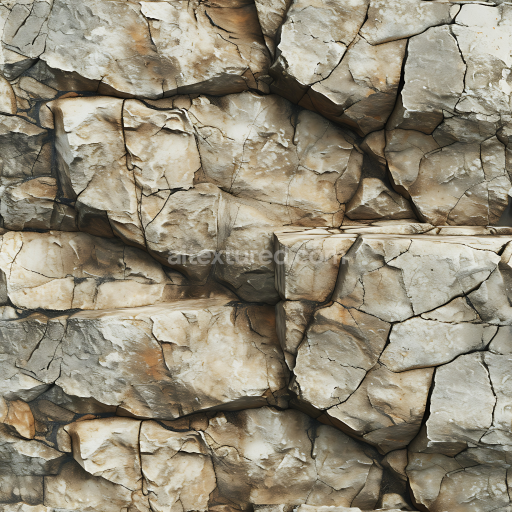
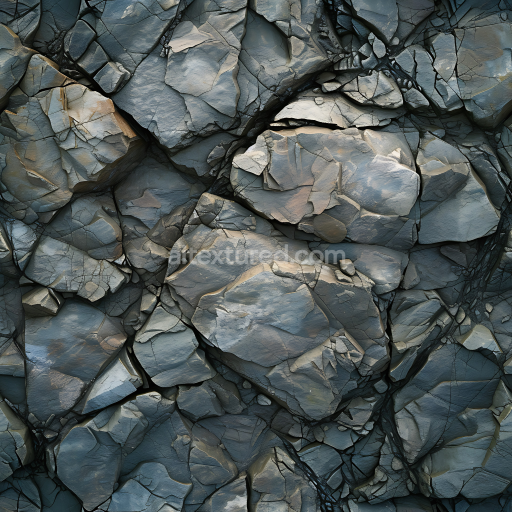
Weathered Stone Wall Seamless Texture with Rough, Cracked Blocks
Seamless texture (tileable) · PNG, WEBP, PBR ZIP. License: AITextured Free Commercial License (FCL) v1.1. Free personal and commercial use. Raw resale, standalone redistribution, mirroring/scraping, competing asset packs, and AI/ML training are not allowed without written permission. Attribution is not required, but appreciated..

| ID | seamless-3d-texture-pbr-8k-flint-dark-rough-fractured-stone-surface |
|---|---|
| Category | Stone |
| Formats | PNG, WEBP, PBR ZIP |
| Size | 1k (1024x1024px), 2k (2048x2048px), 4k (4096x4096px), 8k (8192x8192px) |
| Color | sRGB |
| Tileable | Yes |
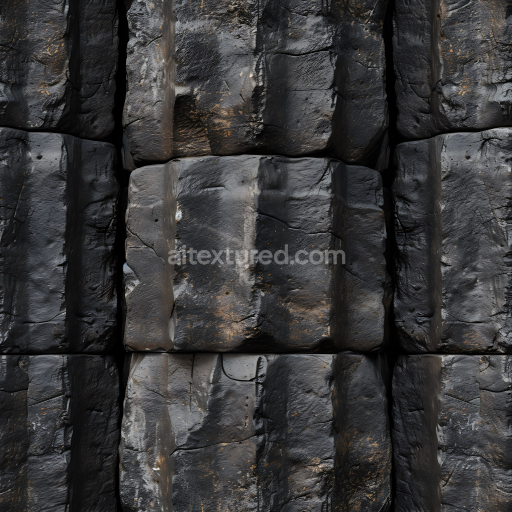
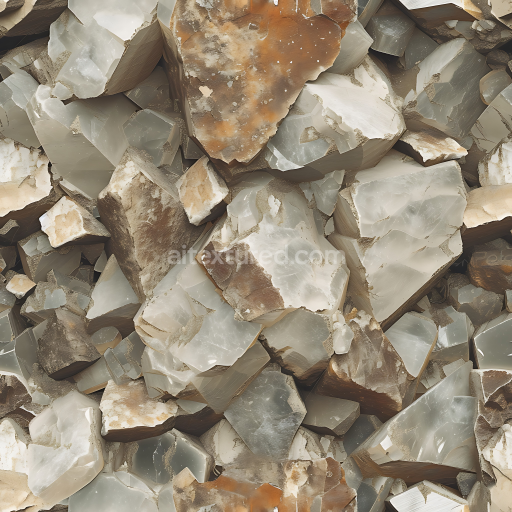
This seamless 3D texture presents a high-resolution 8K capture of dark flint stone characterized by a rough fractured surface that faithfully represents the natural ruggedness of this sedimentary rock. Flint is primarily composed of microcrystalline quartz giving it a hard dense substrate with minimal porosity. The texture reveals the intricate interplay of sharp fractures chipped edges and grainy aggregates typical of aged flint with subtle variations in surface elevation and fine grain patterns that convey its geological history. These details are critical in defining the stone’s fractured form where angular irregular planes intersect to create a complex tessellation of natural rockfaces devoid of any artificial repeating patterns thanks to its seamless design.
The material composition is reflected across the PBR channels for realistic rendering. The BaseColor (Albedo) map captures deep dark gray to nearly black hues with subtle earthy undertones emulating the natural pigmentation influenced by organic minerals embedded within the stone. The Normal map accentuates the pronounced roughness and fractures by simulating the small-scale bumps and sharp edges while the Roughness map maintains a high average value to preserve the matte unpolished finish characteristic of this weathered flint surface. Metallic values remain at zero consistent with the non-metallic siliceous composition of flint. Ambient Occlusion enhances shadowing in crevices and recessed fractures adding depth while the Height/Displacement map encodes the varying elevations of the chipped and fractured surfaces enabling realistic parallax effects and geometry displacement.
This texture is optimized for use in Blender Unreal Engine and Unity ensuring compatibility and high fidelity in natural and geological 3D environments. Its seamless tileable format allows for expansive application over large surfaces such as rock walls cave interiors or rugged outdoor terrain without visible seams or repetitive artifacts. The 8K resolution provides exceptional detail even at close camera distances preserving the intricate microstructure of the flint’s grain and fracture lines.
For practical usage when applying this texture it is advisable to carefully adjust the UV scale to avoid exaggerating the stone’s natural grain size and fractures maintaining realism in the scene. Additionally fine-tuning the Roughness map can help simulate different weathering conditions—reducing roughness slightly can mimic polished or water-worn surfaces while increasing it enhances the raw fractured appearance. Blending the Height map with the Normal map can also improve depth perception and surface complexity especially in real-time engines that support parallax occlusion mapping.
Import the texture maps into Blender with sRGB color space for albedo/base color and Non-Color for normal, roughness, metallic, AO, height, and ORM maps. Connect normal maps through a Normal Map node, then adjust UV scale with a Mapping node so the material repeats naturally on your model.
For the full step-by-step setup, see How to Use Seamless Textures in Blender. Browse related material examples in wood, concrete, and metal.
Yes. This texture is designed as a seamless tileable PBR material, so it can repeat across large surfaces without visible borders.
You can download PNG/WEBP versions and use 1K, 2K, 4K and 8K download options when available on the page.
Yes. The download options and engine-mapped ZIP workflow are designed for Blender, Unreal Engine, Unity Standard, URP and HDRP material pipelines.
Yes. The texture is available under the AITextured free commercial license. Review the license page for redistribution and AI-training restrictions.


Build, preview, and export seamless PBR materials. Generate full map sets from a single image, inspect them in a real-time WebGL viewer, and re-package maps for Unreal, Unity, and Blender—directly in your browser.
AI text-to-texture: type a prompt and get a seamless, tileable base image ready for PBR workflows (great starting point for materials).
Create a full PBR set (Normal, Roughness, AO, Metallic, etc.) from a single image. Seamless and tiling-friendly.
Instant WebGL viewer: inspect materials on a sphere, plane, and cube. Check tiling and lighting in real time.
Re-packages maps per engine: Unreal (BaseColor + ORM), Unity (Mask/MetallicSmoothness), Blender (separate channels).
PNG ↔ JPG ↔ SVG: fast convert, SVG rasterize, embed/trace options, quality & background controls.