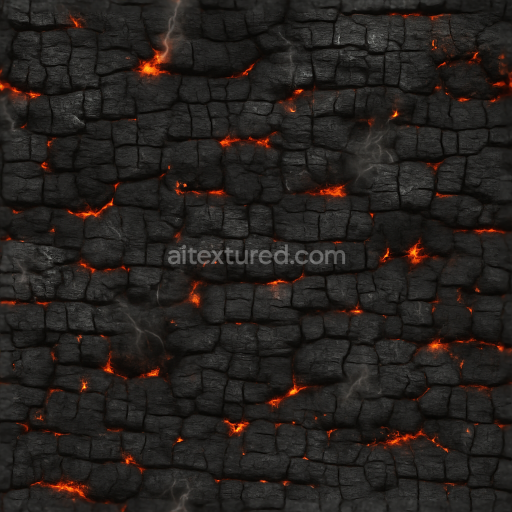
Burnt Bark With Dark Soot And Fire Kissed Highlights
Seamless texture (tileable) · PNG, WEBP, PBR ZIP. License: AITextured Free Commercial License (FCL) v1.1. Free personal and commercial use. Raw resale, standalone redistribution, mirroring/scraping, competing asset packs, and AI/ML training are not allowed without written permission. Attribution is not required, but appreciated..

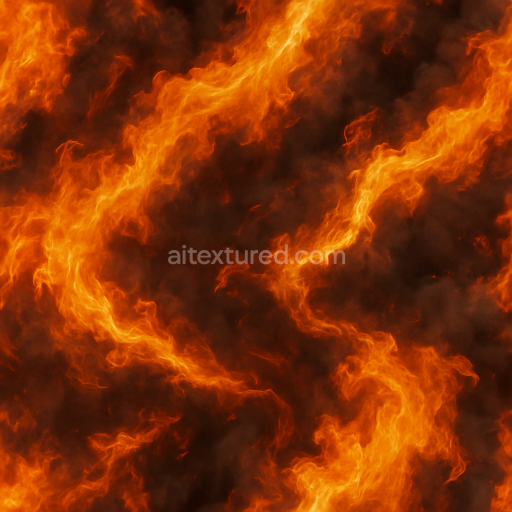
| ID | seamless-3d-texture-pbr-8k-fire-cracked-earth-with-charred-cracks-and-cinder-dust |
|---|---|
| Category | Fire |
| Formats | PNG, WEBP, PBR ZIP |
| Size | 1k (1024x1024px), 2k (2048x2048px), 4k (4096x4096px), 8k (8192x8192px) |
| Color | sRGB |
| Tileable | Yes |
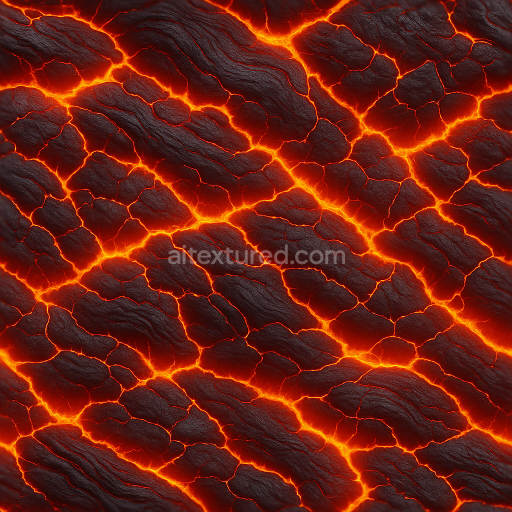
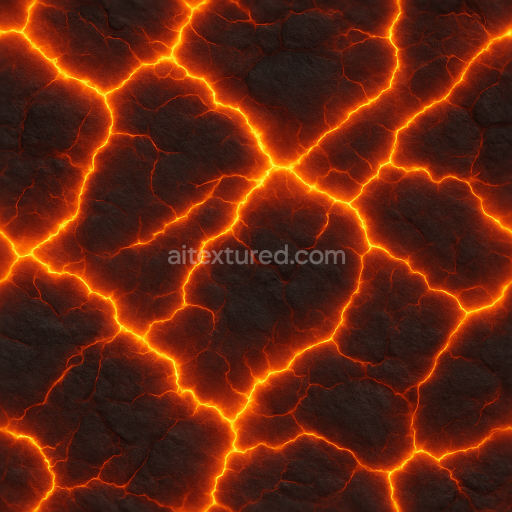
This seamless 8K resolution PBR 3D texture showcases a fire cracked earth surface characterized by detailed charred cracks and delicate cinder dust particles. The base substrate mimics a mineral-rich weathered soil layer heavily affected by intense thermal exposure. The surface composition includes burnt organic fragments such as bark remnants embedded around the edges contributing to an authentic natural appearance. The texture reveals a porous blistered finish where dark soot and fine ash settle deeply within the fissures enhancing the rugged and weathered look. Pigments and oxide layers in the BaseColor channel replicate the varying shades of scorched earth ranging from deep blacks and grays to subtle reddish-browns while the Normal and Height maps emphasize the intricate cracking pattern and surface depth caused by thermal stress and fire weathering.
In the PBR workflow the Roughness map captures the contrasted surface qualities—smooth ashen dust patches juxtaposed with rough cracked and blistered areas—offering realistic light scattering that simulates charred earth’s natural texture. The Metallic channel is minimal reflecting the predominantly non-metallic composition of the soil and burnt organic matter while the Ambient Occlusion enhances the depth perception in the fissures and crevices accentuating the texture’s natural micro-variation. This texture tiles seamlessly without visible repetition making it ideal for large-scale 3D environments that require authentic fire damaged ground surfaces. It is fully optimized and ready for integration in Blender Unreal Engine and Unity supporting high-fidelity renders and real-time applications alike.
When applying this fire cracked earth texture consider adjusting the UV scale to maintain the fine detail of charred cracks and cinder dust at close range ensuring the intricate thermal cracking and ash settling remain visually impactful. Additionally fine-tuning the Roughness can help achieve the desired balance between matte dusty patches and glossy blistered surfaces enhancing realism in various lighting conditions. This texture is well-suited for natural disaster simulations post-fire landscapes or any 3D scene requiring an authentic representation of fire-weathered earth and ground surfaces with enhanced visual complexity.
Import the texture maps into Blender with sRGB color space for albedo/base color and Non-Color for normal, roughness, metallic, AO, height, and ORM maps. Connect normal maps through a Normal Map node, then adjust UV scale with a Mapping node so the material repeats naturally on your model.
For the full step-by-step setup, see How to Use Seamless Textures in Blender. Browse related material examples in wood, concrete, and metal.
Yes. This texture is designed as a seamless tileable PBR material, so it can repeat across large surfaces without visible borders.
You can download PNG/WEBP versions and use 1K, 2K, 4K and 8K download options when available on the page.
Yes. The download options and engine-mapped ZIP workflow are designed for Blender, Unreal Engine, Unity Standard, URP and HDRP material pipelines.
Yes. The texture is available under the AITextured free commercial license. Review the license page for redistribution and AI-training restrictions.


Generate, preview, and export seamless PBR materials for Blender, Unity, and Unreal Engine—directly in your browser.
AI text-to-texture: type a prompt and get a seamless, tileable base image ready for PBR workflows (great starting point for materials).
Create a full PBR set (Normal, Roughness, AO, Metallic, etc.) from a single image. Seamless and tiling-friendly.
Instant WebGL viewer: inspect materials on a sphere, plane, and cube. Check tiling and lighting in real time.
Re-packages maps per engine: Unreal (BaseColor + ORM), Unity (Mask/MetallicSmoothness), Blender (separate channels).
PNG ↔ JPG ↔ SVG: fast convert, SVG rasterize, embed/trace options, quality & background controls.