
Knitted Sweater Cozy Wool Fireplace Brick Santa Hat
Seamless texture (tileable) · PNG, WEBP, PBR ZIP. License: AITextured Free Commercial License (FCL) v1.1. Free personal and commercial use. Raw resale, standalone redistribution, mirroring/scraping, competing asset packs, and AI/ML training are not allowed without written permission. Attribution is not required, but appreciated..

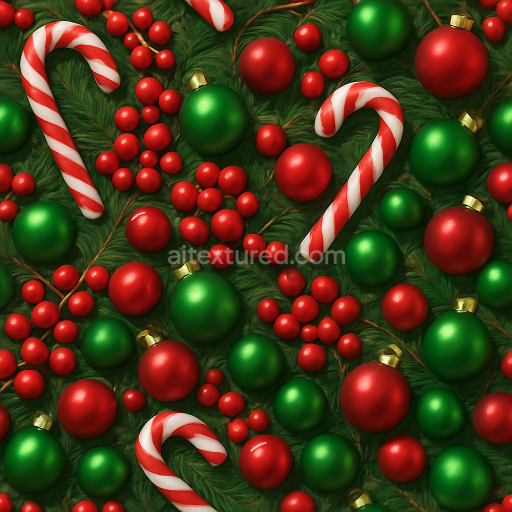
| ID | seamless-3d-texture-pbr-8k-holiday-candle-candle-wax-candle-flame-candy-cane-striped-candy |
|---|---|
| Category | Merry christmas |
| Formats | PNG, WEBP, PBR ZIP |
| Size | 1k (1024x1024px), 2k (2048x2048px), 4k (4096x4096px), 8k (8192x8192px) |
| Color | sRGB |
| Tileable | Yes |
This seamless 3D texture presents a richly detailed holiday scene centered around traditional wax candles and festive striped candies. The primary material simulated is candle wax characterized by a slightly translucent smooth yet subtly uneven surface that captures the soft glow of a flickering flame. The wax substrate is modeled with fine micro-variations and gentle undulations to reflect the natural imperfections found in hand-poured candles. Embedded within the wax are colorants that create warm hues of creamy whites and deep reds enhancing the authentic feel of holiday candles. The candle flame itself is rendered as a glowing emissive detail adding depth and warmth to the overall composition. Complementing the wax the candy cane and striped candy elements exhibit a glossy glass-like surface with hard-edged geometric forms consisting of cylindrical and twisted spiral shapes that replicate the familiar candy cane curvature and striped patterning.
The texture’s composition mimics layered materials: a waxy binder acting as the base with pigment inclusions forming the distinct red and white stripes of the candy canes and the subtle glitter effect reminiscent of red holiday sparkles. The surface finish varies between the matte slightly porous candle wax and the high-gloss polished candy surfaces introducing contrast in reflectivity and roughness. Fine surface details such as the gentle ridges on the candy’s spiral stripes and the soft melting drips of wax are captured through height and normal maps providing realistic depth and tactile variation. Ambient occlusion enhances the perception of shadows where the wax folds or where the candies overlap adding dimensionality to the scene. The metallic channel remains minimal as these organic and sugar-based materials are non-metallic focusing instead on accurate roughness and specular responses to simulate natural light interaction.
Rendered at an ultra-high 8K resolution using Physically Based Rendering (PBR) principles this texture ensures exceptional detail and realism suitable for close-up views in 3D environments. The texture seamlessly tiles without visible borders making it ideal for wrapping around 3D models such as holiday candles gift boxes or festive backgrounds. Its PBR maps include a richly detailed BaseColor (Albedo) for true-to-life color representation a finely tuned Normal map for surface irregularities a Roughness map that differentiates between the soft wax and glossy candy and an Ambient Occlusion map to boost shadow realism. Height or displacement maps add an extra layer of surface relief useful for parallax effects in real-time engines. This texture is fully compatible and optimized for use in Blender Unreal Engine and Unity providing flexibility across various digital content creation workflows.
For practical application when deploying this texture consider adjusting the UV scale to maintain the intricate wax drips and candy stripes at realistic proportions relative to your 3D asset. Tuning the roughness values can help balance the matte candle surfaces against the shiny candy gloss enhancing material differentiation. Additionally blending height and normal maps can create a more convincing three-dimensional effect especially in real-time renderers by emphasizing the subtle depth of wax textures and candy grooves without excessive geometry. This approach ensures a visually rich and immersive holiday atmosphere suitable for digital scenes requiring warm lighting and festive detail.
Import the texture maps into Blender with sRGB color space for albedo/base color and Non-Color for normal, roughness, metallic, AO, height, and ORM maps. Connect normal maps through a Normal Map node, then adjust UV scale with a Mapping node so the material repeats naturally on your model.
For the full step-by-step setup, see How to Use Seamless Textures in Blender. Browse related material examples in wood, concrete, and metal.
Yes. This texture is designed as a seamless tileable PBR material, so it can repeat across large surfaces without visible borders.
You can download PNG/WEBP versions and use 1K, 2K, 4K and 8K download options when available on the page.
Yes. The download options and engine-mapped ZIP workflow are designed for Blender, Unreal Engine, Unity Standard, URP and HDRP material pipelines.
Yes. The texture is available under the AITextured free commercial license. Review the license page for redistribution and AI-training restrictions.


Build, preview, and export seamless PBR materials. Generate full map sets from a single image, inspect them in a real-time WebGL viewer, and re-package maps for Unreal, Unity, and Blender—directly in your browser.
AI text-to-texture: type a prompt and get a seamless, tileable base image ready for PBR workflows (great starting point for materials).
Create a full PBR set (Normal, Roughness, AO, Metallic, etc.) from a single image. Seamless and tiling-friendly.
Instant WebGL viewer: inspect materials on a sphere, plane, and cube. Check tiling and lighting in real time.
Re-packages maps per engine: Unreal (BaseColor + ORM), Unity (Mask/MetallicSmoothness), Blender (separate channels).
PNG ↔ JPG ↔ SVG: fast convert, SVG rasterize, embed/trace options, quality & background controls.