
Knitted Sweater Cozy Wool Fireplace Brick Santa Hat
Seamless texture (tileable) · PNG, WEBP, PBR ZIP. License: AITextured Free Commercial License (FCL) v1.1. Free personal and commercial use. Raw resale, standalone redistribution, mirroring/scraping, competing asset packs, and AI/ML training are not allowed without written permission. Attribution is not required, but appreciated..

| ID | seamless-3d-texture-pbr-8k-christmas-tree-holly-leaves-red-berries-snowflakes |
|---|---|
| Category | Merry christmas |
| Formats | PNG, WEBP, PBR ZIP |
| Size | 1k (1024x1024px), 2k (2048x2048px), 4k (4096x4096px), 8k (8192x8192px) |
| Color | sRGB |
| Tileable | Yes |
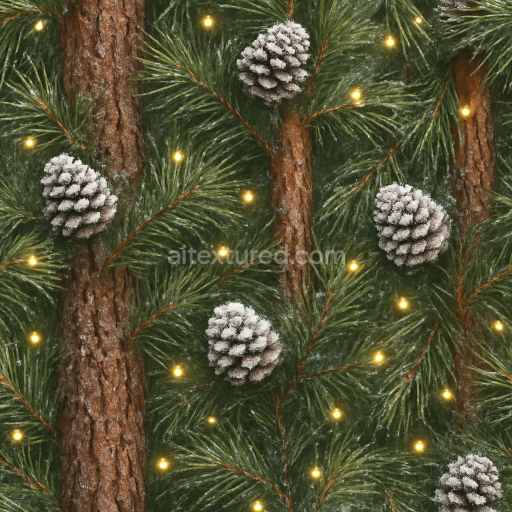
This seamless 3D PBR texture at an impressive 8K resolution meticulously replicates the intricate surface of intertwined Christmas tree branches holly leaves red berries and delicate snowflakes. The underlying material is a composite organic substrate resembling natural coniferous needles and broadleaf holly foliage featuring a fibrous and slightly waxy surface typical of evergreen plants. The geometric form is a dense overlapping mesh of slender pine needles and sharply veined holly leaves with clusters of spherical berries interspersed throughout. The snowflakes appear as a fine crystalline overlay settled gently on the foliage contributing subtle height variation and a translucent frost effect. This combination creates a richly detailed and volumetric pattern that is both seamless and tileable ideal for wrapping complex 3D models or environments.
At the material level the base color (albedo) channel captures vibrant greens of the pine needles and holly leaves punctuated by deep red pigments in the berries and cool whites from the snowflake deposits. The normal map emphasizes the fibrous texture of the needles and the raised veins of the holly leaves as well as the rounded silhouette of the berries providing pronounced depth and tactile realism without harsh edges. Roughness values vary naturally: the waxy leaves and berries feature a moderately low roughness for subtle specular highlights while the snowflakes and needle clusters exhibit higher roughness to simulate matte frost and natural surface irregularities. The metallic channel remains near zero reflecting the organic non-metallic nature of the materials. Ambient occlusion enhances shadowed crevices where branches and leaves overlap adding contrast and dimensionality. Height and displacement maps finely define the micro-relief of the needles and the soft layering of snow allowing for realistic parallax effects and surface detail amplification.
This texture’s seamless tiling and ultra-high 8K resolution ensure it maintains crisp detail and photorealistic quality even on large-scale surfaces or close-up renders. It is fully compatible and optimized for use in Blender Unreal Engine and Unity providing artists and developers with a versatile resource for creating immersive winter or holiday scenes. The consistent PBR workflow guarantees accurate interaction with dynamic lighting and environment reflections enhancing visual believability across diverse rendering platforms.
For practical application it is recommended to carefully adjust the UV scale to balance detail density especially on large objects to avoid visual repetition or texture stretching. Fine-tuning the roughness channel can help achieve the desired balance between frosty matte snowflakes and the slightly glossy evergreen foliage. Additionally blending the height and normal maps with subtle parallax occlusion mapping can elevate the perceived surface complexity making the snowy branches and holly berries stand out convincingly in interactive or cinematic visuals.
Import the texture maps into Blender with sRGB color space for albedo/base color and Non-Color for normal, roughness, metallic, AO, height, and ORM maps. Connect normal maps through a Normal Map node, then adjust UV scale with a Mapping node so the material repeats naturally on your model.
For the full step-by-step setup, see How to Use Seamless Textures in Blender. Browse related material examples in wood, concrete, and metal.
Yes. This texture is designed as a seamless tileable PBR material, so it can repeat across large surfaces without visible borders.
You can download PNG/WEBP versions and use 1K, 2K, 4K and 8K download options when available on the page.
Yes. The download options and engine-mapped ZIP workflow are designed for Blender, Unreal Engine, Unity Standard, URP and HDRP material pipelines.
Yes. The texture is available under the AITextured free commercial license. Review the license page for redistribution and AI-training restrictions.


Build, preview, and export seamless PBR materials. Generate full map sets from a single image, inspect them in a real-time WebGL viewer, and re-package maps for Unreal, Unity, and Blender—directly in your browser.
AI text-to-texture: type a prompt and get a seamless, tileable base image ready for PBR workflows (great starting point for materials).
Create a full PBR set (Normal, Roughness, AO, Metallic, etc.) from a single image. Seamless and tiling-friendly.
Instant WebGL viewer: inspect materials on a sphere, plane, and cube. Check tiling and lighting in real time.
Re-packages maps per engine: Unreal (BaseColor + ORM), Unity (Mask/MetallicSmoothness), Blender (separate channels).
PNG ↔ JPG ↔ SVG: fast convert, SVG rasterize, embed/trace options, quality & background controls.