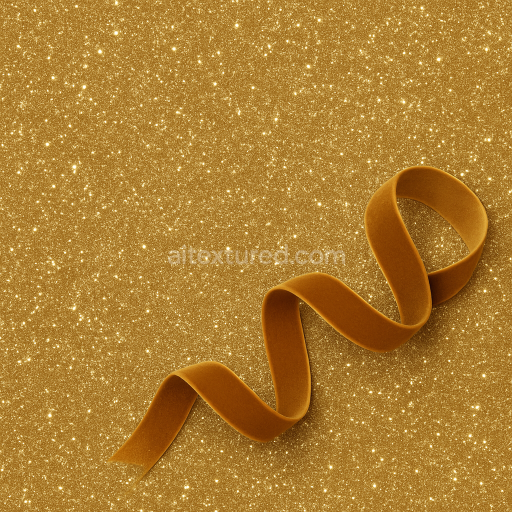
Gold Glitter Sparkling Holiday Finish
Seamless texture (tileable) · PNG, WEBP, PBR ZIP. License: AITextured Free Commercial License (FCL) v1.1. Free personal and commercial use. Raw resale, standalone redistribution, mirroring/scraping, competing asset packs, and AI/ML training are not allowed without written permission. Attribution is not required, but appreciated..

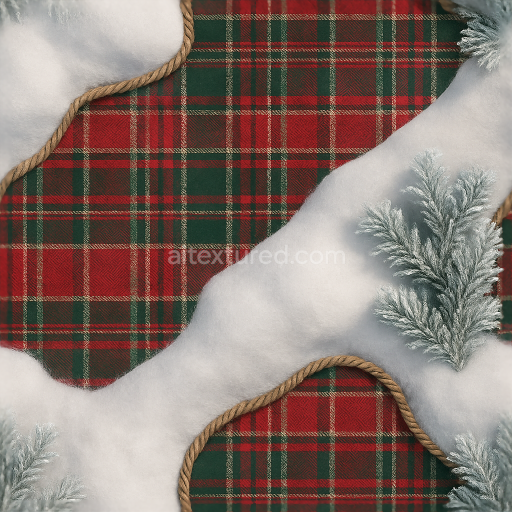
| ID | seamless-3d-texture-pbr-8k-knitted-sweater-wool-knit-plaid-fabric-tartan-pattern-festive-plaid |
|---|---|
| Category | Merry christmas |
| Formats | PNG, WEBP, PBR ZIP |
| Size | 1k (1024x1024px), 2k (2048x2048px), 4k (4096x4096px), 8k (8192x8192px) |
| Color | sRGB |
| Tileable | Yes |
This seamless 3D texture represents a richly detailed knitted sweater fabric composed primarily of natural wool fibers woven into a classic tartan plaid pattern. The base material consists of tightly spun wool yarns creating a dense yet soft substrate with inherent elasticity and warmth. The knitting technique involves interlocking loops that form a textured three-dimensional surface with visible stitch patterns enhancing the tactile realism. The fabric's composition includes natural wool fibers bound by the knit structure producing subtle variations in thickness and porosity. This results in a surface that is breathable yet insulating with a slightly fuzzy finish typical of woolen textiles. Coloration features traditional festive reds greens and muted earth tones achieved through pigment dyes that penetrate the fibers yielding durable and vibrant hues representative of holiday-themed tartan plaids.
The geometric form is characterized by a woven plaid pattern combining horizontal and vertical bands of contrasting colors arranged in a symmetrical repeating grid. The knit structure itself adds an organic raised relief effect that is emphasized through the 3D texture’s normal and height maps simulating the yarn loops’ depth and curvature. Surface roughness varies subtly across the fabric with the wool fibers exhibiting a matte slightly fuzzy finish that scatters light diffusely while occasional tighter knit areas add minor glossiness. The texture’s PBR setup uses the BaseColor (Albedo) channel to capture the rich plaid hues and subtle fiber color variations while the Normal and Height maps recreate the intricate knit stitches and fabric relief. Roughness maps define the soft non-reflective quality of wool and the Metallic channel is set to zero reflecting the non-metallic nature of textile materials. Ambient Occlusion enhances shadowing within the knit loops emphasizing depth and material density.
Rendered at an impressive 8K resolution this texture is optimized for physically based rendering workflows across multiple platforms including Blender Unreal Engine and Unity. The high-resolution detail ensures that even close-up views reveal the fine yarn structures and fabric weave without pixelation supporting hyper-realistic digital asset creation. The seamless nature of the texture allows for infinite tiling without visible borders ideal for large surface applications such as winter clothing models festive interior decorations or textile visualization projects. The color fidelity and precise normal mapping ensure consistent appearance under varied lighting conditions maintaining authenticity in both real-time and offline render engines.
For practical application it is advisable to carefully adjust the UV scale to match the intended garment or object size as the knit pattern’s scale greatly influences perceived realism. Additionally tuning the roughness map can help simulate different wear levels—from fresh unworn sweaters with a soft finish to gently used fabrics with slightly compressed fibers. When integrating height or parallax maps blending them subtly with normal maps can enhance the perception of yarn depth without causing rendering artifacts especially in game engines where performance and visual fidelity must be balanced.
Import the texture maps into Blender with sRGB color space for albedo/base color and Non-Color for normal, roughness, metallic, AO, height, and ORM maps. Connect normal maps through a Normal Map node, then adjust UV scale with a Mapping node so the material repeats naturally on your model.
For the full step-by-step setup, see How to Use Seamless Textures in Blender. Browse related material examples in wood, concrete, and metal.
Yes. This texture is designed as a seamless tileable PBR material, so it can repeat across large surfaces without visible borders.
You can download PNG/WEBP versions and use 1K, 2K, 4K and 8K download options when available on the page.
Yes. The download options and engine-mapped ZIP workflow are designed for Blender, Unreal Engine, Unity Standard, URP and HDRP material pipelines.
Yes. The texture is available under the AITextured free commercial license. Review the license page for redistribution and AI-training restrictions.


Build, preview, and export seamless PBR materials. Generate full map sets from a single image, inspect them in a real-time WebGL viewer, and re-package maps for Unreal, Unity, and Blender—directly in your browser.
AI text-to-texture: type a prompt and get a seamless, tileable base image ready for PBR workflows (great starting point for materials).
Create a full PBR set (Normal, Roughness, AO, Metallic, etc.) from a single image. Seamless and tiling-friendly.
Instant WebGL viewer: inspect materials on a sphere, plane, and cube. Check tiling and lighting in real time.
Re-packages maps per engine: Unreal (BaseColor + ORM), Unity (Mask/MetallicSmoothness), Blender (separate channels).
PNG ↔ JPG ↔ SVG: fast convert, SVG rasterize, embed/trace options, quality & background controls.