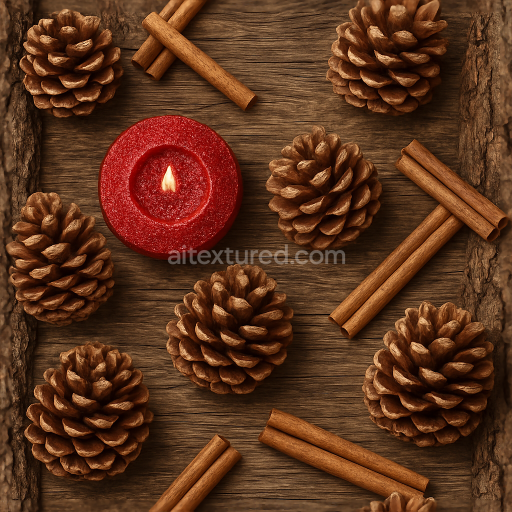
Pine Cones Rustic Wood Bark Texture Cinnamon Sticks
Seamless texture (tileable) · PNG, WEBP, PBR ZIP. License: AITextured Free Commercial License (FCL) v1.1. Free personal and commercial use. Raw resale, standalone redistribution, mirroring/scraping, competing asset packs, and AI/ML training are not allowed without written permission. Attribution is not required, but appreciated..

| ID | seamless-3d-texture-pbr-8k-gingerbread-icing-holiday-sweets-surface |
|---|---|
| Category | Merry christmas |
| Formats | PNG, WEBP, PBR ZIP |
| Size | 1k (1024x1024px), 2k (2048x2048px), 4k (4096x4096px), 8k (8192x8192px) |
| Color | sRGB |
| Tileable | Yes |
This seamless 3D texture presents a highly detailed gingerbread icing surface layered over an organic gingerbread dough base meticulously crafted to emulate the authentic composition of holiday sweets. The dough substrate exhibits fine grain orientation and subtle porosity characteristic of baked gingerbread rendered with warm earthy brown pigments that mimic natural flour and spice blends. The sugary icing layer acting as a binder is glossy yet textured incorporating micro-cracks and crystalline sugar granules to enhance realism. Accents such as cinnamon sticks and star anise spices are integrated as natural organic elements contributing to the overall surface complexity and seasonal authenticity. The finish balances a slightly matte dough base with a polished sugary icing surface capturing the visual contrast between soft baked goods and crisp decorative toppings.
In terms of PBR channels this 8K resolution texture excels in conveying material fidelity and depth: the BaseColor channel reflects the rich warm tones of gingerbread dough and creamy white icing while the Normal map details the fine icing ridges dough grain and spice contours. The Roughness map differentiates the semi-glossy icing from the more diffused matte dough enabling realistic light scattering. Metallic values remain minimal to preserve the organic non-metallic nature of ingredients whereas Ambient Occlusion enhances the subtle shadowing around the spices and icing edges emphasizing relief. Height and Displacement maps capture the intricate layering and surface elevation useful for parallax effects in 3D renders.
Designed for seamless tiling without visible borders this texture is optimized for use in popular 3D engines including Unreal Engine Blender and Unity supporting photorealistic holiday baking visualizations and Christmas-themed sweet designs. The 8K resolution ensures exceptional clarity and detail even in close-up renders suitable for both real-time and offline projects. For best results adjusting the UV scale to maintain natural spice proportions and tuning roughness to balance between glossy icing and matte dough will enhance material authenticity and visual impact.
Import the texture maps into Blender with sRGB color space for albedo/base color and Non-Color for normal, roughness, metallic, AO, height, and ORM maps. Connect normal maps through a Normal Map node, then adjust UV scale with a Mapping node so the material repeats naturally on your model.
For the full step-by-step setup, see How to Use Seamless Textures in Blender. Browse related material examples in wood, concrete, and metal.
Yes. This texture is designed as a seamless tileable PBR material, so it can repeat across large surfaces without visible borders.
You can download PNG/WEBP versions and use 1K, 2K, 4K and 8K download options when available on the page.
Yes. The download options and engine-mapped ZIP workflow are designed for Blender, Unreal Engine, Unity Standard, URP and HDRP material pipelines.
Yes. The texture is available under the AITextured free commercial license. Review the license page for redistribution and AI-training restrictions.


Build, preview, and export seamless PBR materials. Generate full map sets from a single image, inspect them in a real-time WebGL viewer, and re-package maps for Unreal, Unity, and Blender—directly in your browser.
AI text-to-texture: type a prompt and get a seamless, tileable base image ready for PBR workflows (great starting point for materials).
Create a full PBR set (Normal, Roughness, AO, Metallic, etc.) from a single image. Seamless and tiling-friendly.
Instant WebGL viewer: inspect materials on a sphere, plane, and cube. Check tiling and lighting in real time.
Re-packages maps per engine: Unreal (BaseColor + ORM), Unity (Mask/MetallicSmoothness), Blender (separate channels).
PNG ↔ JPG ↔ SVG: fast convert, SVG rasterize, embed/trace options, quality & background controls.