
3D Visual Illusion Wallpaper | Free PBR
Seamless texture (tileable) · PNG, WEBP, PBR ZIP. License: AITextured Free Commercial License (FCL) v1.1. Free personal and commercial use. Raw resale, standalone redistribution, mirroring/scraping, competing asset packs, and AI/ML training are not allowed without written permission. Attribution is not required, but appreciated..

| ID | christmasy-wrapping-paper-free-pbr |
|---|---|
| Category | Paper |
| Formats | PNG, WEBP, PBR ZIP |
| Size | 1k (1024x1024px), 2k (2048x2048px), 4k (4096x4096px), 8k (8192x8192px) |
| Color | sRGB |
| Tileable | Yes |
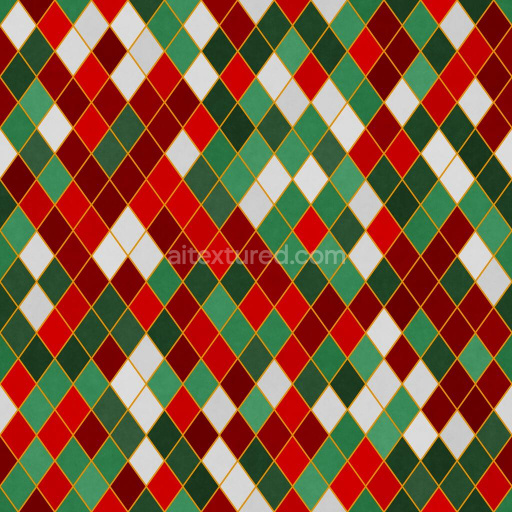
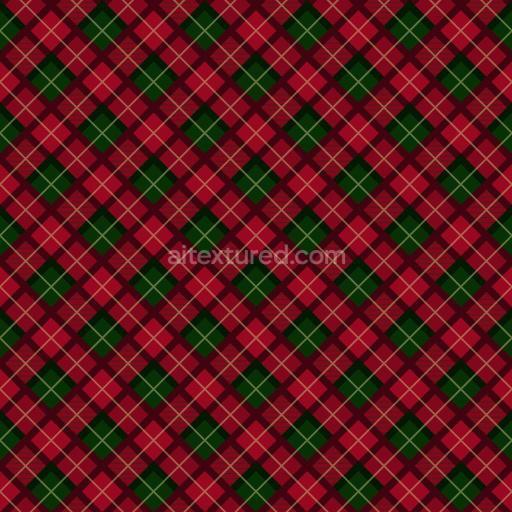
This Christmasy Wrapping Paper texture is meticulously crafted to capture the essence of winter and festive celebrations through a balanced pattern of alternating stripes, hexagons, and star shapes, all subtly enhanced by a delicate snow effect that adds a refined seasonal charm. The base material is designed to mimic a high-quality polymer-coated paper, renowned for its smooth yet slightly fibrous surface that expertly balances durability with flexibility. This substrate incorporates fine cellulose fibers randomly oriented within the paper matrix, creating natural porosity that influences light scattering and surface roughness, contributing to a realistic tactile feel. The binders and adhesives traditionally used in such wrapping paper ensure the vibrancy and longevity of the pattern, maintaining color stability and resistance to wear. Its surface finish is semi-glossy, allowing a gentle reflection that avoids harsh shine, supporting a natural and festive appearance.
In terms of physically based rendering (PBR), this texture thoughtfully represents its material properties across multiple channels. The BaseColor (Albedo) channel showcases rich reds, crisp whites, and warm gold tones with precise pigment distribution to evoke a cozy holiday atmosphere. The Normal map subtly replicates the embossed geometric shapes and snowflakes, adding realistic tactile depth and enhancing the perception of raised details. Roughness is carefully balanced to combine the smooth polymer coating’s glossiness with the matte texture of fibrous paper, resulting in believable light diffusion without unnatural reflections. As expected, the Metallic channel remains negligible, reflecting the organic, non-metallic nature of wrapping paper. Ambient Occlusion enriches the perception of detail by emphasizing shadows around edges and overlaps, while the Height/Displacement map accentuates the raised stars and hexagon edges, making it ideal for parallax occlusion effects in modern 3D engines.
Rendered at an impressive 8K resolution, this seamless Christmasy Wrapping Paper texture is optimized for high-fidelity use in Blender, Unreal Engine, and Unity, ensuring crisp detail even during close-up inspections or large-scale visualizations. To achieve the best visual results, it is recommended to adjust the UV scaling carefully to maintain the clarity and proportion of the pattern without distortion. Additionally, fine-tuning the roughness values allows for customization of the paper’s surface feel—lower roughness simulates a waxy finish, while higher roughness emphasizes the fibrous, natural paper texture. Employing the height map with parallax occlusion mapping further enhances the tactile and visual realism, making this texture an excellent choice for holiday-themed product presentations, virtual gift wrapping, and festive environment designs.
Import the texture maps into Blender with sRGB color space for albedo/base color and Non-Color for normal, roughness, metallic, AO, height, and ORM maps. Connect normal maps through a Normal Map node, then adjust UV scale with a Mapping node so the material repeats naturally on your model.
For the full step-by-step setup, see How to Use Seamless Textures in Blender. Browse related material examples in wood, concrete, and metal.
Yes. This texture is designed as a seamless tileable PBR material, so it can repeat across large surfaces without visible borders.
You can download PNG/WEBP versions and use 1K, 2K, 4K and 8K download options when available on the page.
Yes. The download options and engine-mapped ZIP workflow are designed for Blender, Unreal Engine, Unity Standard, URP and HDRP material pipelines.
Yes. The texture is available under the AITextured free commercial license. Review the license page for redistribution and AI-training restrictions.
Build, preview, and export seamless PBR materials. Generate full map sets from a single image, inspect them in a real-time WebGL viewer, and re-package maps for Unreal, Unity, and Blender—directly in your browser.
AI text-to-texture: type a prompt and get a seamless, tileable base image ready for PBR workflows (great starting point for materials).
Create a full PBR set (Normal, Roughness, AO, Metallic, etc.) from a single image. Seamless and tiling-friendly.
Instant WebGL viewer: inspect materials on a sphere, plane, and cube. Check tiling and lighting in real time.
Re-packages maps per engine: Unreal (BaseColor + ORM), Unity (Mask/MetallicSmoothness), Blender (separate channels).
PNG ↔ JPG ↔ SVG: fast convert, SVG rasterize, embed/trace options, quality & background controls.